There are a number of reasons you may want to delay or schedule your emails in Gmail. From double-checking for errors to sending emails across time zones, delaying your emails can make sure they’re more effective and deliver your message just the way you want them to.
So how do you delay and schedule emails to be sent later in Gmail? This article will answer this question. You’ll learn three different ways to do so and you’ll also be able to determine which method is the most appropriate for you.
At the end of this article, you’ll be one step closer to using some of the best Gmail hacks to optimize your email campaigns.
What is a Delayed Email?
A delayed email is an email that does not send immediately. Instead, you can withdraw it after you click the Send button or schedule it to be sent to the recipient at a later time.
There are many reasons you may want to delay sending an email. These include:
- You created the email in the dead of night, so other emails entering the recipient’s inbox may bury it before the morning.
- The recipient is in another timezone, so your uptime (working hours) is their downtime, and they may not appreciate you sending them an email at 1:00am their time.
- You do not want the email sent directly after you write it so you can take a look later and make sure your message is clear.
- You want time-sensitive emails for special discounts sent closer to the expiration of the discount to create FOMO (fear of missing out) and maximize impact.
- You do not want a holiday-related email sent too early to prevent premature exposure that may reduce its relevance.
The 3 Best Ways to Send Delayed Emails in Gmail
There are three main ways to send delayed emails in Gmail. These methods (starting with the least effective) are:
1. Use the Built-In Gmail Delay Send Feature
Gmail Delay Send is a feature in Gmail that holds a “sent email” in your mailbox for a few seconds after you click Send, giving you an opportunity to undo the send action.
That is, when you hit “Send” in Gmail, the email does not leave your mailbox instantly. Instead, the email remains in your mailbox for a few seconds before it is sent to your recipient’s mailbox.
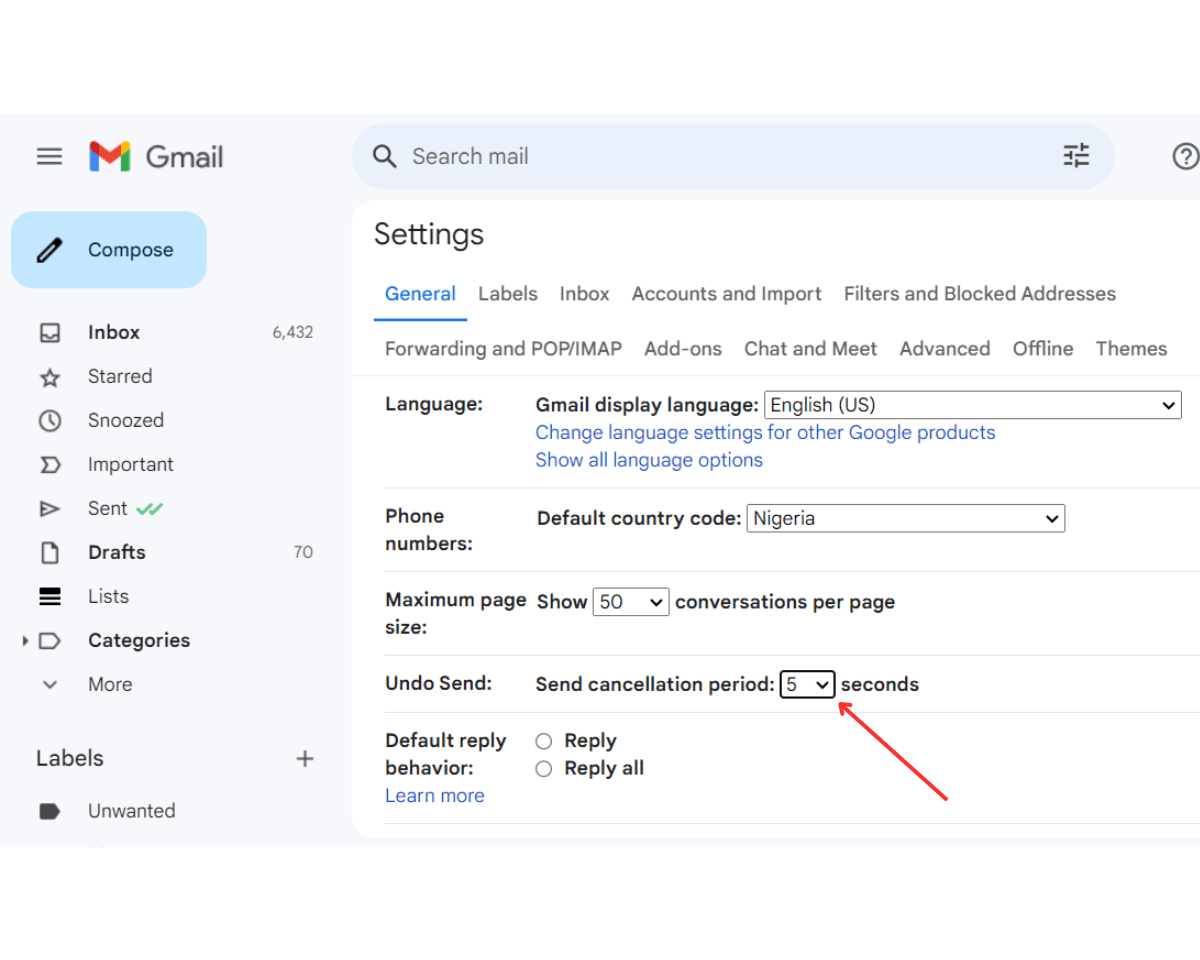
By default, the Gmail Delay Send feature holds a sent email for 5 seconds before sending it. Five seconds may seem short, but it can be a lifesaver.
For example, you hit “Send” and immediately remember you forgot to add an important attachment to your email. In that situation, you’ll immediately wish you could recall the email.
Gmail Delay Send lets you do this. Within 5 seconds of sending the email, you can hit Undo to stop it from sending, saving yourself the embarrassment of sending an important email without its equally important attachment.
You can also extend Delay Send in Gmail from 5 seconds to up to 30 seconds, giving you even more time to retract a sent email in case you made a mistake. The steps for extending the Gmail send delay are as follows:
Step 1: Open your Gmail account
Step 2: Click the Gmail Setting button (the wheel icon) at the top right corner of your Gmail dashboard
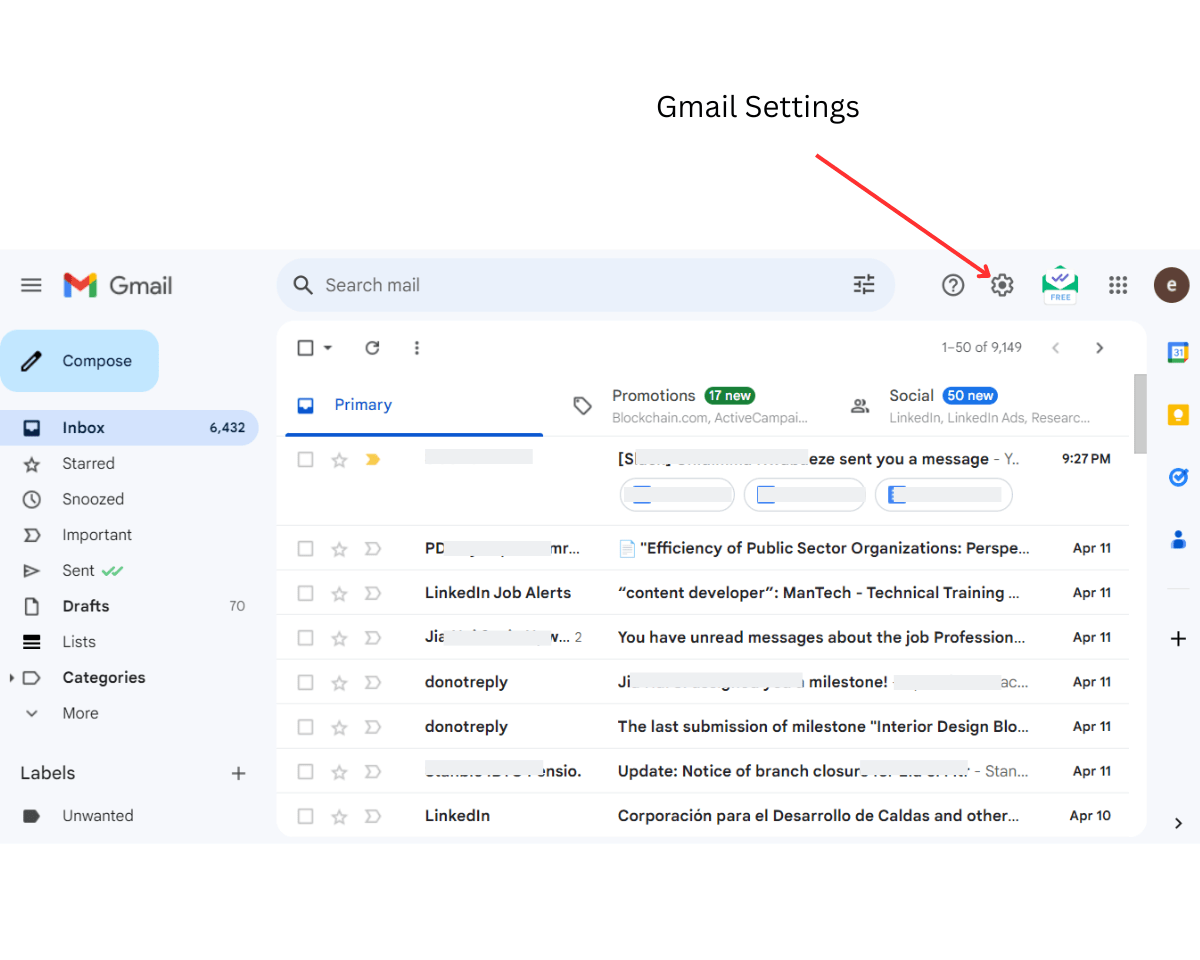
Step 3: Click “See all settings”

Step 4: Click the downward arrow in the “Undo Send” section of the Settings window.
Step 5: From the dropdown menu, select a preferred delay send time (5, 10, 20, or 30 seconds).
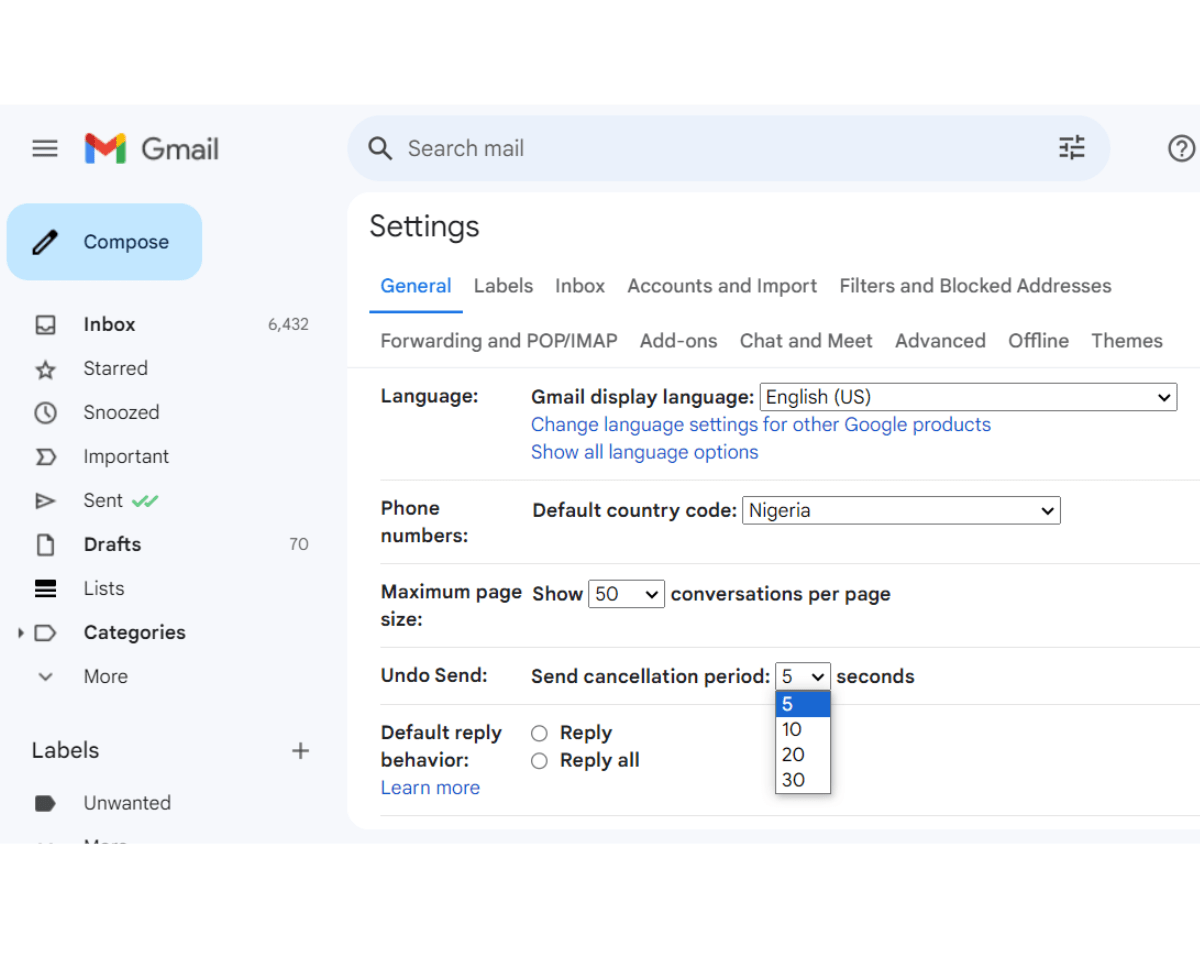
Step 6: Scroll to the bottom of the page and click “Save changes.”
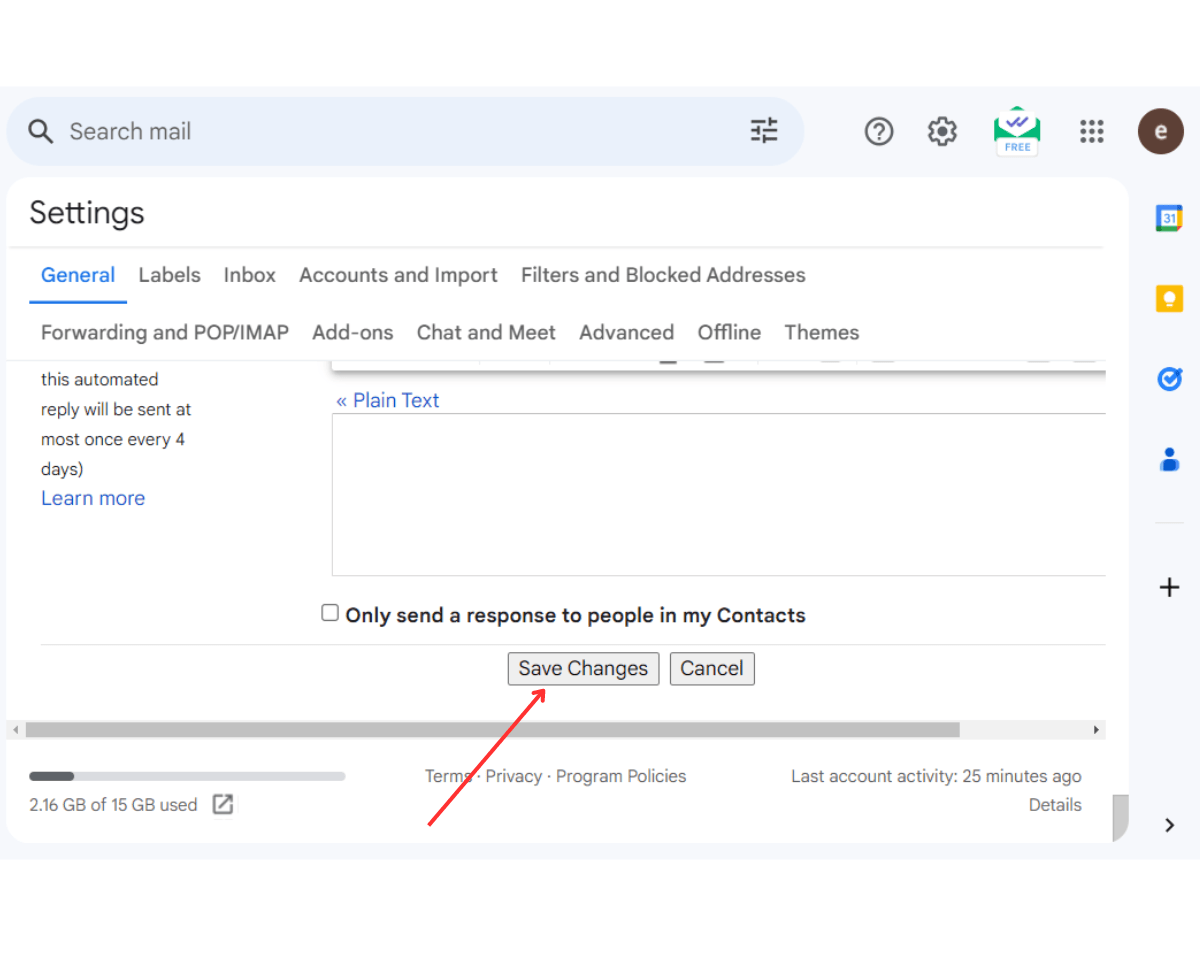
And just like that, you’ve extended the Delay Send Gmail feature. The next time you send an email, you’ll have some extra time to retract your email if you make a mistake.
Limitations of the Gmail Delay Send Tool
Gmail Delay Send can be a lifesaver. But the sending delay is extremely short. Even if you extend the length of time Gmail delays your email before sending it, the maximum “delay” you can have is 30 seconds. And that may be too short.
If you want to have a longer time to review your email before Gmail sends it, it’s better to use a different Gmail feature: Schedule Send.
2. Schedule a Delayed Email in Gmail (on Desktop, Android, and iOS)
Gmail Schedule Send is a feature that lets you set a future time (up to 49 years) for Gmail to send your email. The previous feature we discussed allows you to retract a sent email, while this feature allows you to schedule one to send in the future.
Once you schedule an email to be sent at a later time, Gmail will automatically send the email when that time comes without any manual action from you.
Thus, with Gmail’s scheduling feature, you can delay email delivery for up to 49 years. This gives you plenty of time to review your email and make adjustments.
Here’s how to schedule emails in Gmail across the different devices:
On Desktop
Follow these steps to schedule Gmail emails for sending later on desktops:
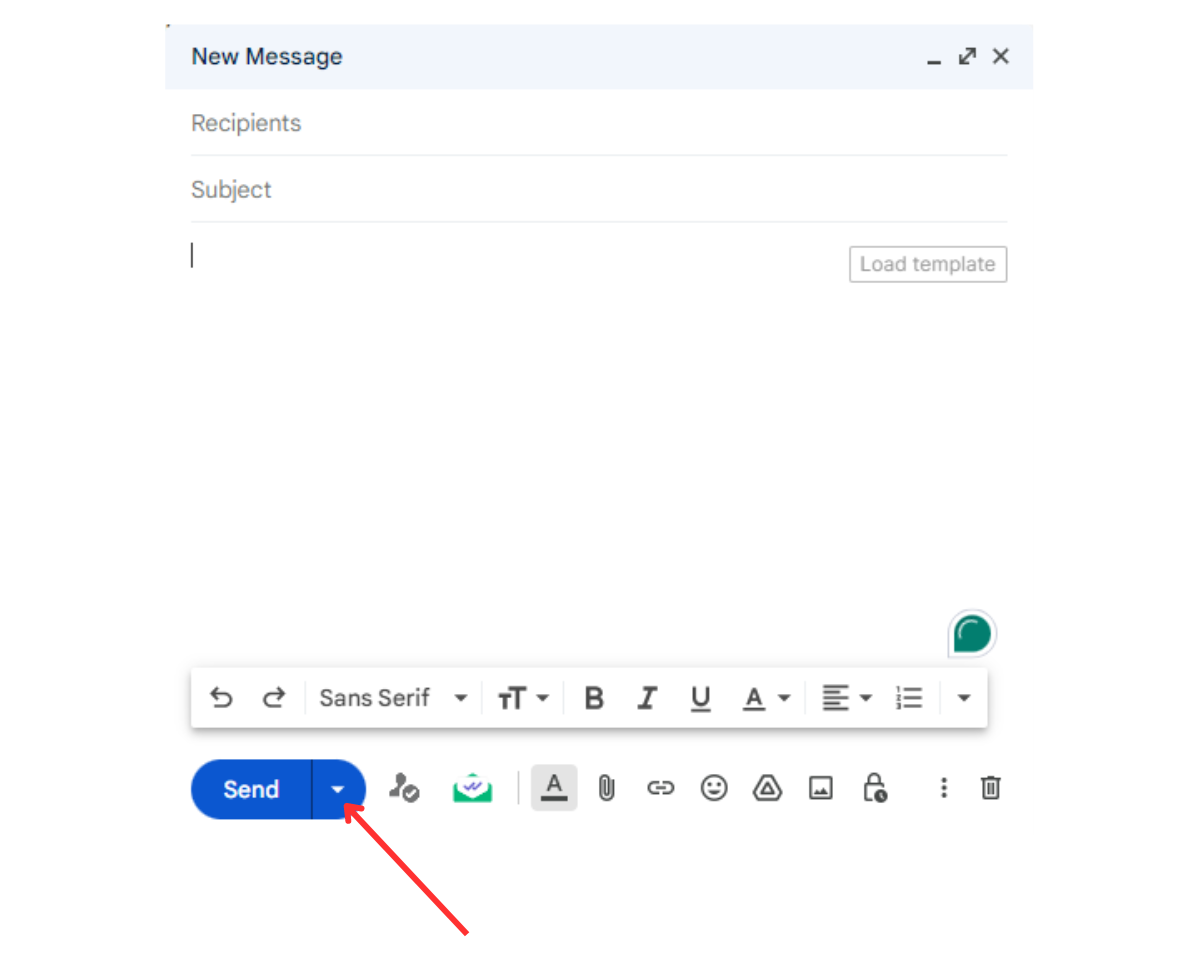
Step 1: Open Gmail.
Step 2: Click Compose, then compose your email.
Step 3: After composing your email, click the down arrow to the right of the Send button.
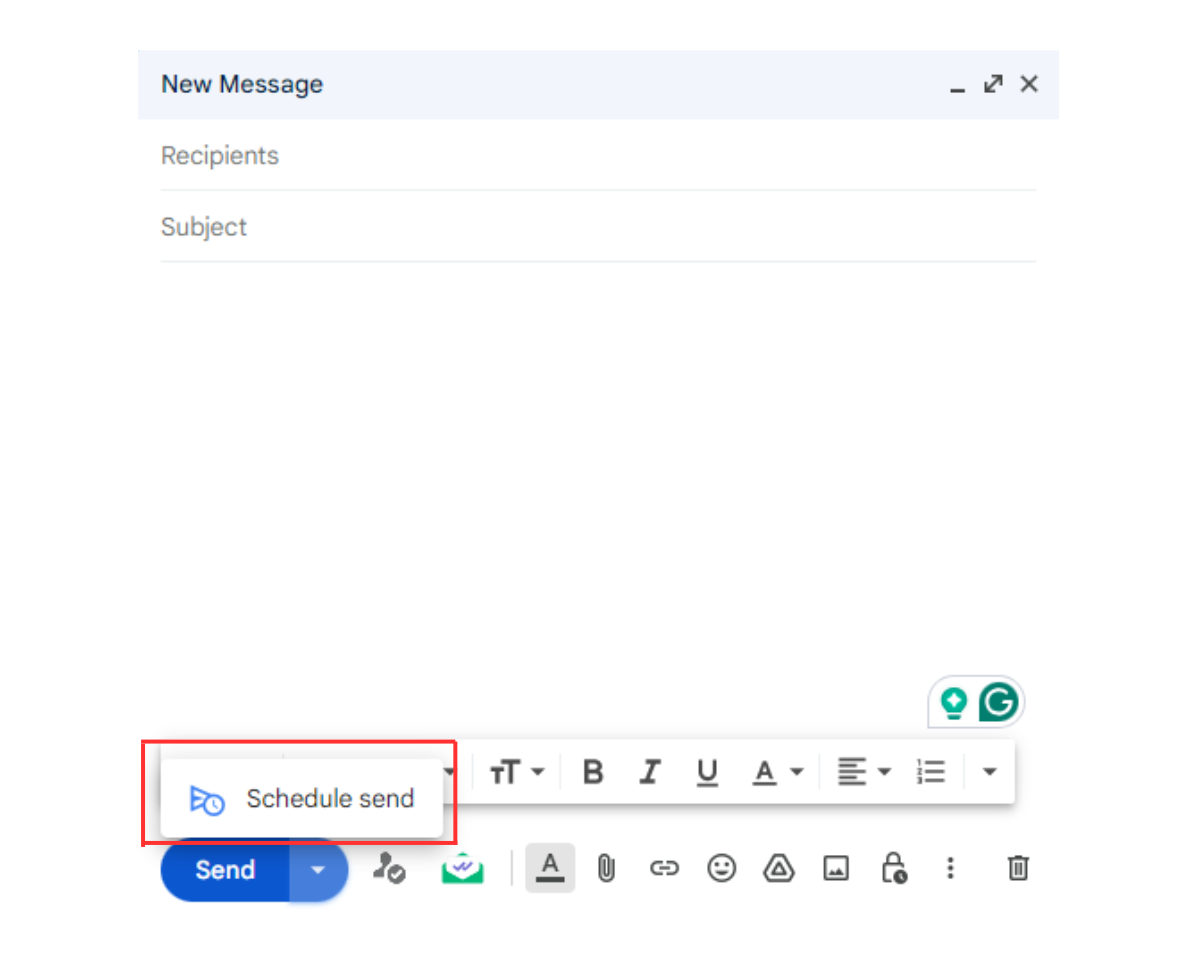
Step 4: Select Schedule send
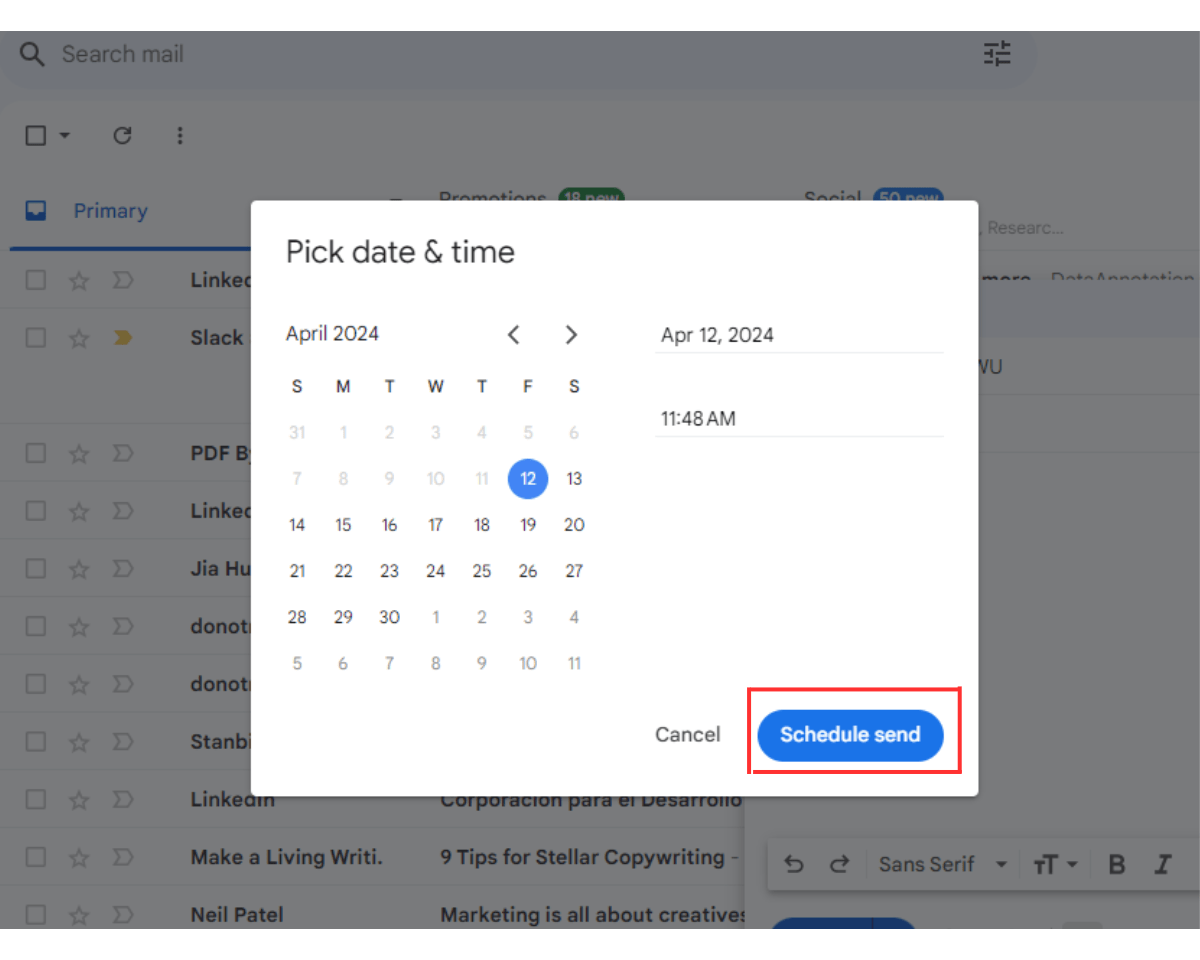
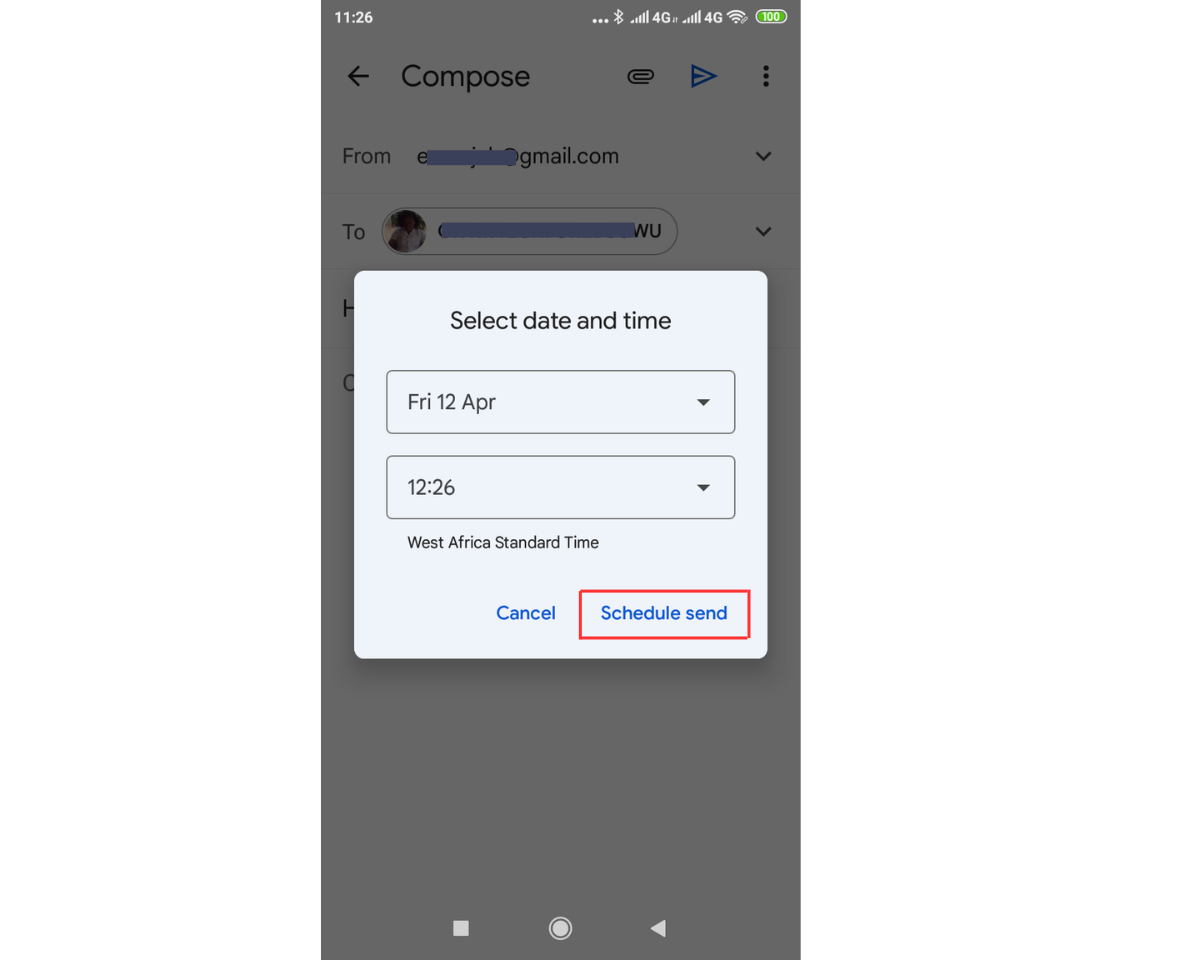
Step 5: Choose Pick date & time
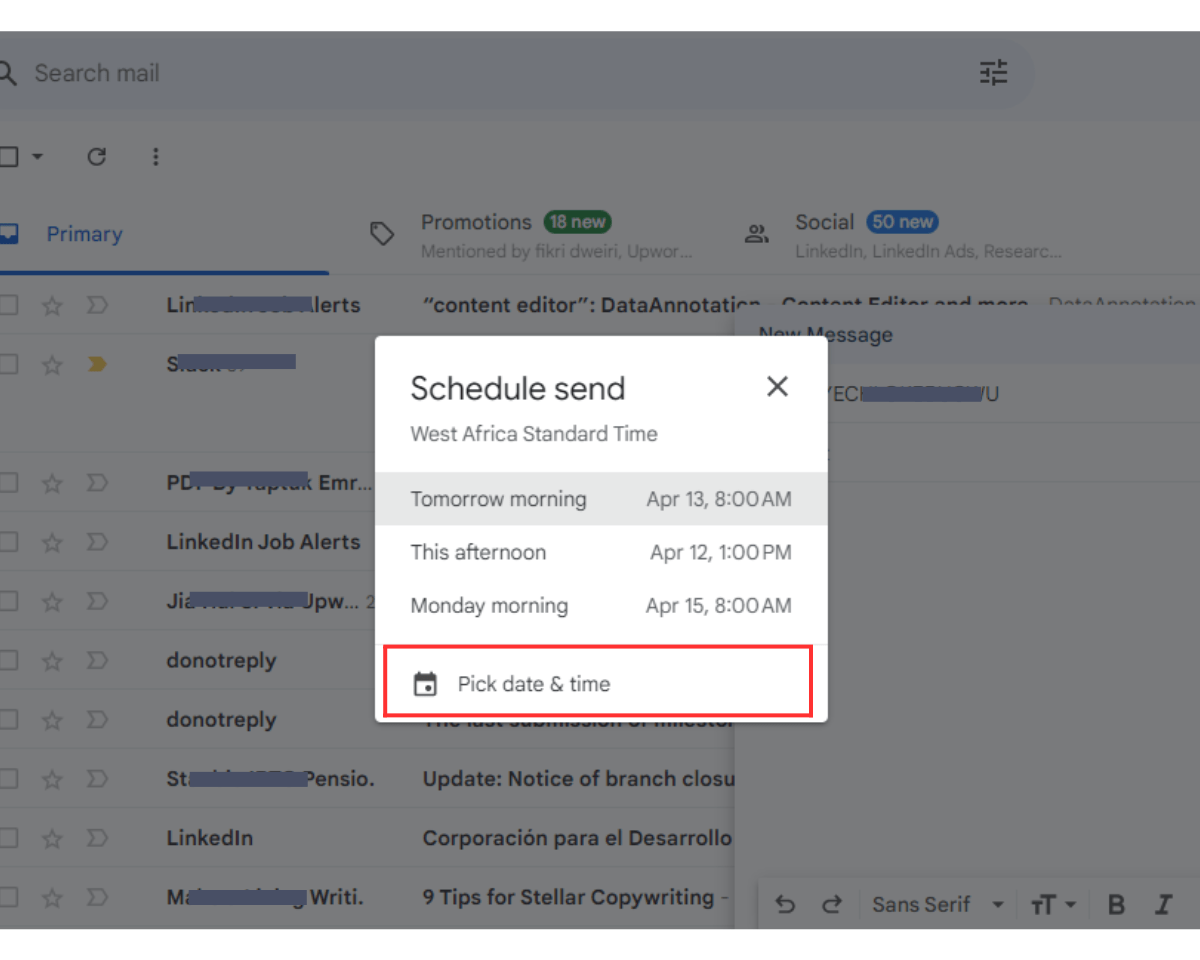
Step 6: Select the date and time you want Gmail to send your email, then click Schedule Send.
On Android
Follow these steps to schedule Gmail emails to be sent later on Android mobile devices.
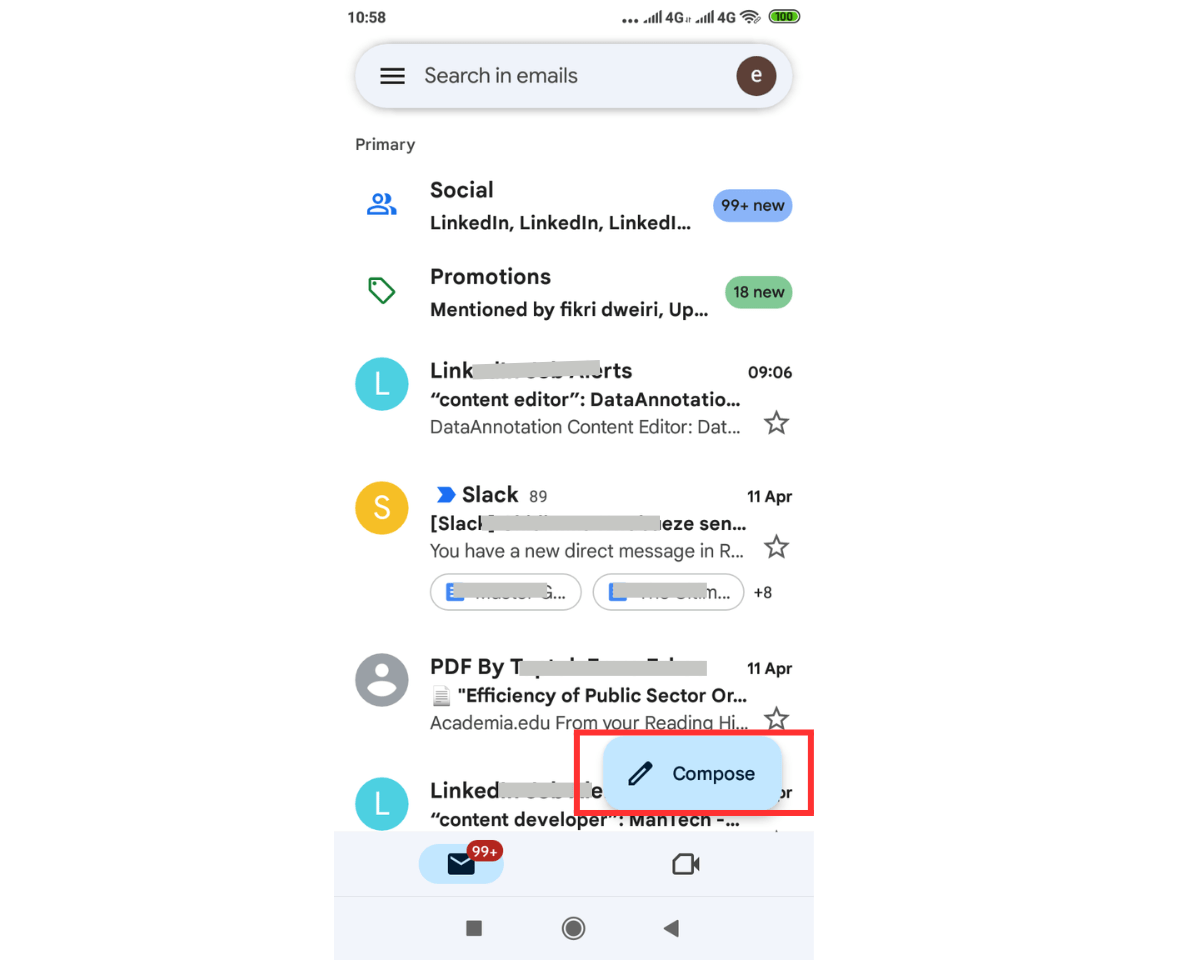
Step 1: Open your Gmail app on your Android device
Step 2: Click the Compose button and compose your email
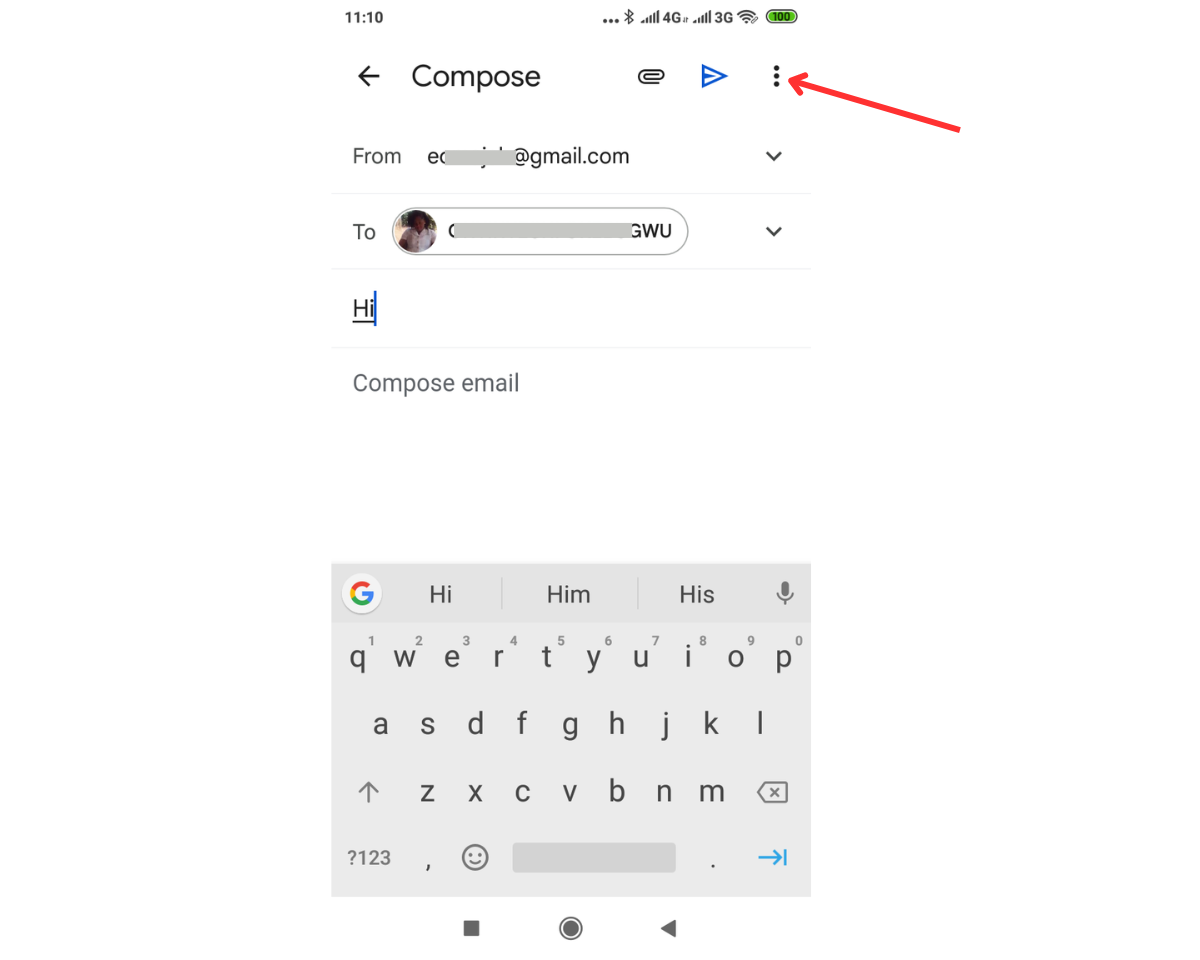
Step 3: Click the More (three stacked dots) button at the top right corner of the Compose window.
Step 4: Click Schedule send
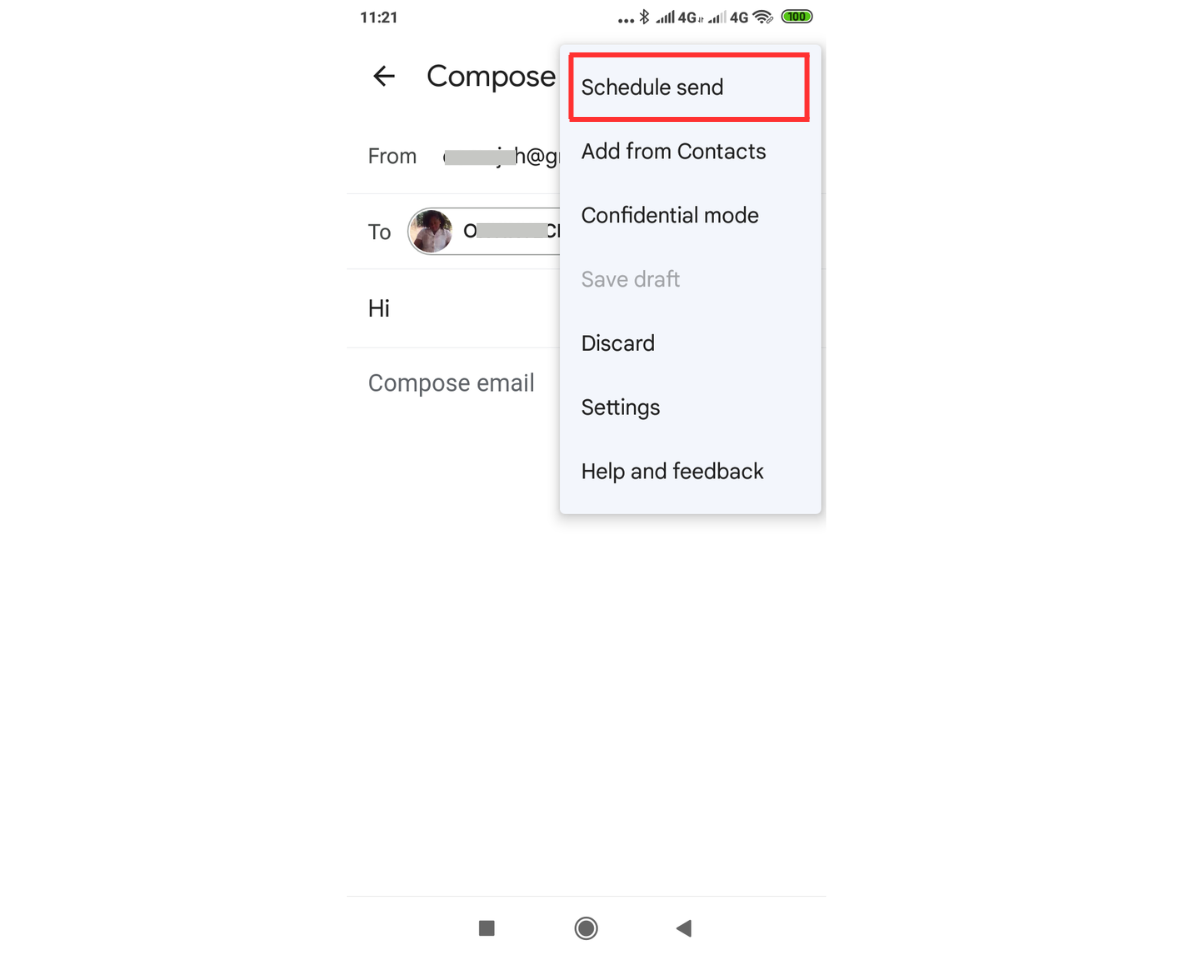
Step 5: Click Pick date & time

Step 6: Set the date and time you’ll want Gmail to send your email, and click Schedule send.
On iOS
Follow these steps to schedule Gmail emails to be sent at a later time on your iOS device.
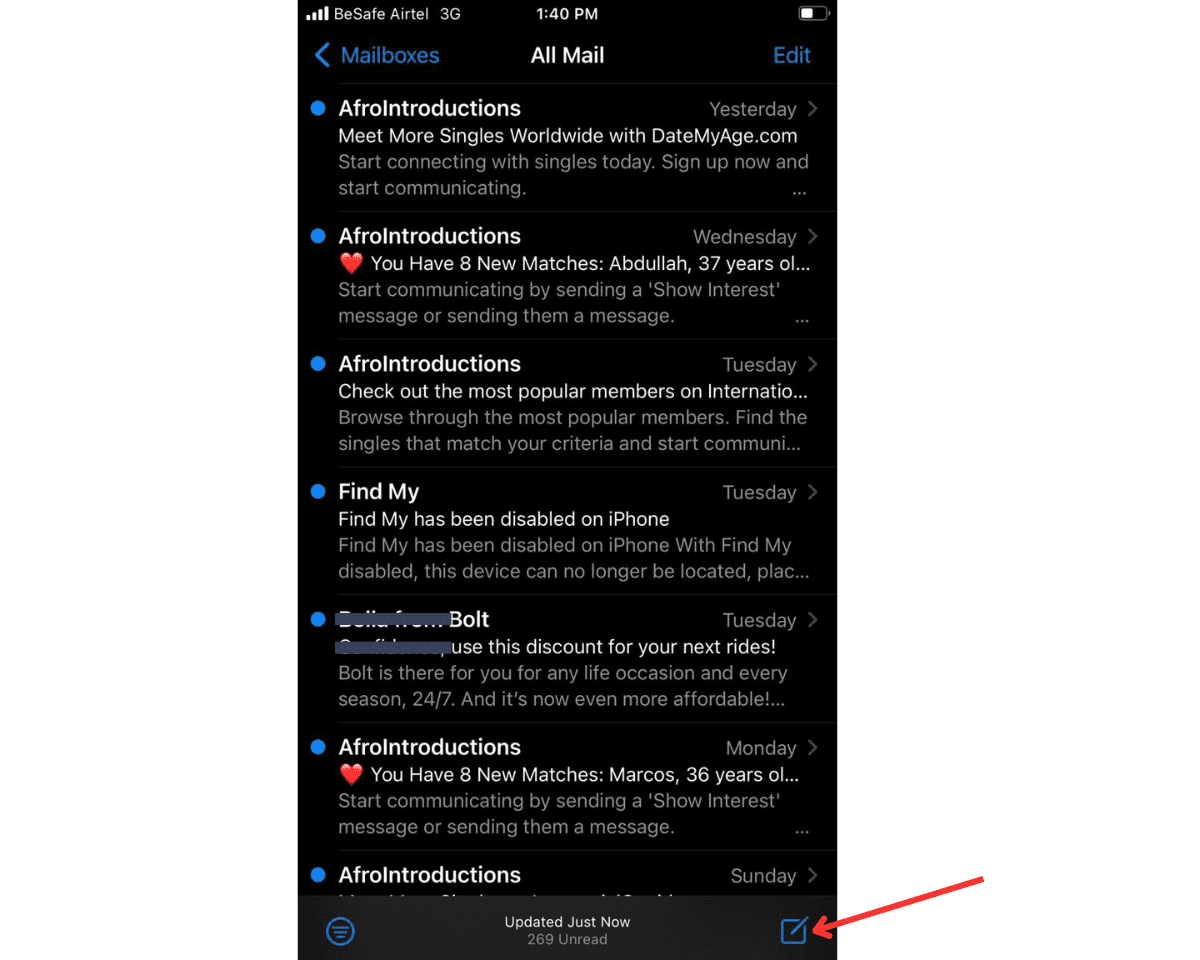
Step 1: Open the Gmail mobile app on your device.
Step 2: Click the compose icon at the bottom of the screen.
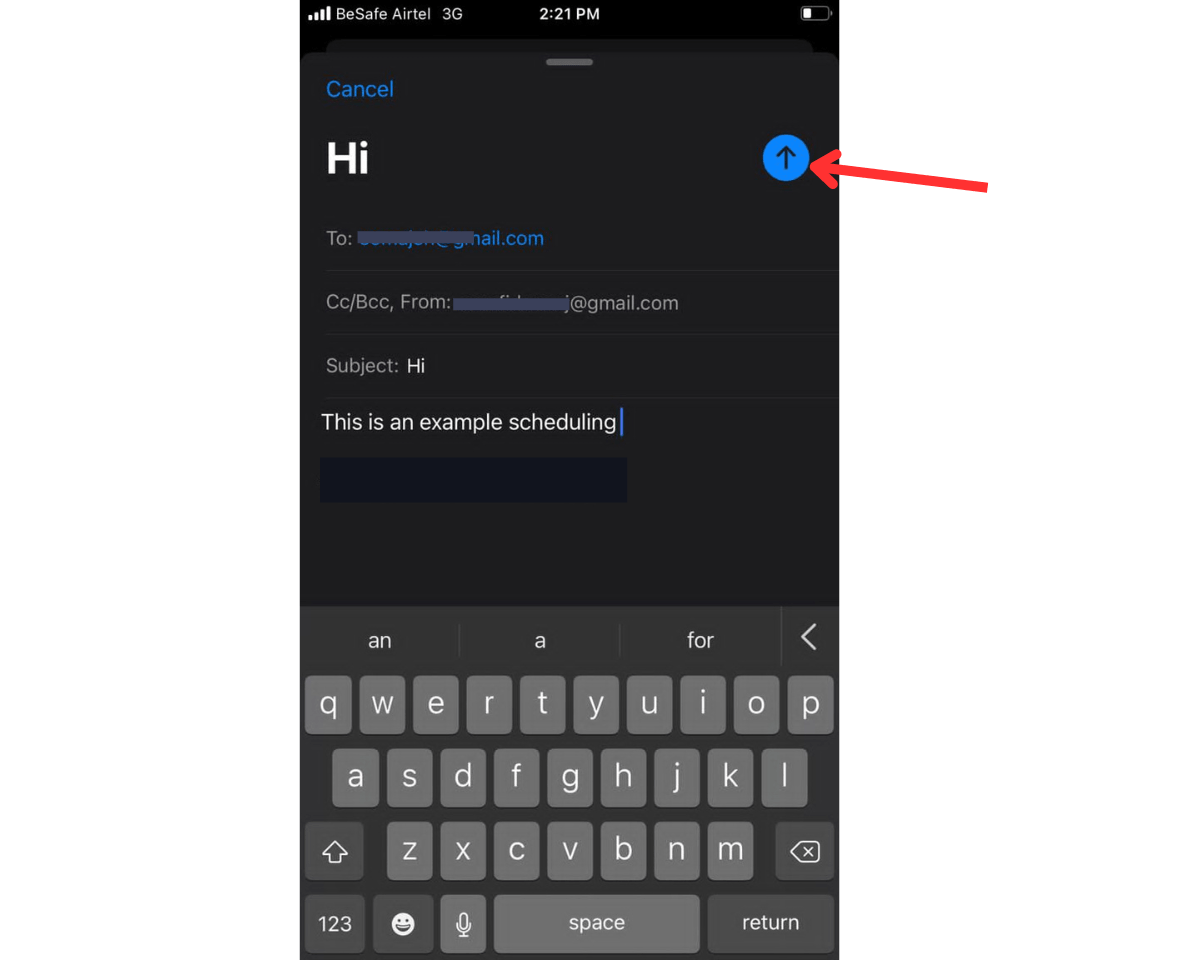
Step 3: Set up your email (add a recipient, include a subject line, and add your email text).
Step 4: Press and hold the Send icon to reveal more sending options.
Step 5: Choose Send Later from the sending options in the pop-up window.
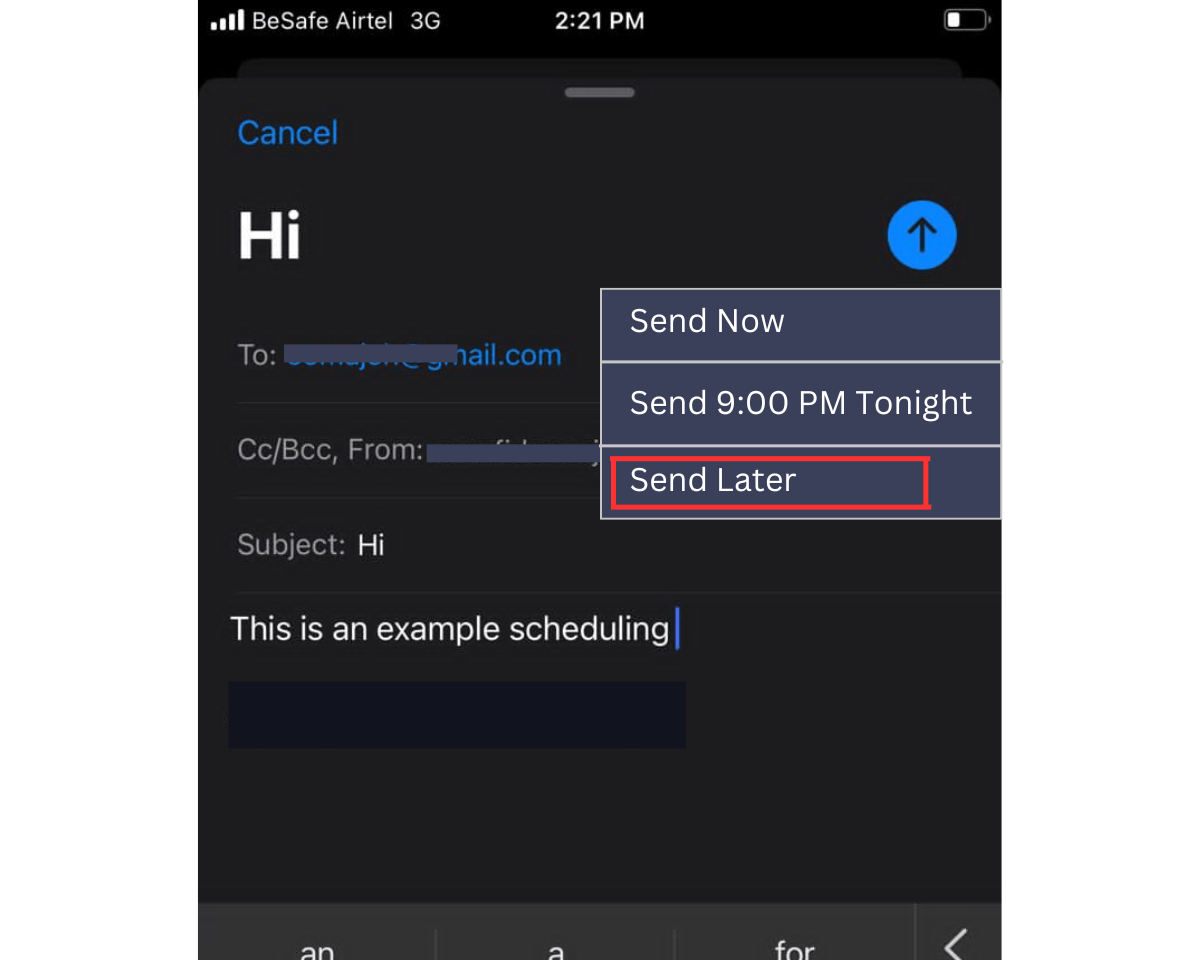
Step 6: Choose a desired time and date for sending the scheduled email.
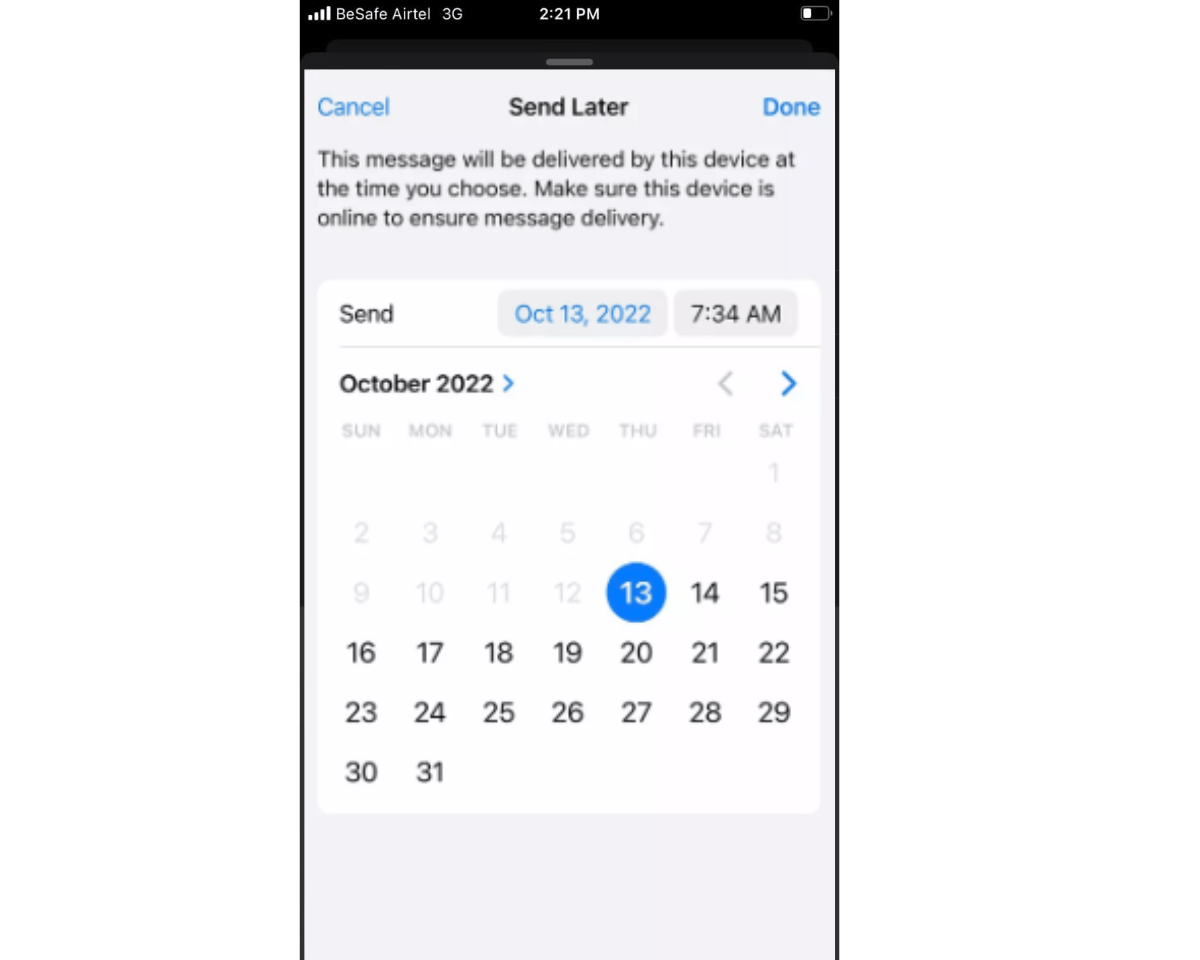
Step 7: Click Done at the top right corner of the Send Later window.
Limitations of Scheduling a Delayed Email in Gmail
Scheduling emails to be sent at a specific time in the future offers many advantages. However, the Gmail Schedule Send feature has a few limitations you should know.
First, it requires an internet connection to work. If you’re offline when the scheduled time arrives, Gmail won’t send the email until you regain internet access.
Also, you cannot edit scheduled emails. You’ll have to cancel the scheduled send email, find it in your draft, make the necessary changes, and reschedule sending. When you cancel scheduled emails, they are always saved in your drafts folder.
However, the most frustrating limitation of Gmail’s Schedule Send feature is that you can only schedule emails individually. Consider that you want to send 50 personalized emails. You would need to create and schedule each one individually. Needless to say, this can make email scheduling tiring.
If you want to streamline the process of scheduling personalized mass emails, you’ll need another method. This is where a Gmail add-on like Mailsuite comes in.
3. Use Mailsuite to Schedule and Send Emails Automatically
Mailsuite is the best method for scheduling emails because it lets you schedule multiple emails to send at the same time. And it’s helpful whether you’re an individual sending emails to family and friends or a small business sending marketing emails to your list of customers.
With Mailsuite, you can create one email and insert merge tags that automatically personalize your Gmail message for each of your recipients.
Then, you can schedule the email to be sent at a future time. Thus, despite scheduling emails to be sent to multiple recipients, you only go through the process of scheduling once.
Also, Mailsuite does not change your Gmail experience. So, with Mailsuite, you’ll still be using the Gmail interface, and scheduling can delay email sending for up to 49 years.
Here’s how to use Mailsuite to schedule the sending of personalized mass emails in Gmail.
Step 1: Add Mailsuite to Gmail.
If you have not installed Mailsuite, the first thing to do is to install it. Go to the Chrome web store and click the Add to Chrome button to install Mailsuite for free.
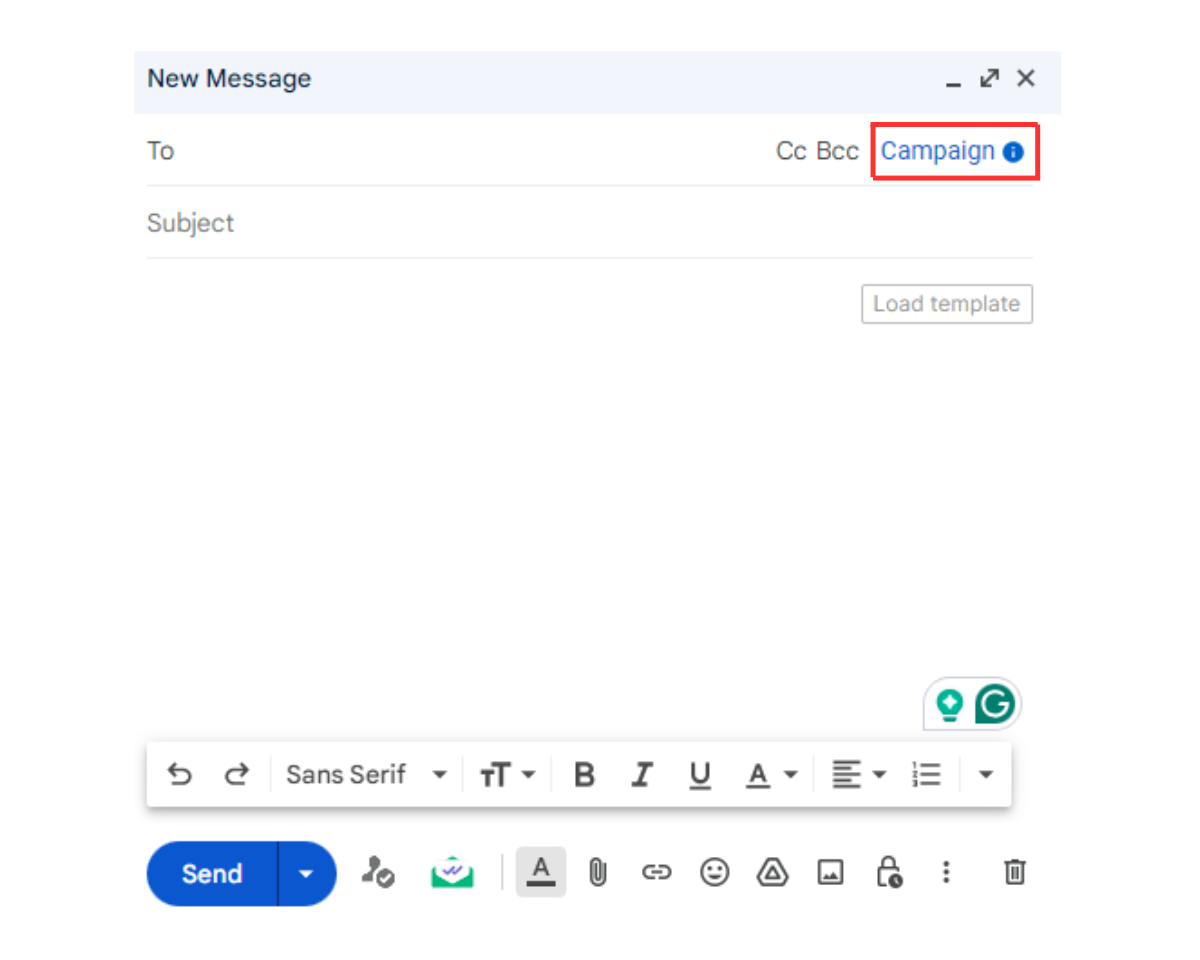
Step 2: Open your Gmail and click the Compose button.
Step 3: Start a Mailsuite campaign.Click Campaign in the To field of the compose window.
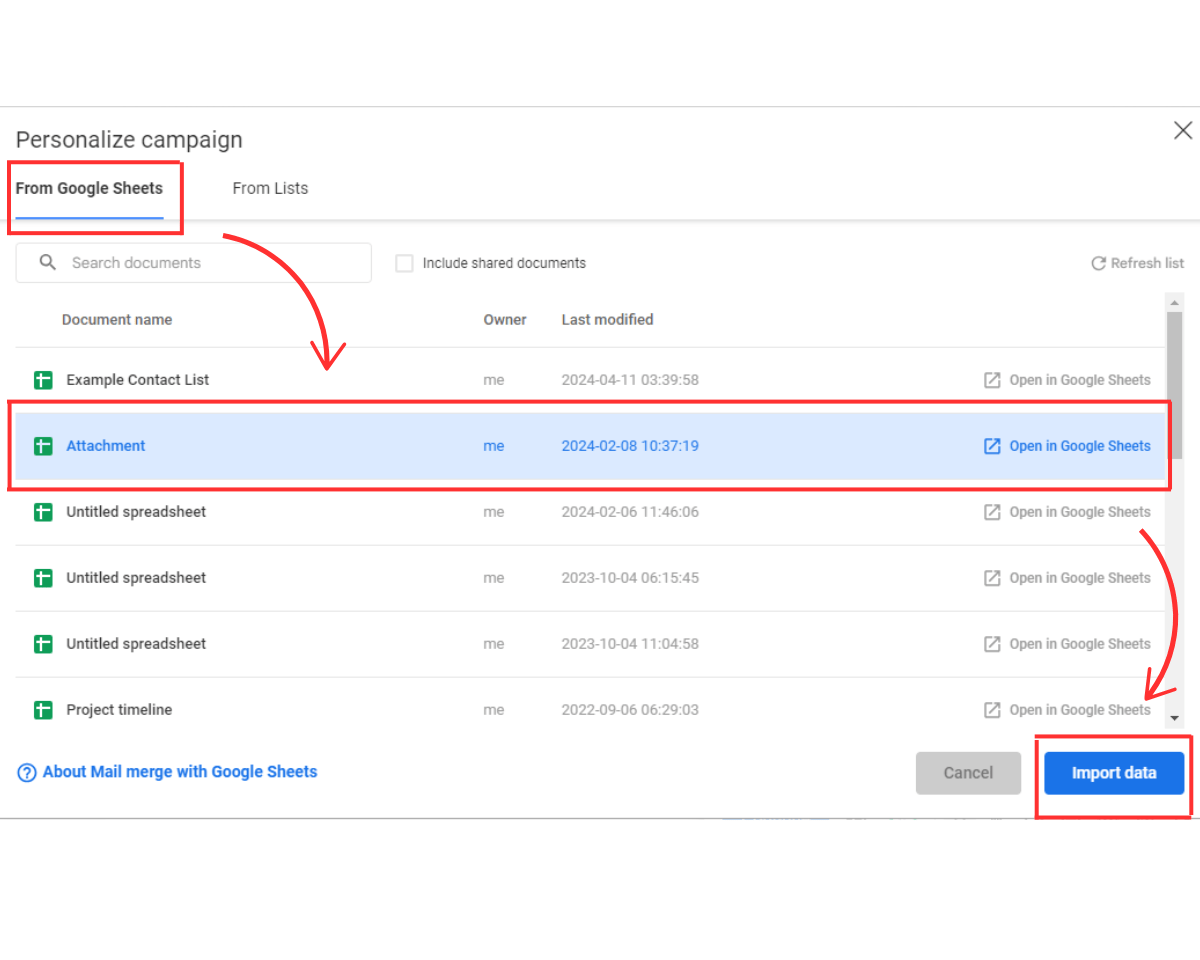
Step 4: Personalize your campaign.Click the Personalize button in the compose window.

Step 5: Import recipients’ contacts from your contact list.
You’ll be prompted to import your recipient data. Choose Google Sheets, select your contact list, and click Import data.
Step 6: Add your email text, including merge fields.
Enter your email text into the compose window. Include merge fields in your email for where you’ll want to personalize with recipients’ data. Use “{{ }}” for the merge tags, and ensure the merge tags match the column titles in your contact list.
Gmail will replace the merge tag with the corresponding data from your contact list, thereby personalizing your mass emails for each recipient.
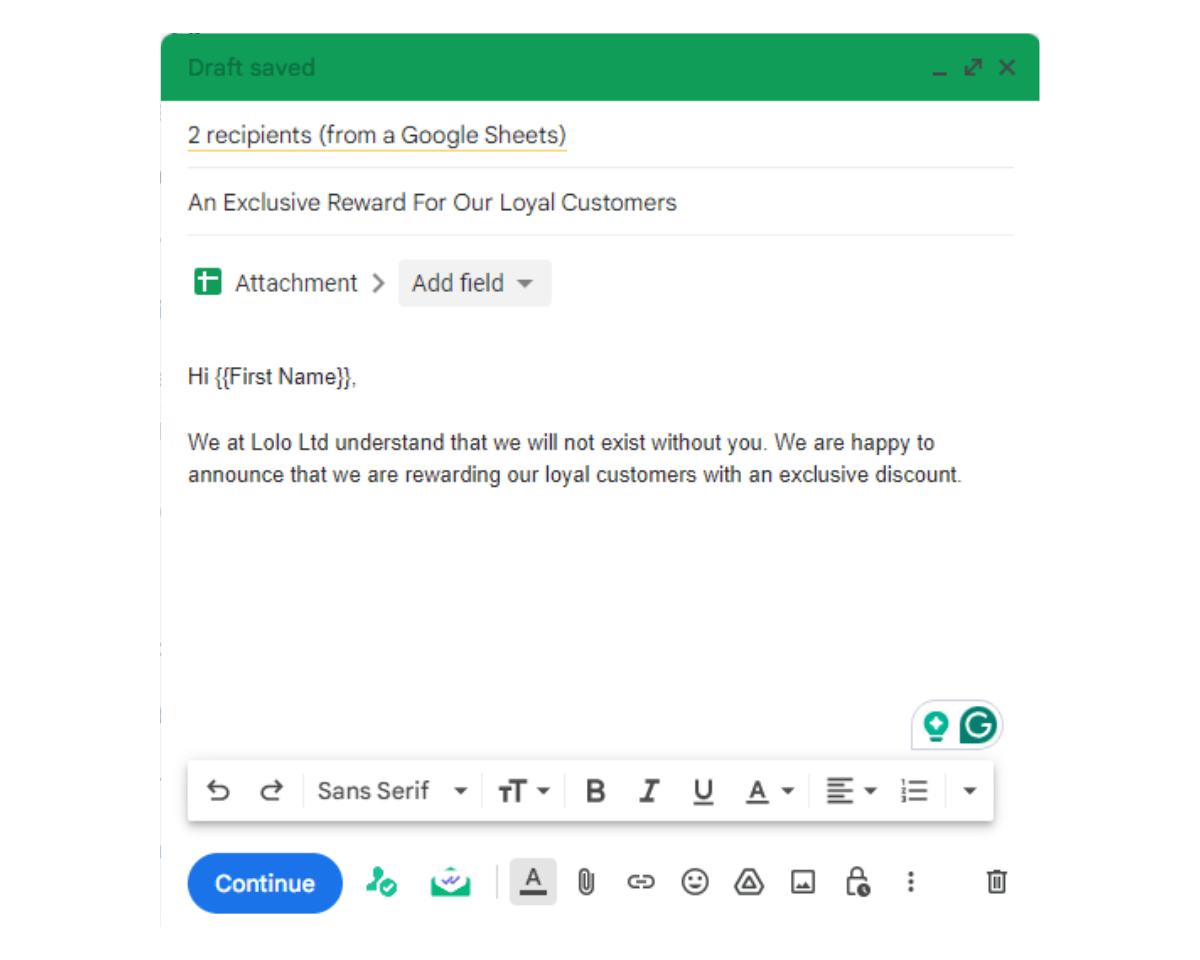
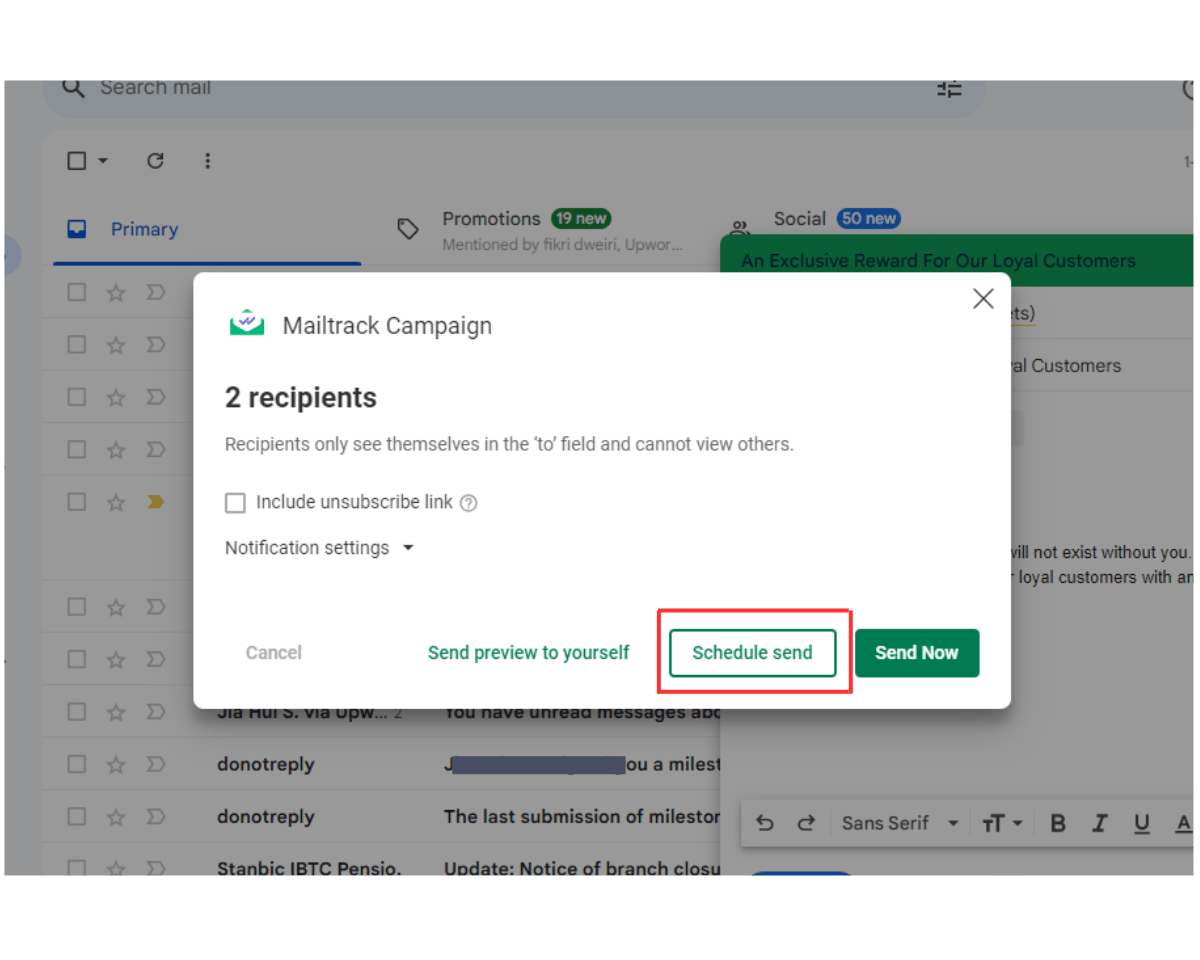
Step 7: Click Continue.After setting up your email, click Continue in the Compose window to open sending options for your campaign.
Step 8: Click Schedule Send.Instead of clicking Send Now, tap Schedule Send to set a future time for the email to be sent.
Step 9: Click Customize date & time.
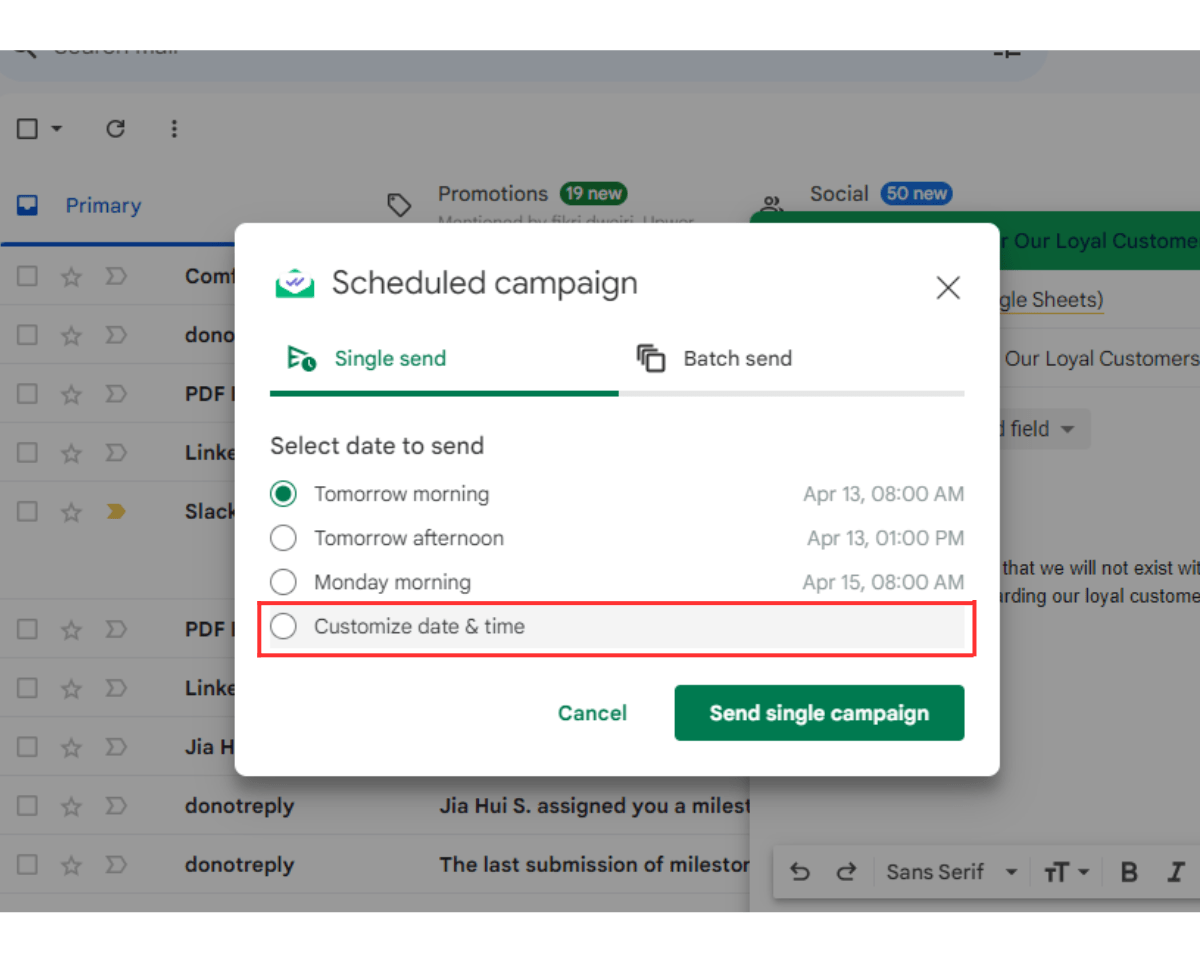
Step 10: Choose your preferred future date and time for the email campaign to be sent, then click Send single campaign.
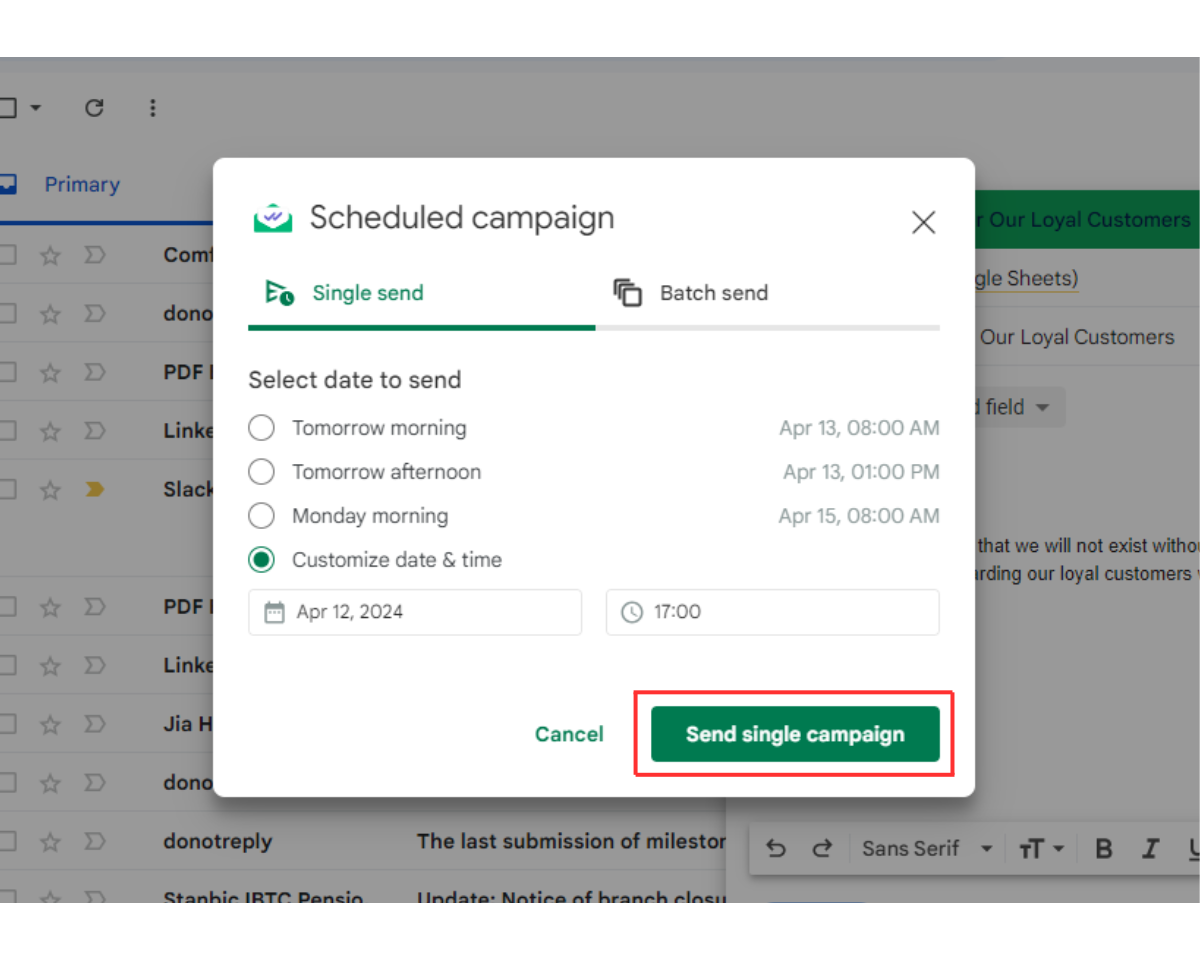
Gmail will delay sending the email until the date and time you specify. Upon sending it, each recipient will receive a personalized email, ensuring better engagement.
In addition, Mailsuite offers excellent email tracking. It’ll tell you when your recipients open your email, click email links, view your attachments, and more. This helps you measure the success of your campaign and create more effective follow-ups.
See how the three methods to send delayed emails in Gmail compare:
| Gmail Send Delay feature | Gmail scheduling feature | Mailsuite | |
|---|---|---|---|
| Maximum delay | 30 seconds | 49 years | 49 years |
| Send personalized emails | No | No | Yes |
| Track emails | No | No | Yes |
Reasons to Use Delayed Emails in Gmail
There are different reasons you may want to schedule an email to be sent later. Some of these include:
Sending to Different Clients or Colleagues in Different Time Zones
If you are emailing clients or colleagues in a different time zone, you may want to use email scheduling so they won’t receive it at an inappropriate hour.
Your business hours may be their nighttime. They may not be happy with you if your email wakes them up, potentially souring future interactions.
Moreover, other emails may enter their inbox before their morning, pushing yours down and making it difficult for them to see it.
Maximize Your Free Time
Email scheduling helps you make your free time more productive. For example, you know it is not an optimal time to send an email, but you are free. You can proceed to write the email and schedule it to be sent at the appropriate time.
That way, you won’t have to drop everything else to write an email when it’s optimal to send.
Send Time-Sensitive Emails at the Perfect Moment
Scheduled sending is also important when sending emails that are tied to specific times.
Sending such emails earlier than required will make them meaningless. Consider reminder emails like “Your subscription expires in 2 days” or “Only 24 hours left to save 20%.”
Customers cannot receive a “Your subscription expires in 2 days reminder” when they still have more than 2 days remaining.
However, you can schedule such emails to be sent just at the right time.
Takeaway: Send Emails at the Perfect Time with Mailsuite
Your emails may not be getting the response you want because you are sending them at the wrong time. Sending your emails at the right time can be the secret sauce that makes your email campaigns more successful.
Mailsuite is the best tool for doing this. Gmail’s built-in Delay Send feature can delay an email for 30 seconds, which is only beneficial if you catch a mistake after you send it. Gmail’s Schedule Send feature can delay an email for 49 years, but using it is cumbersome when scheduling personalized mass emails.
Mailsuite, on the other hand, offers powerful email marketing capabilities, allowing you to effortlessly schedule personalized mass emails with just a few clicks.
It also tracks emails, giving you valuable information to optimize your campaigns (such as when recipients open your email and click your links). This makes it useful even after you hit send!