Nowadays, adding signatures to documents has become a regular part of our lives. From business contracts to consent forms in clinics, financial institutions, schools, and workplaces, there’s virtually no place you turn that does not require signing one document or another.
In fact, it’s even becoming more common for people to send documents through email, requiring recipients to sign them electronically.
So, how do you sign a document sent by email?
We’ll show you the exact steps you need to follow, but let’s examine what an electronic signature even is in the first place!
What is an electronic signature?
An electronic signature (also called an e-signature) is a digital representation of an individual’s handwritten signature added to a document to show that the person agrees with its contents.
Like its handwritten counterpart used offline, an electronic signature is used to authenticate the identity of the signer and convey that the individual agrees to be bound by the terms of the signed document.
Electronic signatures can take different forms, including:
- Your name: At the most basic level, typing your name at the end of a document may be considered an electronic signature.
- Scanned signature: This involves scanning your handwritten signature and inserting it into a digital document.
- Digital signature: This is a digital code that is generated using a digital certificate unique to the signer and cryptographically attached to the document using public key infrastructure. A digital signature is the most secure form of electronic signature.
Why use electronic signatures?
Electronic signatures offer many benefits over traditional paper-based signatures. Some of the benefits are that:
Electronic signatures are legally binding
Various laws and regulations have established the validity of electronically signed documents. For example, the ESIGN Act (Electronic Signatures in Global and National Commerce Act) enacted in the US in 2000 regulates electronic signatures and establishes that documents electronically signed are legally binding.
So, when you add an electronic signature to an electronic document, the signature is as binding as one you sign on a paper-based document.
They’re more efficient than pen-and-paper signatures
Electronic signatures are more efficient than pen-and-paper signatures because they streamline the process of signing a document.
For example, to obtain a paper-based signature, you need to prepare the document and mail it to the individual who should sign it. The person receives it, signs it, and mails it back to you.
But with electronic signatures, there’s no need for physical delivery, mail processing, and manual handling. There’s also less cost involved!
Using them reduces errors
Electronic signatures reduce errors in the document signing process compared to traditional paper-based signatures. With paper documents, there’s a risk of loss, delays, and inconsistencies in signatures, leading to missed deadlines or rejections.
Electronic signatures mitigate these risks, ensuring a smoother and more reliable document signing process without concerns about signature consistency or legibility.
More cost-effective than other methods
Electronic signatures are more cost-effective than paper-based signatures as they reduce paper usage, eliminate mailing costs, and decrease administrative costs.
Electronic documents also eliminate the need to mail documents between parties, thereby eliminating costs related to postage, envelopes, and courier services.
Additionally, electronic signatures eliminate the need to file and archive physical documents, reducing associated administrative costs.
They’re better for the environment
Electronic signatures are better for the environment as they reduce paper use, thereby reducing the environmental impacts associated with paper production.
Know that billions of trees are cut down every year to make paper. Besides deforestation, the process of producing paper has significant negative environmental impacts.
How to sign a document sent by email
Now that you know why you should use electronic signatures, how do you actually sign an email document?
Below, we explore different methods of signing documents sent by email:
How to sign documents in Gmail
If you’re looking for how to sign a document in Gmail, the answer you seek is Mailsuite. Mailsuite allows you to sign Gmail documents quickly without leaving Gmail.
Using Mailsuite, here’s how to sign or send a document for signature on Gmail.
How to sign a document sent by email with Mailsuite
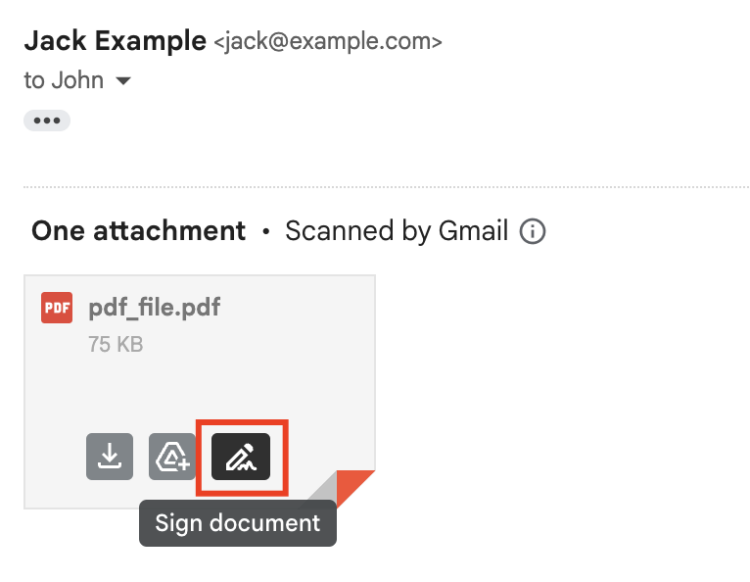
With Mailsuite, every time you receive a PDF document attached to an email, you can easily sign it without leaving your Gmail inbox.
Step 1: Open the email the document is atatched to in Gmail
Step 2: Click the signature icon at the bottom of the email body or at the top right side of the document preview.

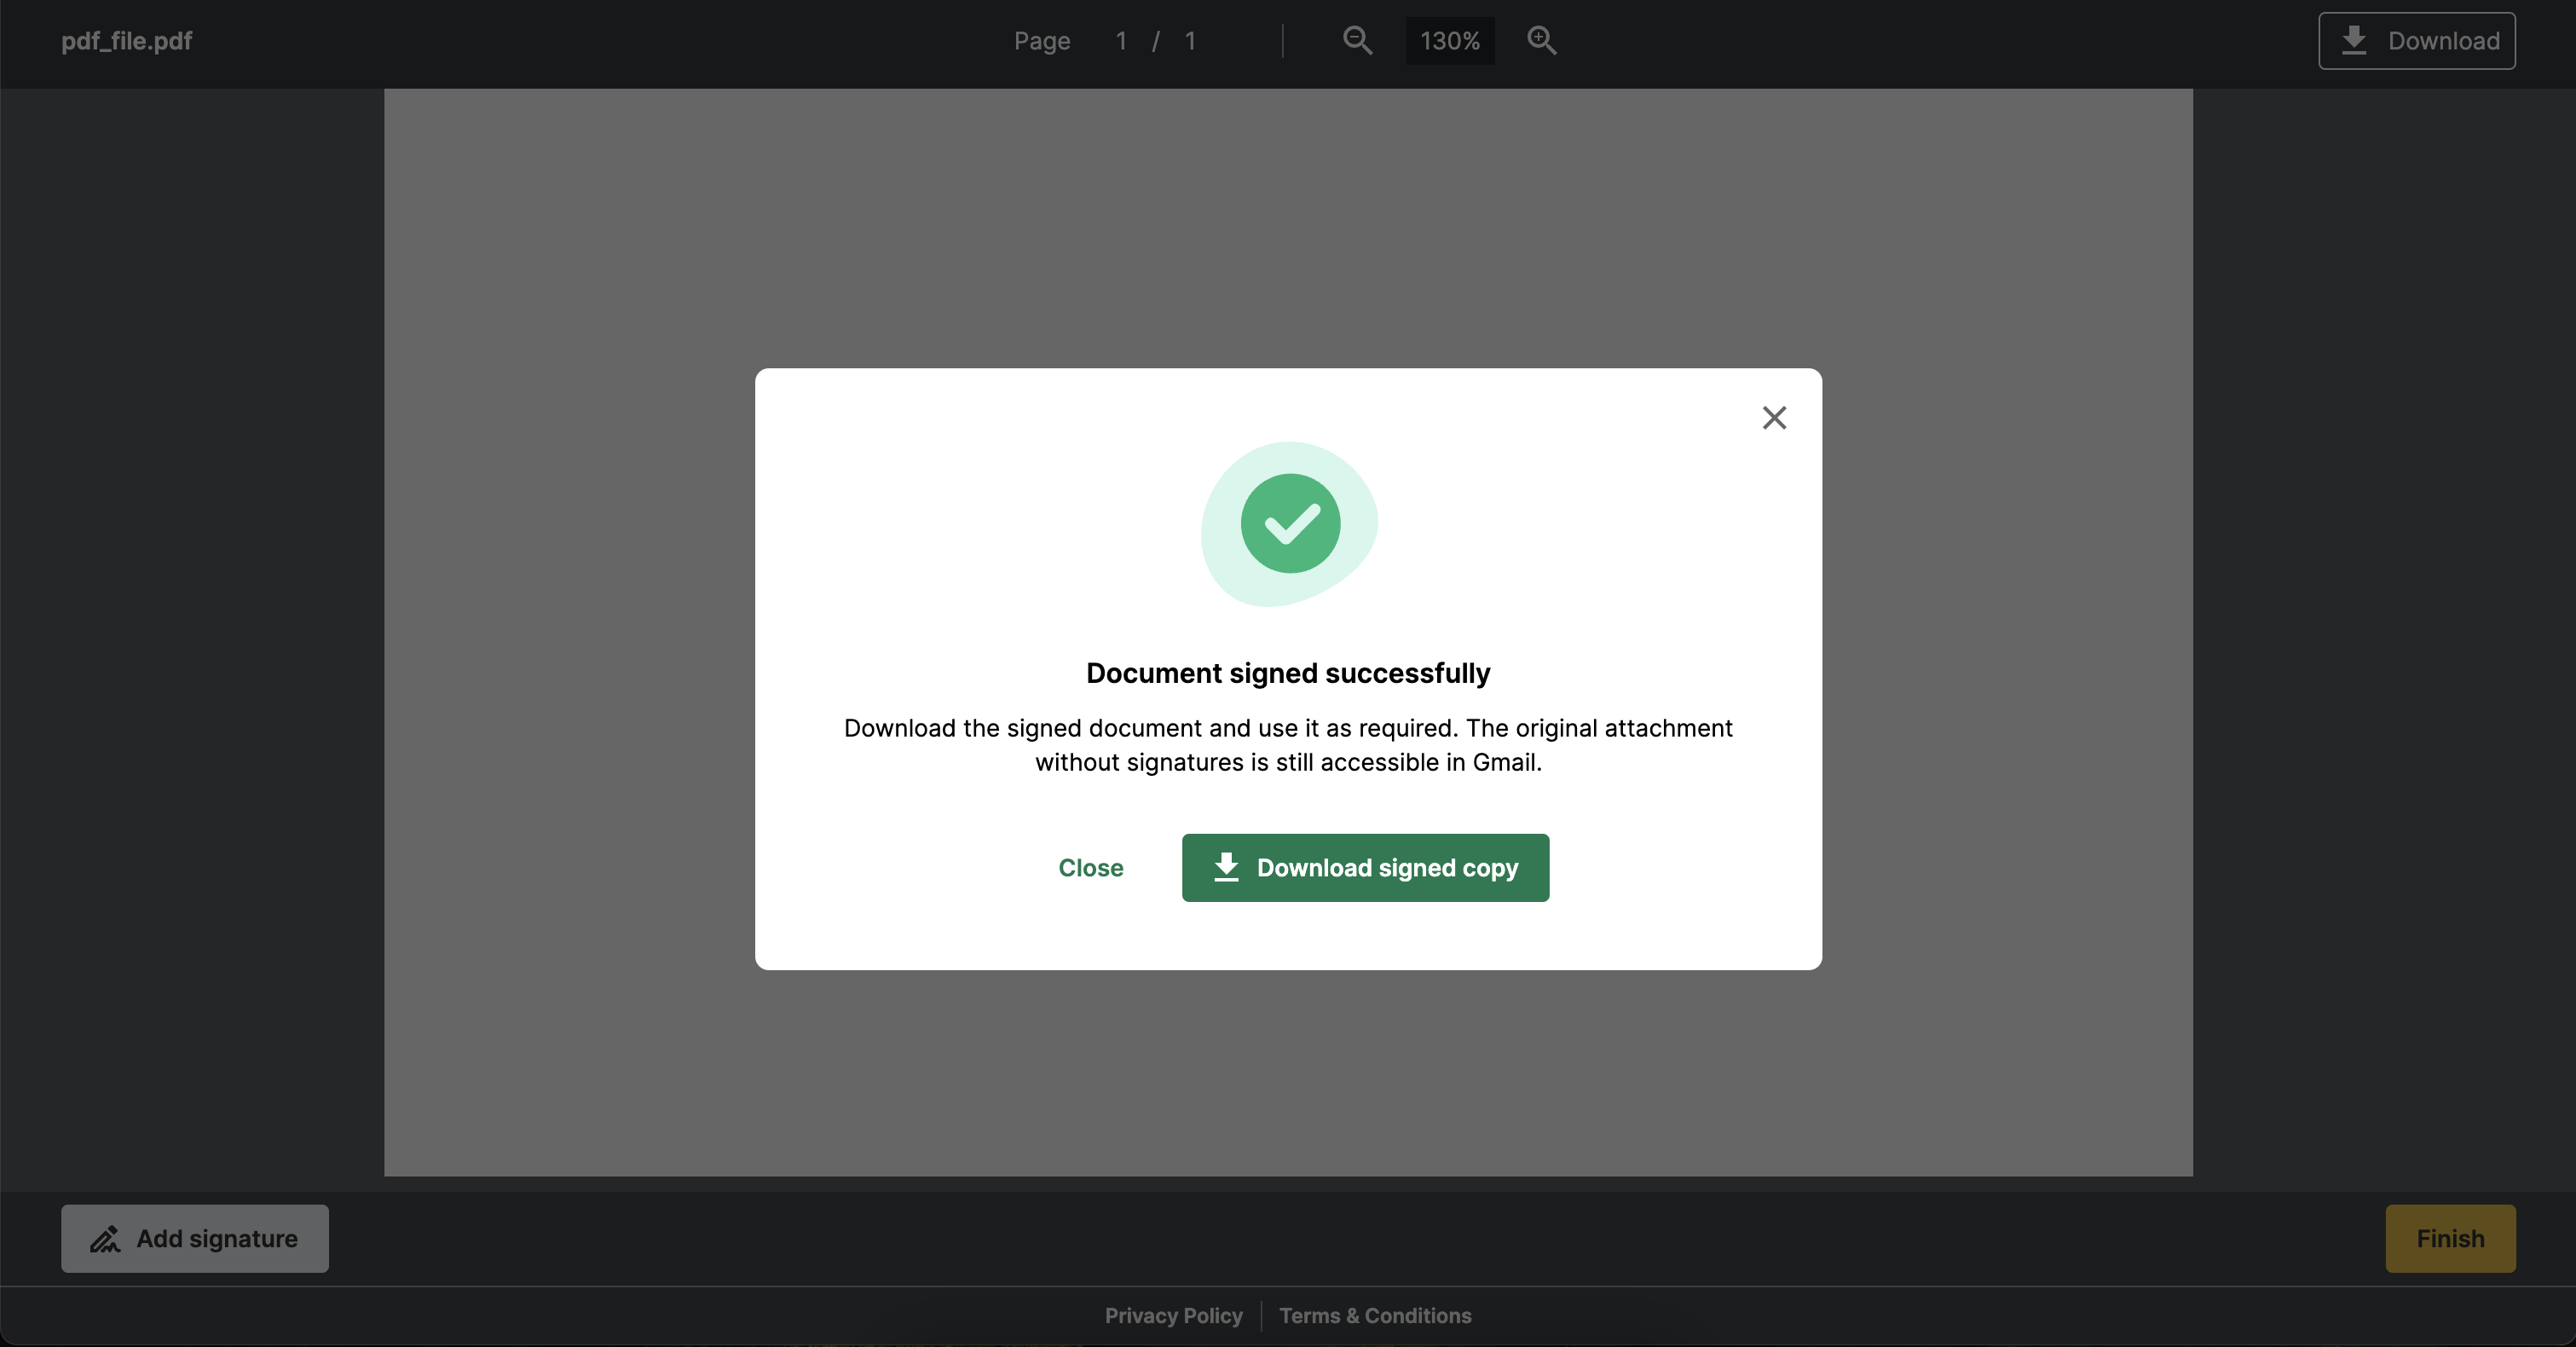
Step 3: Sign the document on our PDF viewer.
Step 4: Download the signed document.

How to obtain signatures for an email document with Mailsuite
Step 1: Compose your email in Gmail
Step 2: Click the Mailsuite icon at the bottom of the page (beside the Continue button).
Step 3: Navigate to Document for signing and click it
Step 4: Browse for the documents you want recipients to sign and select them.
Upon selecting the document(s), a button will be added to your email that lets the recipient access the document to sign it.
Step 5: Send your email.
How your recipients can sign email documents
Mailsuite not only makes it easy to request signatures for email documents, but it also makes it easy for recipients to sign the document.
When your recipients open the attached PDF in the email, they’ll see the yellow option Add Signature at the bottom left corner of the page.
If they click the Add Signature option, a window opens where they can draw their signature.
After drawing their signature, they can add it to the document by simply clicking the green Add Signature button in the window.
Once the recipient has signed the document, they can send it back to you by simply clicking Confirm Send in the next window.
Now, that’s how to sign a PDF document on Gmail. It’s as simple as that! The recipients also have the option to download a completed copy of the signed document.
Use a third-party electronic signature software
There are many third-party electronic signature softwares that people can use to obtain signatures for documents.
Some of the most popular platforms include DocuSign, PandaDoc, and ReadySign. While these platforms are different, they work in pretty much the same way.
The steps for using them are as follows:
Step 1: Document upload
Log into your account with the electronic signature platform. Then, upload the document you want recipients to sign to the platform.
Step 2: Placement of signature fields
After uploading your document to the platform, the next step is usually to specify the signature field – where the signature will be placed in the document.
You can simply drag and drop signature fields onto the document.
Step 3: Invitation to sign
After preparing the document, you initiate the signing process by sending invitations to recipients to sign the document. Invitations are typically sent via emails with a link to the recipient, telling them to access the document.
The platforms usually include authentication methods to verify the identity of signers before they can access the document for signing. This usually includes email verification, password protection, or SMS verification.
Step 4: Signature capture
When recipients receive the link, they can access the document, review it, and place their digital signature in the designated fields.
The top electronic signature platforms support multiple signature types. For example, DocuSign supports typed signatures, drawn signatures, and the use of digital certificates.
Step 5: Completion and notification
Once the recipient signs the document, they can click the necessary button to complete the process. Both you (the sender) and they will receive notifications confirming the completion of the signing process.
The signed document is then stored securely within the electronic signature platform.
Limitations of third-party electronic signature software
While third-party platforms provide all the need-to-have features regarding electronic signatures, they have some drawbacks as well.
One of them is security concerns. The first step in using these platforms is uploading your document.
True, these platforms usually comply with industry standards regarding protecting sensitive information. However, it’s understandable that not many people will be comfortable exposing sensitive documents to a third party.
Another drawback of using third-party electronic signature platforms is cost. These platforms operate on a subscription or pay-per-use model. And these costs can accumulate over time.
For example:
- DocuSign has three plans: A $10/month Personal plan for individuals with basic e-signature needs, a $25/month Standard plan for small to medium teams, and a $40/month Business Pro plan.
- PandaDoc has three plans: A $19/month Essentials plan, a $49/month Business plan, and a negotiable Enterprise plan.
- ReadySign has three plans: A 10-user plan costing $25/user/month, a 40-user plan costing $10/user/month, and a 100-user plan costing $6/user/month.
Know that these e-signature platforms only offer one service—electronic document signing. Their subscription fee may just be one expense too much for a small business or startup. So, unless you’re signing a lot of documents, they may not be worth paying for.
Print the document and manually return it by mail
Another way to sign an email document is to print it, physically sign it with a pen, and return it to the sender by physical mail.
However, though an electronic document is sent via email, this method is not fully electronic, as you have to print the document and sign it manually before mailing it back.
For this reason, it has many of the drawbacks of traditional pen-to-paper signature methods. For example:
- You need a printer and paper, which adds to your expenses.
- Mailing the signed document to the sender is another expense.
- It takes longer to obtain your signature for documents because you have to mail the signed document.
- Delays with the mail courier could make the document get to its destination late, causing problems for time-sensitive documents.
- The mail courier could lose your document.
- The use of paper means the method is not good for the environment.
Best practices for signing a document through email
When signing a document through email, it’s important to follow best practices to ensure the efficiency of the signing process as well as the security and legality of the document.
Best practices for signing documents electronically include:
Ensure the document is from a trusted source
Before you sign any email document electronically, ensure the document is from a trusted source. The main reason for verifying the authenticity of a document is to avoid fraud.
Ensuring the document is from a trusted source reduces the risk of signing fake or altered documents.
It also protects against phishing attacks, so you do not unknowingly click links that will corrupt your system and steal sensitive information.
One way to ensure an email document is from a trusted source is to check the sender’s identity. If the email has an email signature, check it for the sender’s personal details.
Also, consider reaching out to the sender through a known and verified communication channel to confirm their identity and the legitimacy of the document.
Read the entire email and all relevant attachments
Email invitations to sign a document often contain important instructions about how to sign the document.
Reading the entire email and all attachments helps you find such instructions. This can help you avoid making mistakes when signing the document.
Make sure you understand what you’re signing
Documents signed electronically carry legal implications. So, before you sign any document in an email, it is important to ensure that you understand the terms and conditions outlined in the document.
Reading the entire email and its attachments ensures you clearly understand the content of the document before signing. It also helps you verify the accuracy of the information contained in the document.
By thoroughly reviewing a document, you can identify discrepancies, errors, or missing details that may impact the document’s accuracy and validity.
Before signing any document through email, it is essential to clarify any information that you do not understand.
Use a safe and secure signing method
A safe and secure signing method protects the integrity of the document, ensures the validity of your signature, and guards against threats.
For example, a safe signing method protects the integrity of the document during the signing process, ensuring that the content of the document remains unchanged.
A safe and secure signing method also ensures that the signature you add to the document is legally recognized, enhancing trust and confidence in the signed document.
Ensure you return the document to the correct recipient
Another best practice for signing documents via email is ensuring you return the document to the correct recipient.
First, it helps you avoid miscommunication and ensure that the signed document is received by the intended party.
Also, documents often contain sensitive and confidential information. Needless to say, you wouldn’t want to send a signed document with sensitive information to the wrong recipient, as that will lead to unauthorized access to sensitive information.
This is one of the many reasons Mailsuite is the best way to sign email documents electronically.
Start signing documents sent by email with Mailsuite
Obtaining signatures for email documents and signing email documents is fast and easy with Mailsuite.
With Mailsuite, it takes just a few clicks to send a document to others to sign (or to sign a document received via mail). You won’t have to leave your Gmail to sign the document either, as the signing process happens at the instance of sending the email (or receiving it).
With third-party electronic signature platforms, you have to log in to the platform and upload your document to get started.
But with Mailsuite, you simply enter your Gmail and compose your email. Then, you attach the document for signature.
And that’s that!
When you send your email, recipients opening the document will get an option to sign the document.
Moreover, you don’t have to worry about the extra expense of paying for a third-party app just for signing email documents.
At just $5.99/user/month, Mailsuite is cheaper than most third-party electronic signature platforms. Plus, it offers more features than just signing email documents.
It is a helpful Chrome extension that you can use to turn your Gmail into a powerful and secure email marketing tool.
Takeaway: Sign documents in sent emails quickly and easily with MailSuite
Electronic signatures are legally binding. The ESIGN Act confirms that when you sign documents electronically, the signature is as binding as a pen-and-paper signature you sign on a paper document.
You should even prefer electronic signatures over pen-and-paper signatures because they reduce the time it takes to obtain signatures, reduce errors in the document signing process, are more cost-effective, and are better for the environment.
When you receive a document in an email, the traditional way of obtaining signatures is to print it and sign it manually before mailing it to the recipient. However, this traditional method is fraught with problems, amongst them being that the signed document can get lost in the mail.
The most efficient method to sign an email document is using Mailsuite. Mailsuite allows you to obtain signatures for documents directly in your Gmail.
Plus, Mailsuite has other powerful features for supercharging your marketing campaigns, with the main one being email tracking.
Want to learn more about sending PDFs through Gmail? Read:
- How to Send a PDF File Quickly, Easily, and Securely: 6 Best Practices
- How to Watermark Your PDF in Minutes (Explained for Beginners)
- How to Securely Send Documents via Email: Best Methods and Practices
