Do you want more successful email campaigns? Consider using merge tags. Merge tags help you personalize mass emails to multiple recipients. Personalization can increase the number of recipients who open your emails, read them, and click your links to reach your landing pages and take action (such as making a purchase).
However, this success depends on mastering merge tags to create personalized documents and emails. This guide will discuss everything you need to know about using merge tags to personalize emails effectively.
How Do Merge Tags Work?
Merge tags (also called emerge fields) are placeholders that email service providers use for automated email personalization when emailing multiple recipients simultaneously. They allow you to automatically insert specific information about a recipient (such as first name, location, or preference) into an email template, thereby creating a personalized version of the email.
Consider using the merge tag {{FirstName}}. When you send the email, the merge tag will be replaced with the first name of each recipient to whom the email is sent. This way, each recipient receives an email that appears written for them in particular.
To personalize mass emails with merge tags, you need the following:
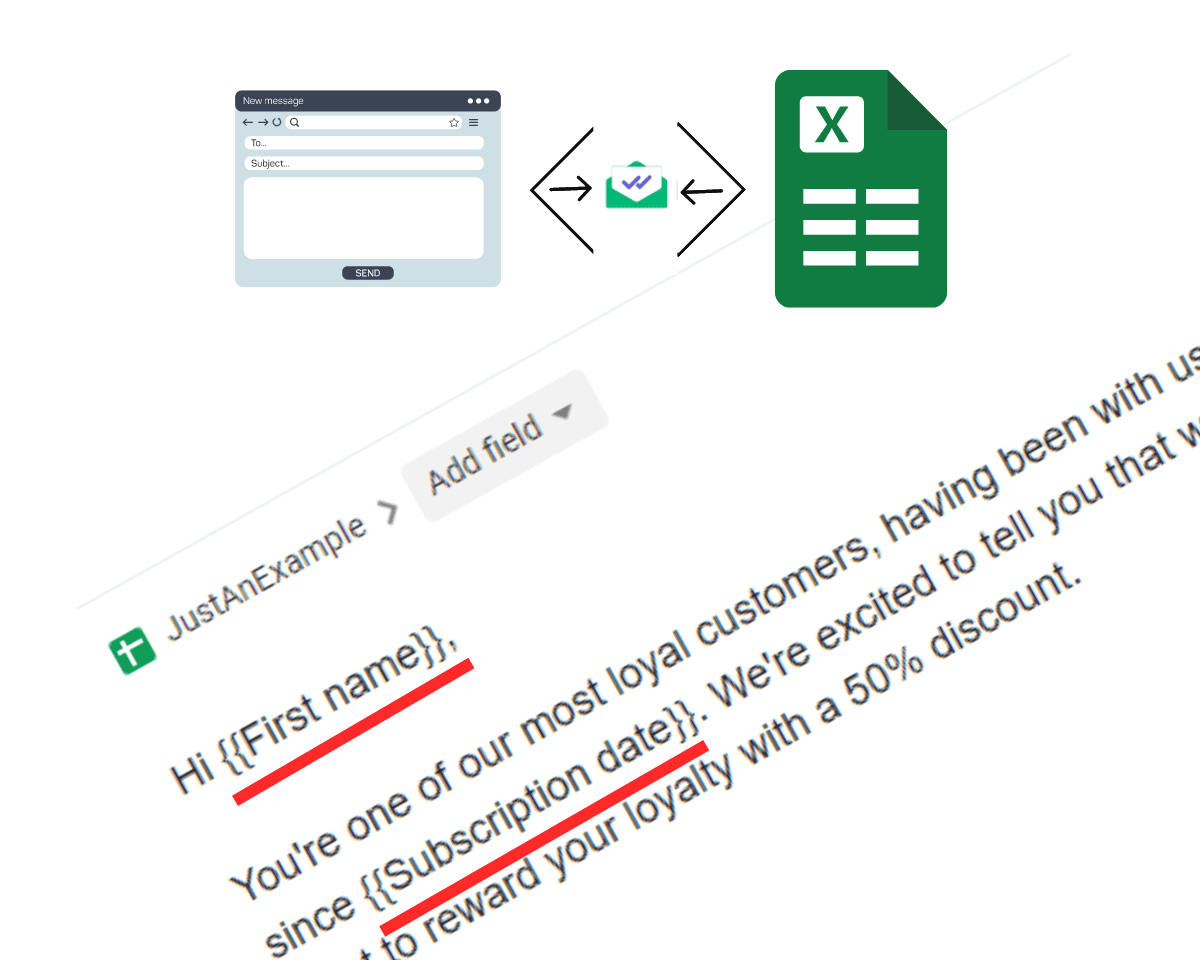
- Email template: This is a copy of the message you want to send. It should contain merge tags in specific places you want to personalize with recipient data. For example, the email’s opening may say, “Hello, {{First Name}}!”
- Data source: This is a document where recipients’ data is stored. It would contain recipients’ details like names, email addresses, and other relevant data.
- Mail merge : This is the tool that merges the email template document and data source. It pulls each recipient’s data from the data source and uses it to replace the corresponding merge tag in the email template. For example, if a recipient’s first name in your data source is “John,” when you send the email, the salutation will say, “Hello, John!” (and not “Hello, {{First Name}}!”
What Are the Most Common Merge Fields?
The most common merge fields marketers include in their email template documents for personalizing mass emails include:
First Name — {{FirstName}}
This is a placeholder for your recipients’ first names. The first name merge tag is commonly used to personalize email greetings (especially in informal communications). It makes your email more friendly and inviting.
Last Name — {{LastName}}
This merge tag is a placeholder for your recipients’ last name. It is commonly used in formal email communications. Like the First Name merge tag, the Last Name tag can make your email feel more personal as you address the recipient by their name. In addition, it can make your email sound more professional.
Full Name — {{FullName}}
This is a placeholder for your recipients’ full names (first and last names). Thus, using the Full Name merge field, {{Full Name}}, or combining the first name and last name merge fields, {{First Name}}{{Last Name}}, will give you the same result.
It is also used to personalize greetings, especially when a more comprehensive greeting is desired. It gives a personal touch to very formal emails. Specific times to use the full name merge field include making first-time contact or emailing someone you don’t know well.
Email Address — {{Email}}
This is a placeholder for your recipients’ email addresses. It is commonly used in account-related communication—to confirm the accuracy of an email address or to send updates. For example, “Were you the one who tried to log in to your account linked to {{Email}}?”
Location — {{Location}}
The location merge tag is a placeholder for your recipients’ geographical locations. It is used to tailor messages based on recipients’ geographical locations, which can make your email more relevant. For example, “We have an exclusive offer for our {{Location}} customers.”
Company Name — {{CompanyName}}
This merge tag is a placeholder for your recipients’ company or organization. It’s commonly used in B2B communication, where the message needs to mention the recipient’s company. Using the Company Name merge tag can show the recipient that you understand their business, which can make them more receptive to your message.
Subscription Date — {{SubscriptionDate}}
This Subscription Date merge tag is a placeholder for when recipients subscribe to your service or mailing list. It is commonly used in communications like anniversary messages or reminders to acknowledge the date a recipient subscribed to a service.
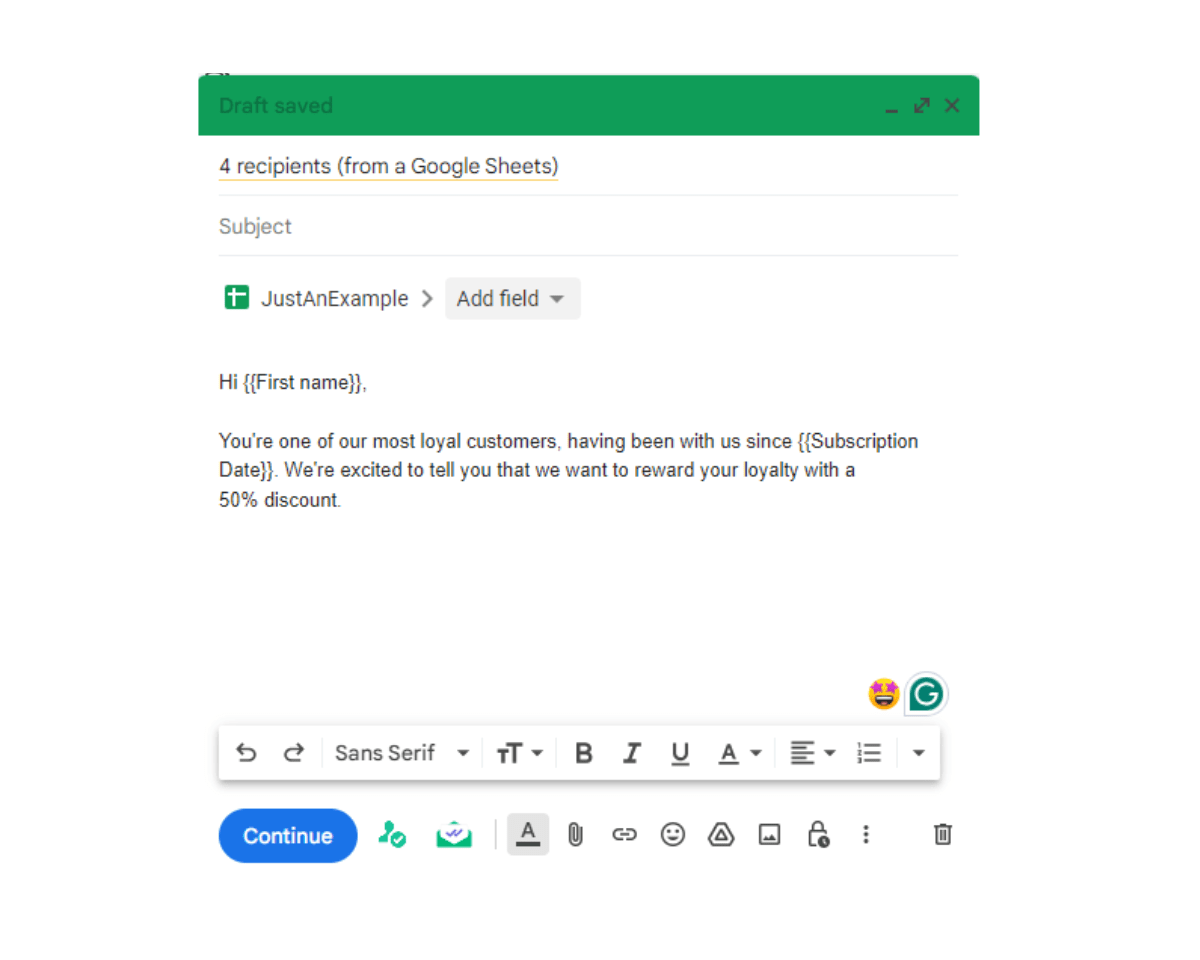
For example, “Being a loyal customer who has been with us since {{Subscription Date}}, we’re excited to offer you a reward.”
How to Use Merge Tags
There is so much you can use merge tags for, depending on the type of data you have about your recipients. Some ways to use emerge tags include:
- Personalized greetings: This is the most popular use of merge tags in email communication. It involves adding recipients’ names in email greetings to make your message warm and inviting. For example, “Hello {{First Name}}.”
- Tailored recommendations: You can use merge tags to recommend additional products to customers based on their previous interactions with your business (like their last purchase). For example, “Based on your interest in {{Last Purchase}}, you will want to see this.”
- Post-purchase engagement: You can use merge fields to tailor post-purchase engagement and educational emails, especially for SaaS products. For example, “We notice you have not assessed {{tool user is yet to use}}. This quick guide will help you get started.”
- Feedback requests: You can use them to tailor feedback requests. This can boost customer satisfaction and loyalty as it tells your recipients that you care about their experience. For example, “Thank you for purchasing {{Last Purchase}} on {{Purchase Date}}. We’d love your feedback on the product.”
- Account updates: Merge tags are useful for sending multiple recipients information about their accounts, such as account balances. For example, “Your account balance is: {{Account Balance}}.”
- Renewal reminders: Merge fields are useful for personalizing mass emails reminding customers about expiring subscriptions. For example, “Your subscription for {{Service}} expires on {{Service Expiration Date}}.”
- Registration confirmation: Use merge tags to confirm registrations and related information. For example, “Thank you for registering for {{Event Name}} which will take place on {{Event date}}.”
- Abandoned cart reminders: Leverage eCommerce data and use merge tags to personalize abandoned cart reminder emails. For example, “Don’t forget about your cart. You have {{Items in cart}} waiting for you.”
- Targeted promotions: Use it to tailor offers. For example, “To celebrate our anniversary, we are offering our customers in {{City}} a {{Discount amount}}% discount.”
How to Use Merge Tags in Mailsuite’s Mail Merge Campaigns
Remember that to create personalized emails using merge tags, you need a data source, a template, and the Mailsuite Google Chrome extension. Mailsuite is the best tool for mail merging, as it streamlines the process and allows you to track the performance of the emails.
Here’s a step-by-step approach for using merge tags in Mailsuite mail merge campaigns:
Step 1: Install Mailsuite
If you have not installed Mailsuite, do so from the Chrome Web Store. In the Chrome Web Store, click the blue Add to Chrome button. Then, follow the on-screen instructions to complete the installation.
Step 2: Prepare Your Data Source
The data source is a spreadsheet from which the mail merge tool will pull your recipients’ data to replace the merge tags.
To prepare your data source, go to Google Sheets and open a new sheet. Next, enter your recipient data. Column titles must correspond to the merge tags you will include in your email template.
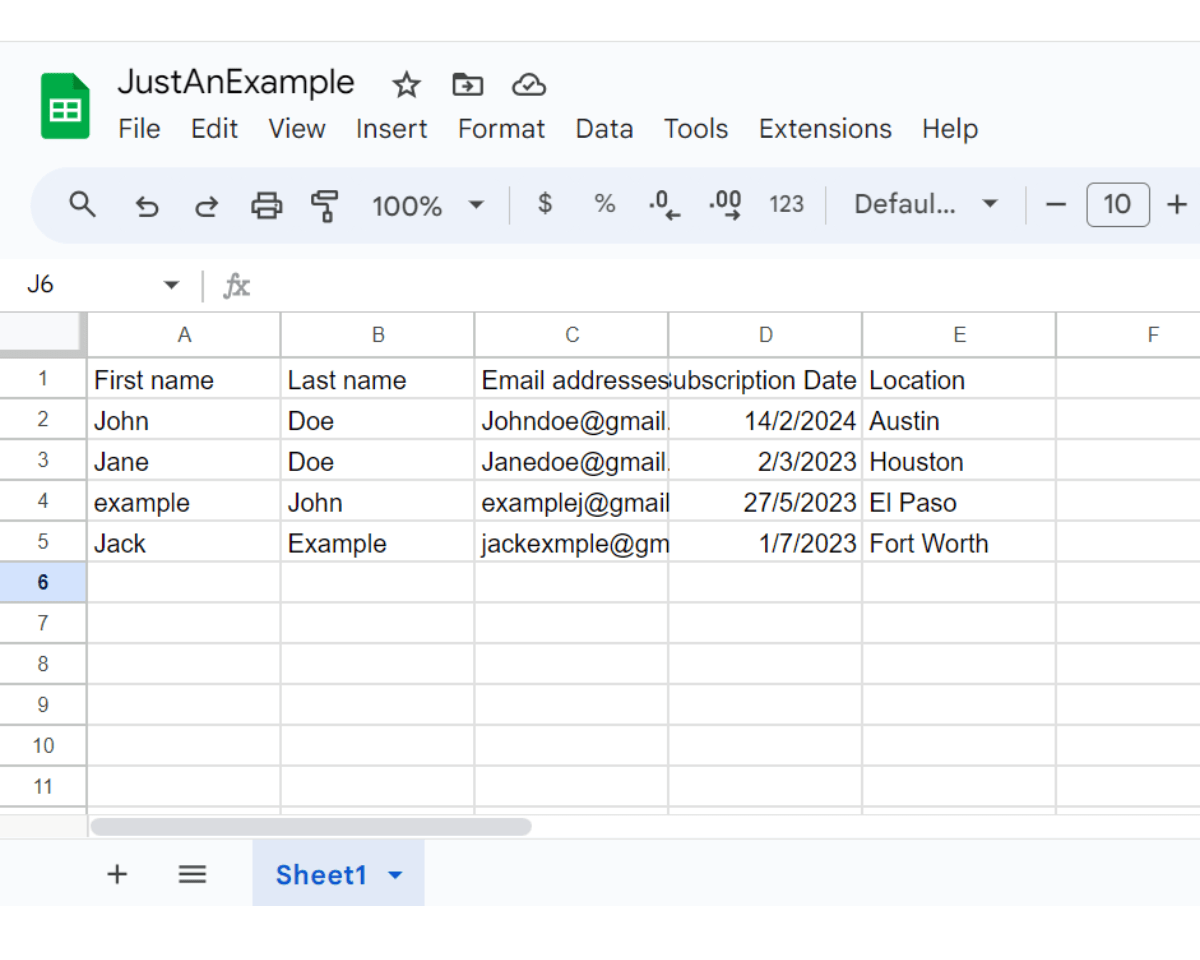
When preparing your data source, ensure:
- You have column headers, and one of those headers is Email.
- You do not have a blank row or column in between data.
- Every cell in the email column has a value.
- You format all email addresses correctly. Incorrectly formatted email addresses (like example@mail..com or example@gamil.com) cannot be imported.
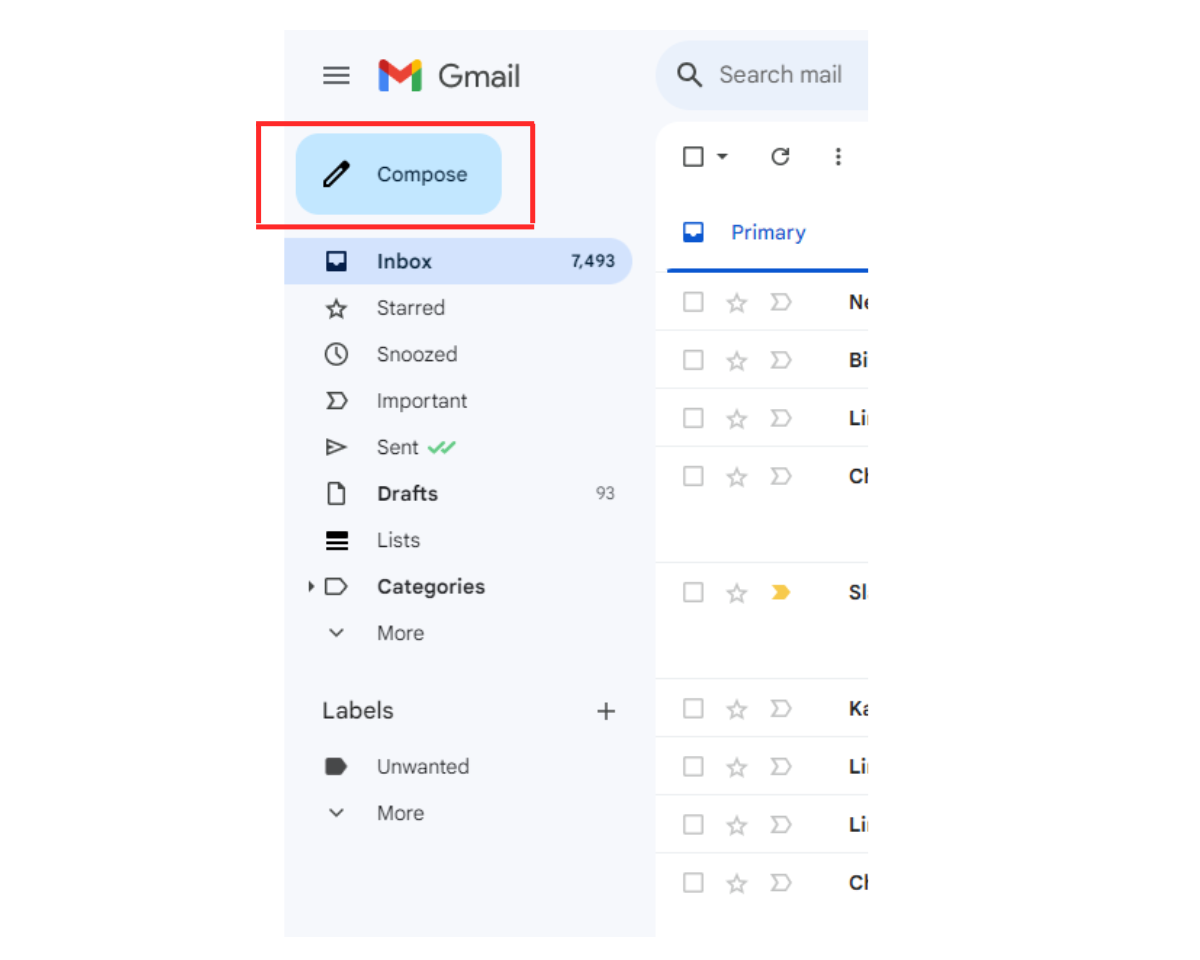
Step 3: Start a New Email
Open your Gmail account. Next, click the Compose button to start a new email.
Step 4: Start a Mailsuite Campaign
In the Compose window, click Campaign in the right corner of the To field.
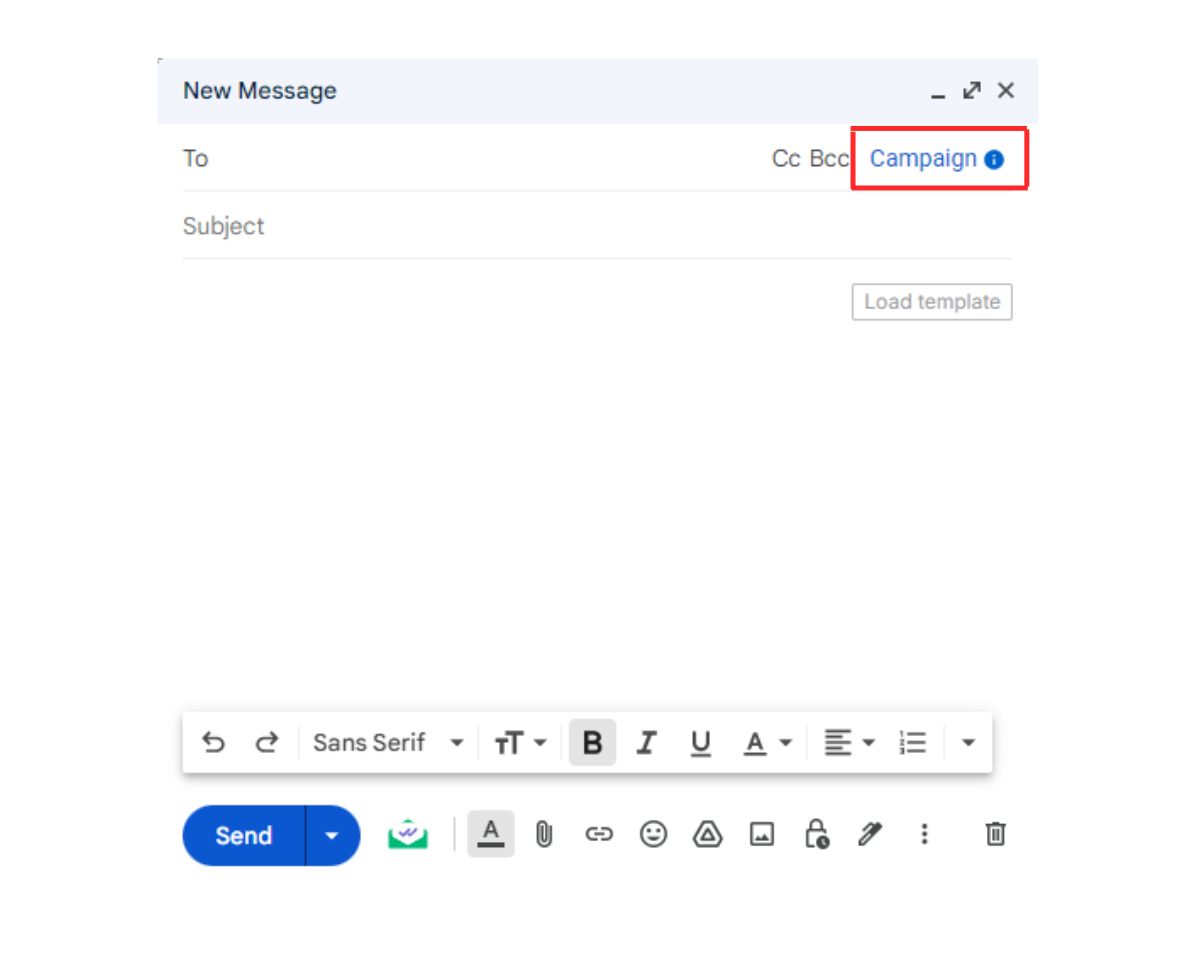
You’ll know Mailsuite Campaign is enabled when the compose window header turns green.
Step 5: Personalize Your Campaign
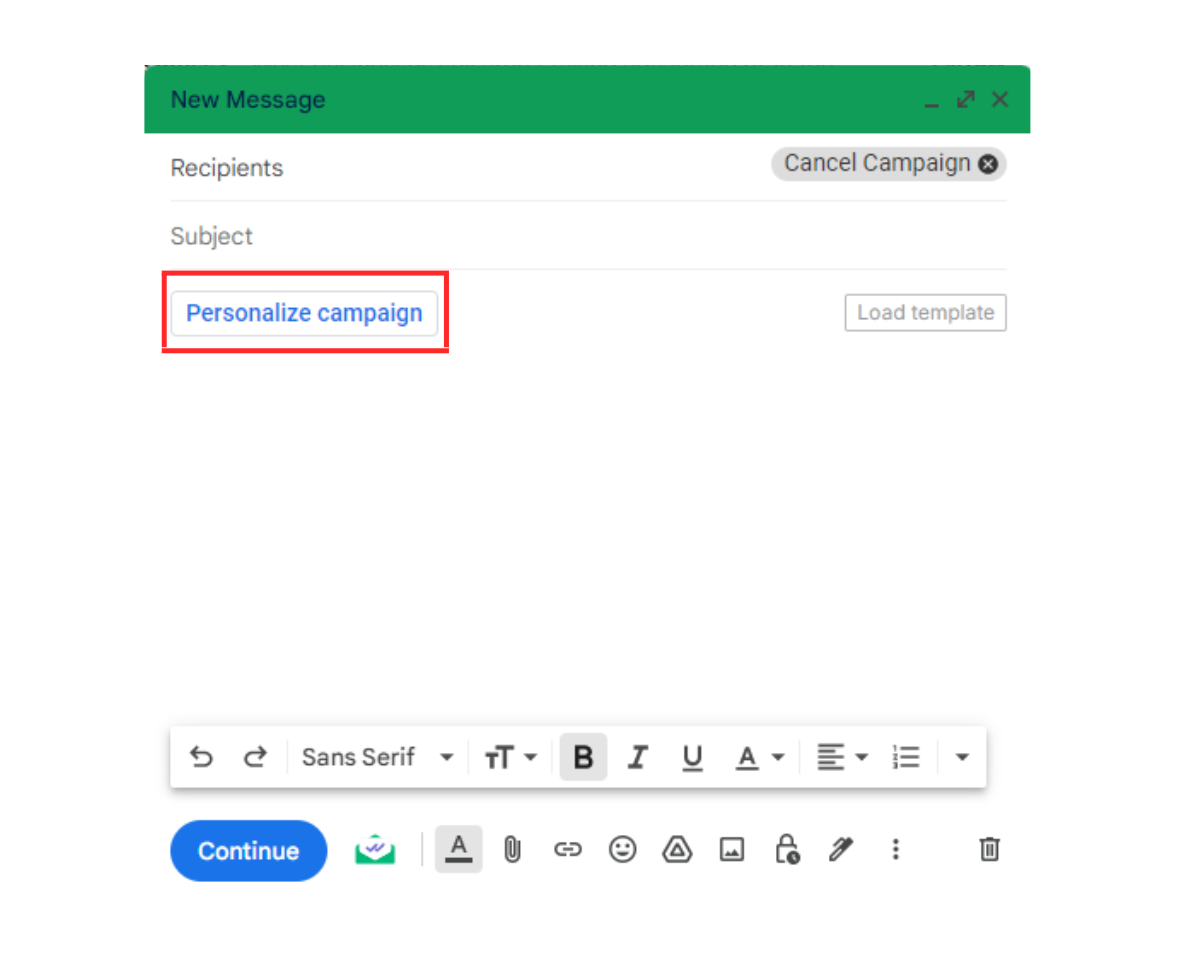
Click Personalize campaign in the main text field of the compose window.
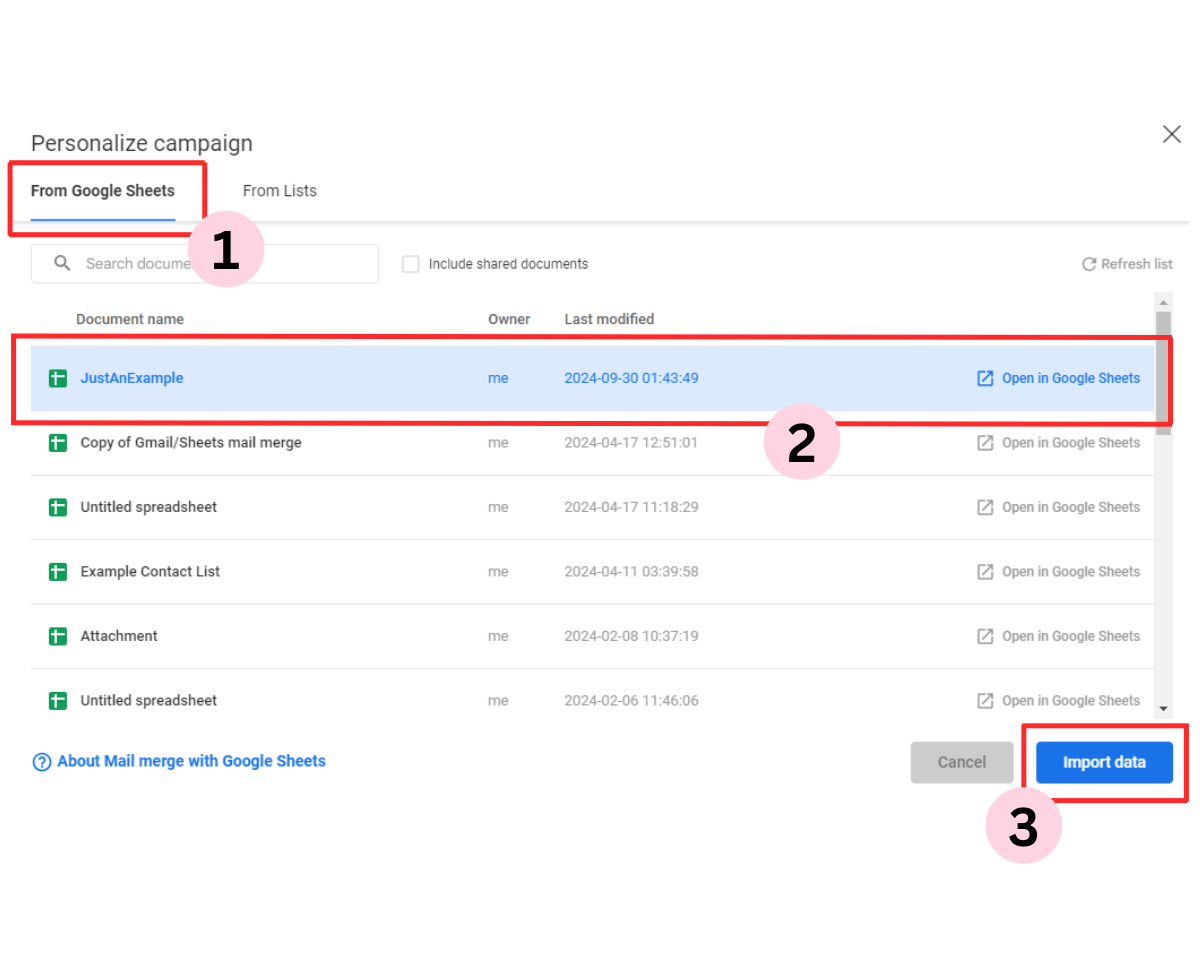
In the Personalize campaign window, import recipients’ data from your data source. First, click the From Google Sheets tab to choose the location of your data source. Next, select your data source document from the listed Google Sheets documents. Lastly, click Import data in the bottom right corner of the window.
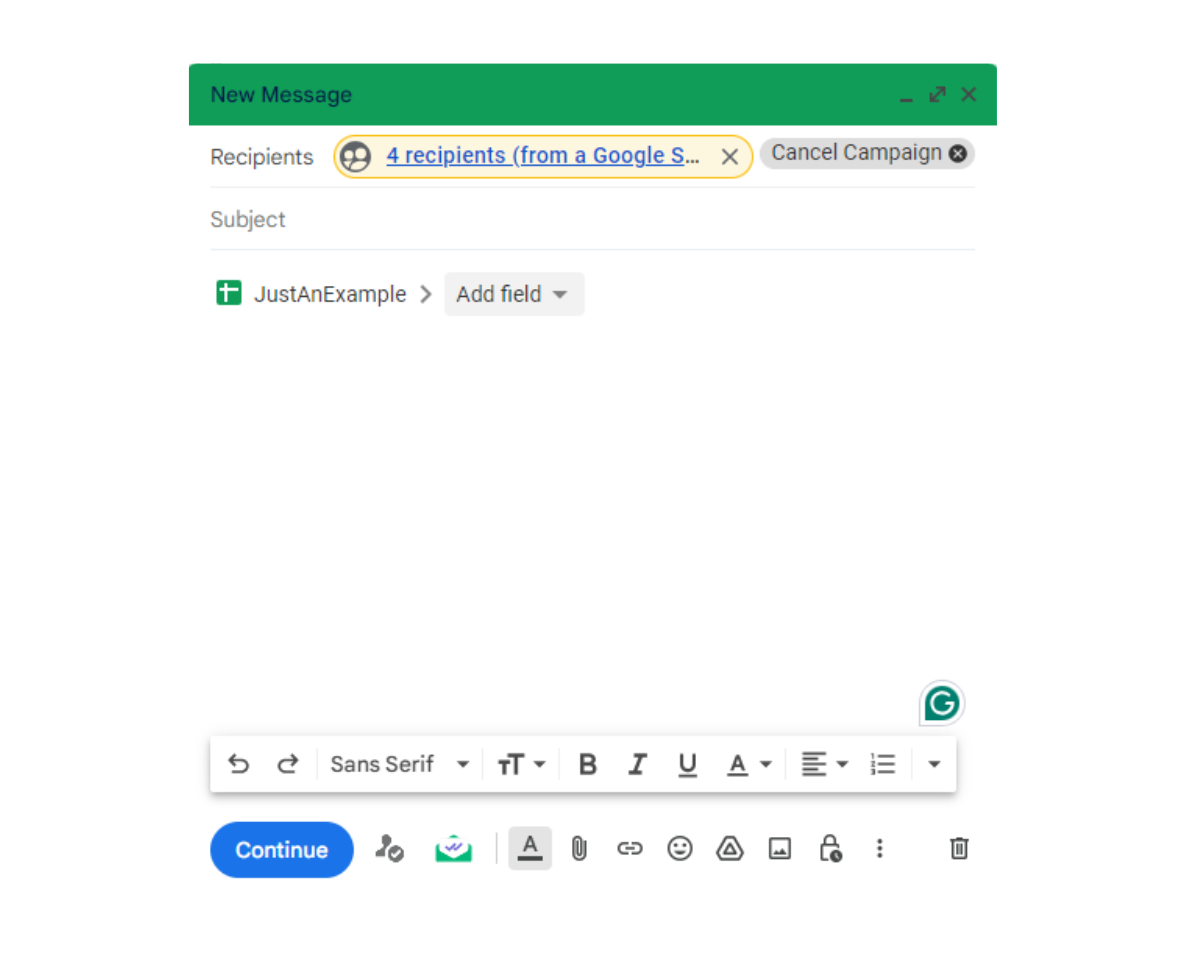
When you click Import data, Gmail will automatically populate the To field of your compose window with your recipients’ email addresses (pulled from the data source). However, it displays only a summary—X recipients (from Google Sheets). Clicking on the summary will take you to the Google Sheet that is being used.
However, if the email column in your data source contains incorrectly formatted email addresses, the data will not be imported. Rather, you’ll get an error message as follows:

Step 6: Create Your Email Template
After successfully importing your data, craft the message you want to send and add merge tags where personalized content will appear.
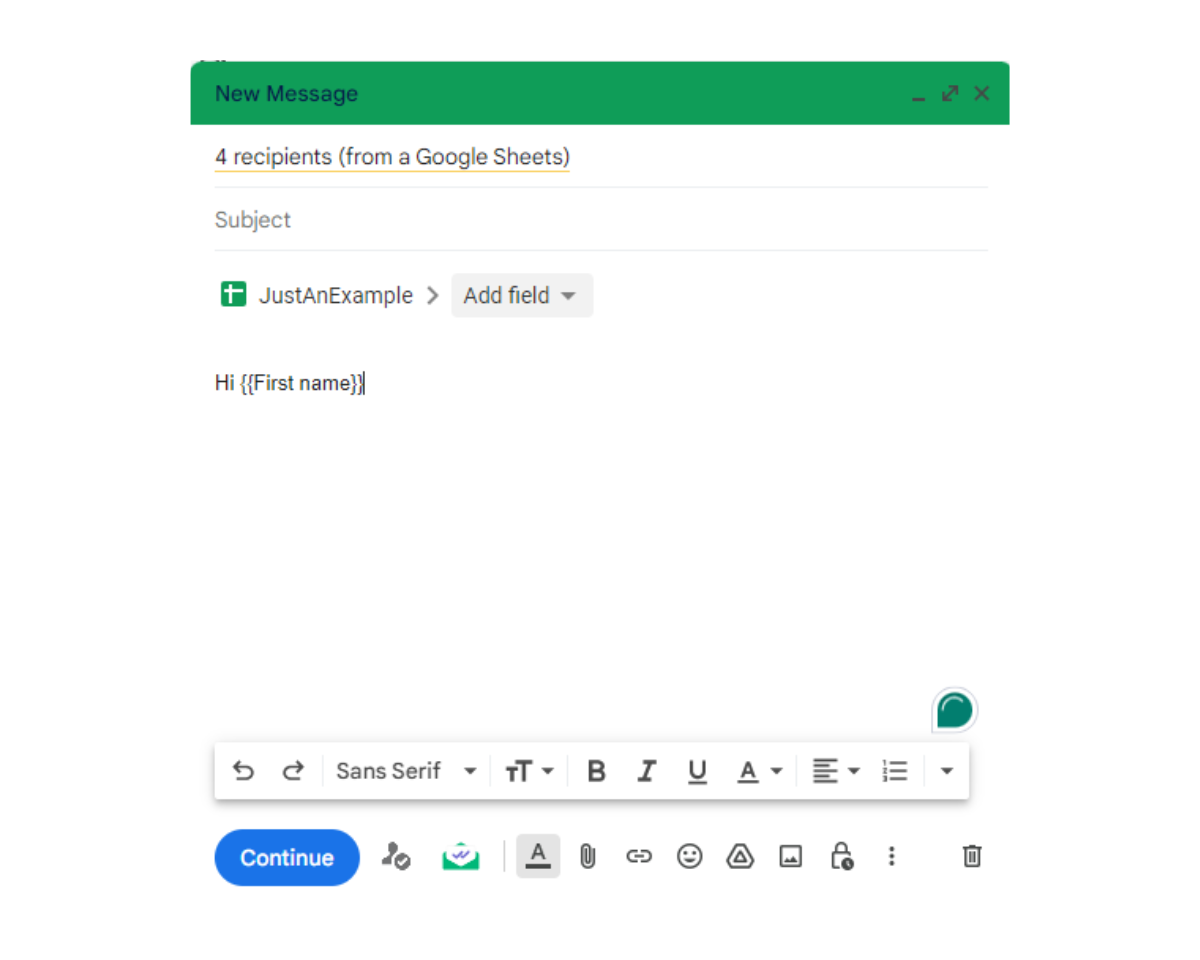
Simply start typing your message. When you reach a place where you want personalized content, leave the pointer at that place, then click the Add Field button at the top of the text field. A drop-down menu will appear with a list of available merge tags. (Note: The listed merge tags will correspond to the column titles in your data source). Select the merge tag you want to use for personalization in that place.
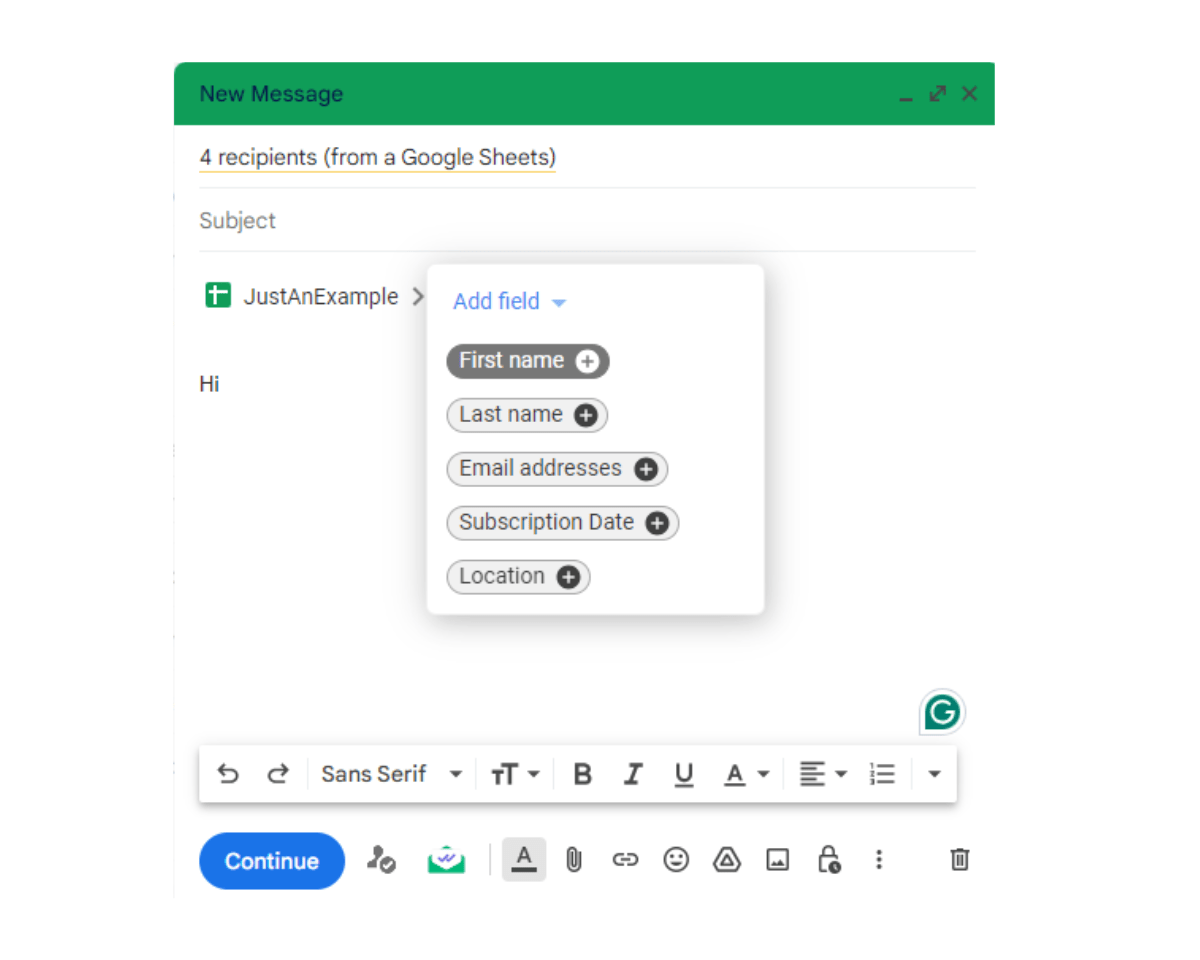
The merge tag will be automatically added to the email. It’s a text representing a specific recipient detail in double brackets. In this example, we selected the First name merge tag, and {{First name}} is added to our email.
Then, continue typing your message. If you reach another place you want to personalize, click the Add Field button again and select the appropriate merge tag.
Note: when automatically adding merge tags using the Add Field button, the tag is added wherever your mouse pointer is located within the email. So, ensure the pointer is at the specific place you want to personalize before clicking the Add Field button.
However, you can also manually add merge tags anywhere in your email. To do this, simply enter text corresponding to a column title in your data source and enclose it in double brackets. When manually adding merge tags:
- Ensure that any merge tag you add corresponds to a column title in your data source. For example, you cannot add a merge tag for recipients’ job titles when you do not have that information in your data source.
- Ensure you enter the column title exactly as it is in your data source. For example, if the data source has the field as FirstName, don’t enter First Name or First name.
If you make any mistakes, the mail merge tool will be unable to fetch data from your data source for the merge tags. To avoid mistakes, it is recommended to automatically insert merge fields using the Add Field button.
Step 7: Complete Email Setup
After creating your message (with merge fields in places where you want personalized information), add a subject line.
Step 8: Review and Send
Lastly, review the email for any errors. If you’re satisfied with it, click the Continue button at the bottom left corner of the Compose window.
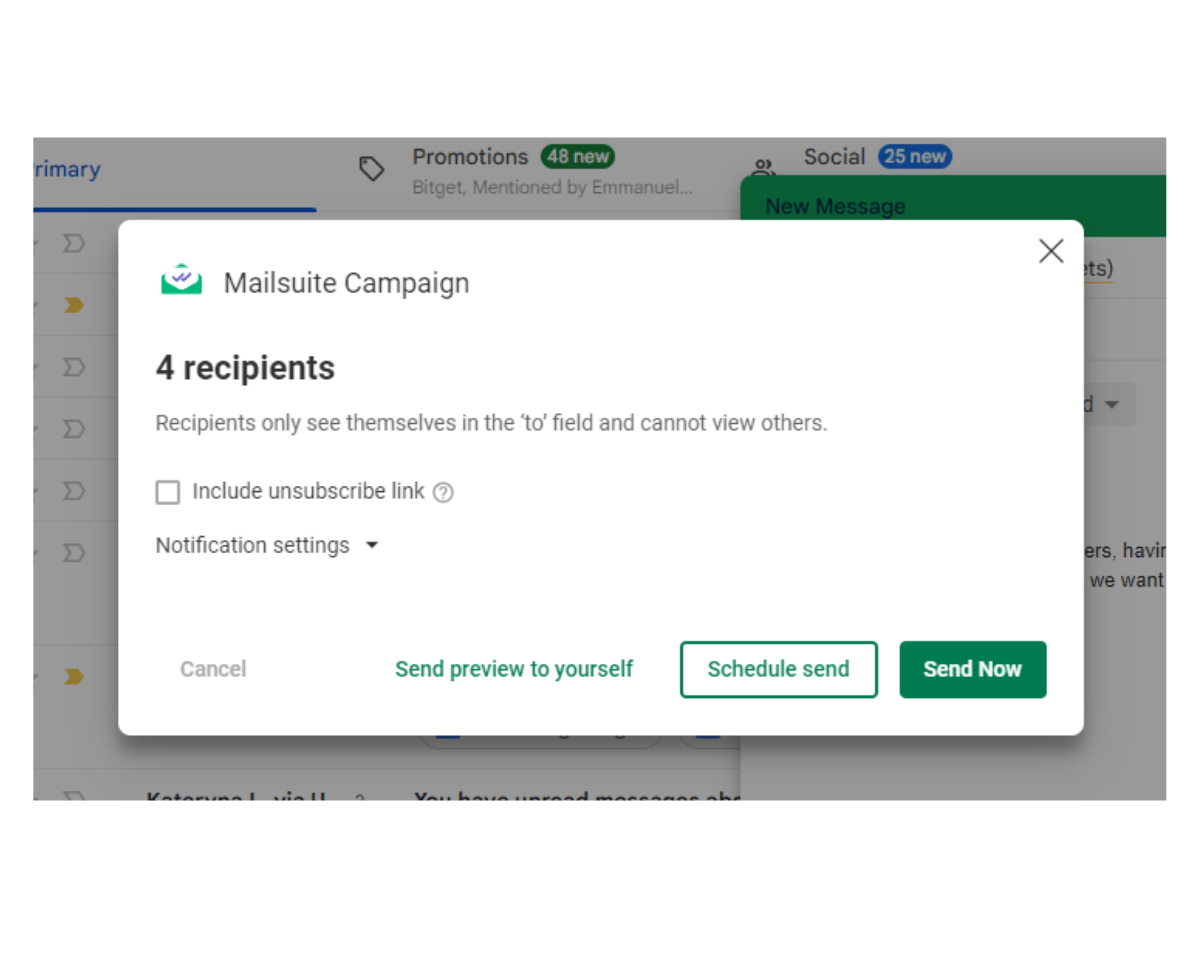
This opens up the sending options window. Here, you can choose:
- Send preview to yourself: This sends a preview to your inbox. It’s useful for checking if your merge tags work as expected.
- Schedule send: This lets you schedule the email to be automatically sent at a later time.
- Send Now: This sends out the email to recipients immediately.
Before choosing a desired sending option, you can click a box to include an unsubscribe link in your email. This helps you comply with relevant laws, like the CAN-SPAM Act and can boost your deliverability rate. Mailsuite allows you to effectively and easily send bulk campaign messages and comply with best business practices, all from your Gmail.
Best Practices for Using Merge Tags
Here are some of the best practices for using merge tags to optimize outcomes for your email marketing efforts:
- Ensure data accuracy: Before you start a mail merge campaign, clean up your data in your data source. For example, ensure that all rows and columns for recipient data have values. Also, ensure there are no duplicates and errors (such as misspellings).
- Avoid mismatched field names: Your placeholder value (merge tag text) must be exactly the same as a column header in your data source. If not, the mail tags will not work.
- Keep it simple: While personalizing with merge tags is advantageous, overdoing it can make recipients uncomfortable. So, keep things simple with a few well-placed tags instead of loading your email with merge tags.
- Segment your audience: Use merge tags in conjunction with segmentation. Break your contact list into smaller groups based on demographics, location, purchase history, and more. Then, tailor your message to each group. This helps you create more relevant messages.
- Test before sending: Before sending out your merged emails, ensure the tags work as expected. The best way to test your merge tags is to send yourself a preview. Mailsuite lets you send yourself a test copy of the mail merge email with just one click.
- Track email performance: Use appropriate tools to track email performance metrics (like open and click-through rates). This helps you gauge the effectiveness of your emails and understand what works and what doesn’t.
Takeaway: Personalize Mass Emails With Mailsuite-Powered Merge Tags
If you’re conducting cold email outreach or following up on close connections, personalizing your emails with merge tags can enhance your success.
This guide has outlined the common merge tags and several ways to use them in email communication.
Mailsuite is a Chrome extension that turns Gmail into a powerful email marketing platform, making it an essential tool for email campaigns. It lets you quickly add merge tags to your email, streamlining mail merge campaigns. It also offers email tracking features, allowing you to track the performance of your campaigns and adjust strategies when necessary to optimize outcomes.
Ready to improve the effectiveness of your campaigns with personalized mass emails? Install Mailsuite and start using merge tags today!