Does your business need to send emails to a specific group of people on a regular basis? You’ll need group mailing for newsletters, announcements, and even professional sales emails.
With group emails, you save yourself the stress and hassle of manually entering the email addresses of all your recipients every time you need to communicate with them via email.
There are two ways to create a group email in Gmail to send messages to multiple contacts at once:
- Use the standard functionality in Gmail itself. It’s completely free, but you also don’t have much control over the situation.
- The second way is to use a free and secure Chrome extension like Mailsuite to create a group email – it’s faster, and you can monitor responses, allowing you to craft more effective follow-ups.
This article will explain these two steps in detail.
Let’s start the discussion by describing what Gmail groups even are in the first place.
Gmail-Integrated CRM
Manage contacts right from Gmail
Overview of Gmail Groups
A Gmail group is a contact list that lets you send an email to multiple contacts at once without having to enter their email addresses. Gmail groups let you create and manage groups of contacts. They streamline group mailing, making the process faster and more efficient.
When you use Gmail groups, you can send emails to groups of people without having to manually enter the email address of each recipient.
Gmail groups or email groups are not to be confused with Google Groups. The latter (a Google Group) is a group email account with a shared inbox.
If you run a small business and want to grow, you will need to send email messages to groups of people from time to time.
- Is your newsletter out? You need to email your general subscribers to tell them about it and encourage them to read it.
- Do you have an event coming up? You need to email your subscribers to build anticipation for the event and encourage them to attend.
- Are you launching a special promotion to boost sales? You need to email your subscribers to inform them of the exclusive offer and the incredible savings it’ll give them.
That said, manually entering the email addresses of every one of your recipients every time you need to email them increases your workload unnecessarily.
Not only does this make group mailing tedious, but it also robs you of time you can use to create more value for your customers.
This is where Gmail groups come in!
How does a Gmail group do the magic?
You create a contact group and name it. Then, you add that contact to the appropriate group. Anytime you need to email everyone in the group, simply enter the group’s name in the “To” field. Gmail will automatically include the group members’ email addresses in the recipients’ field for your email.
Thus, you are able to send emails to multiple people without the tedious task of manually entering the email addresses of every one of the group members.
How to Create a Group in Gmail
The first step of group mailing in Gmail is to create a list or group of contacts that you want to email.
You can do this by following the steps below:
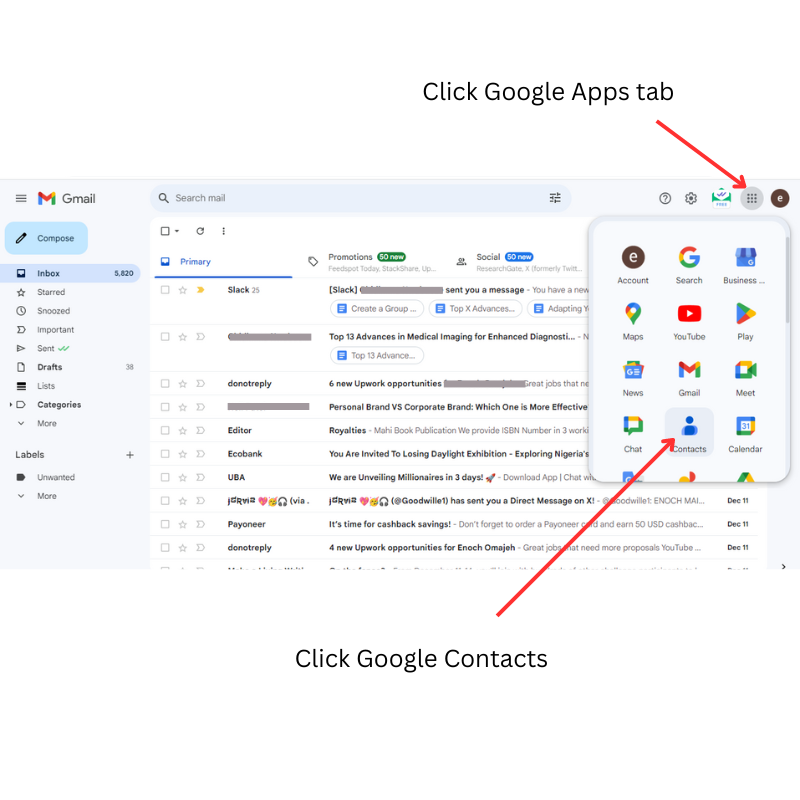
Step 1: Open Google Contacts
You can create a Gmail group from your Google Contacts page. After opening your Gmail box, click on the Google Apps tab on the top right corner of the page. Then, search for and click the Google Contacts app.
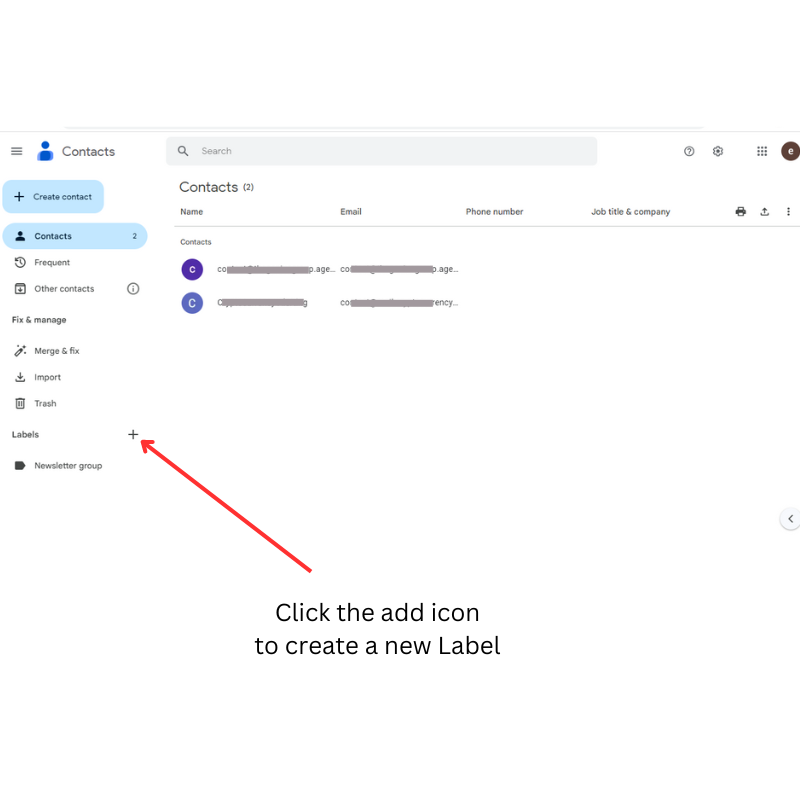
Step 2: Create a New Label
Once your Google Contacts page opens, go to “Labels” on the left-hand side pane. Click the add icon (the plus sign) in front of “Labels” to create a new label.
Step 3: Name Your New Label
Enter a name for your label in the field provided. Then click the “save” button.
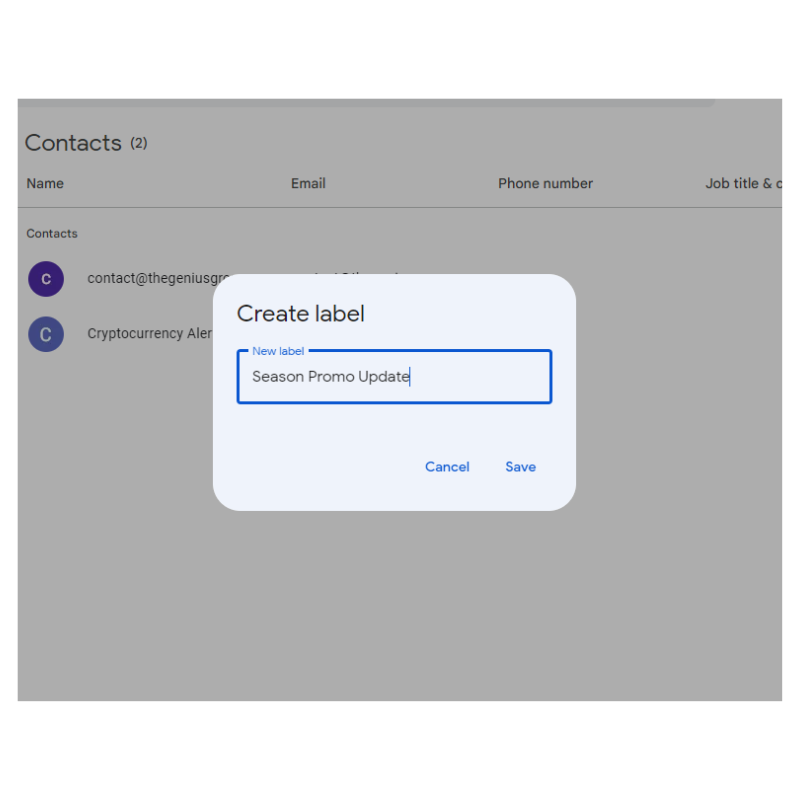
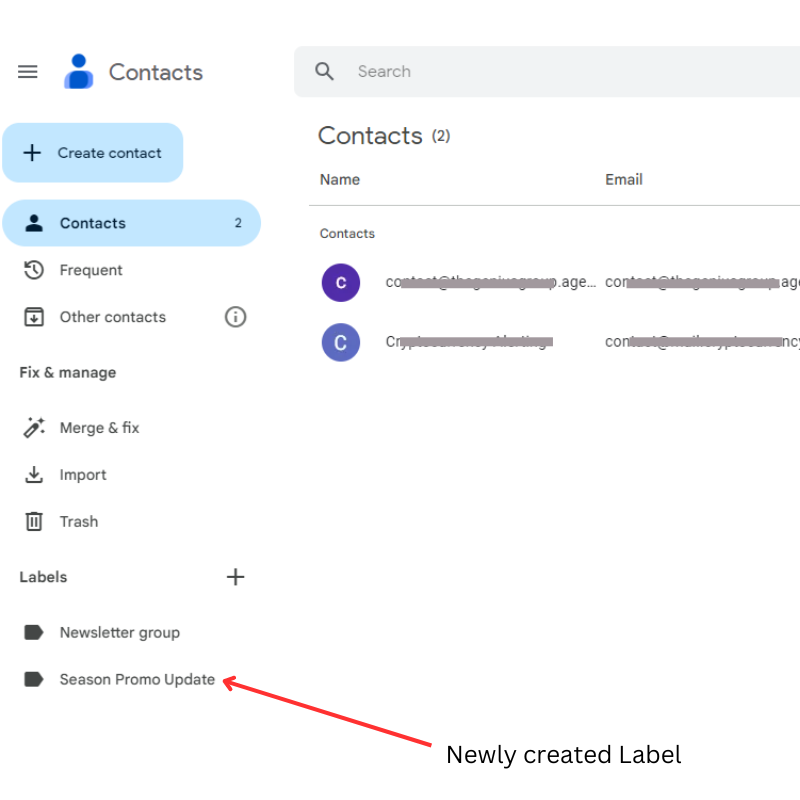
Your new group (label) is automatically created and will appear in the “Label” section on the left-hand side pane.
Step 4: Add Contacts to the New Label/ Group
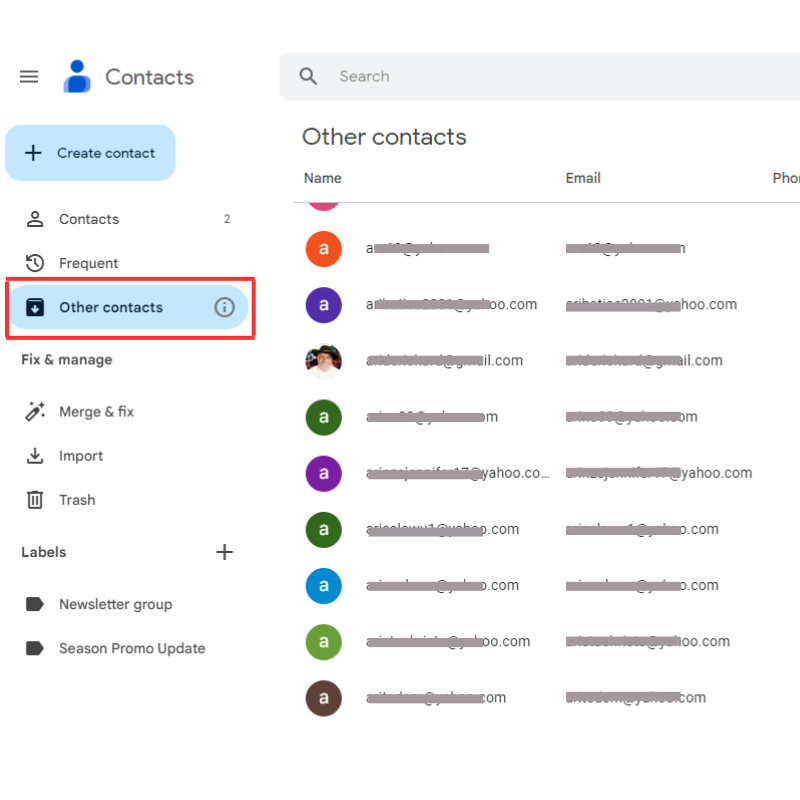
First, click the “Contact” tab on the left-hand pane. Don’t worry if you can’t find everyone you want to include in the newly created group in your Contacts list.
Click “Frequent” to see a list of people you mail frequently or “Other Contact” to see the list of people you’ve ever communicated with via your Gmail account.
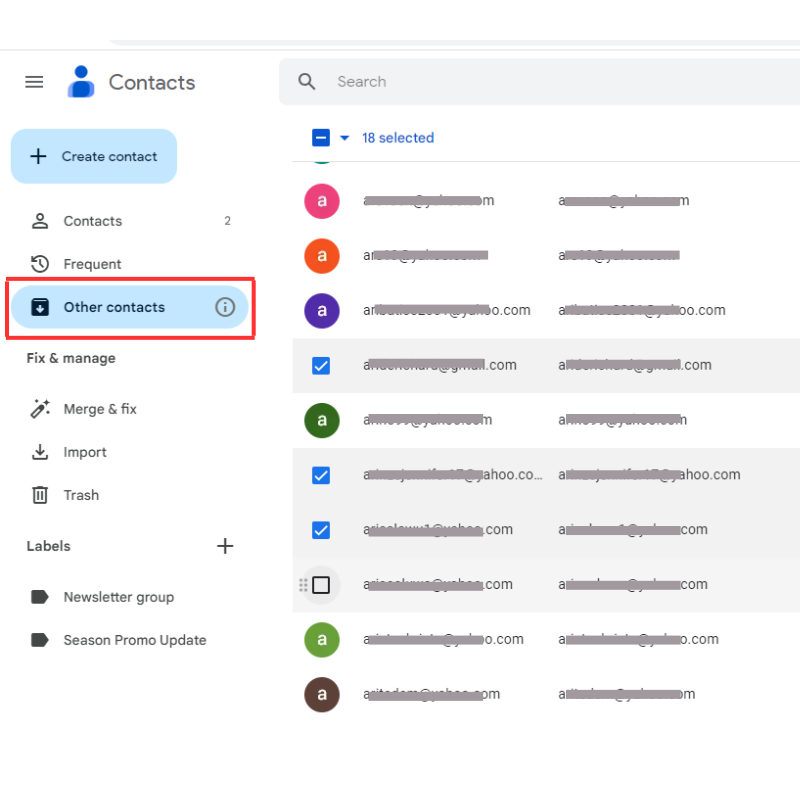
Next, hover over the profile icon of each contact you want to add to the group to reveal a checkbox. Then, click the checkbox to select the contact.
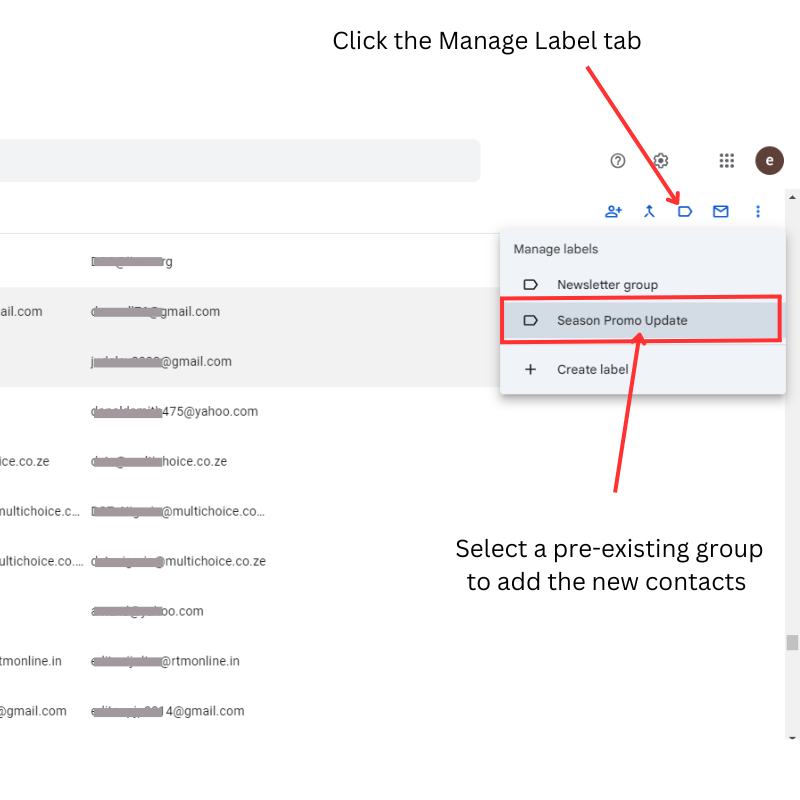
When you are happy with your selection, click the “Manage label” icon at the top right side of the page.
This reveals the groups you have created. Choose the group you want to add the selected contacts to. Then, click “Apply.” Gmail will automatically add the selected contacts to the group.
You can go through the process over and over again to create multiple groups. This is necessary if you segment your subscribers to connect with them better through targeted messaging.
How to Send Group Emails Using Only Gmail
After creating Gmail groups and adding contacts to them, sending group emails in Gmail is easy peasy.
You can send group emails using only Gmail by following these steps:
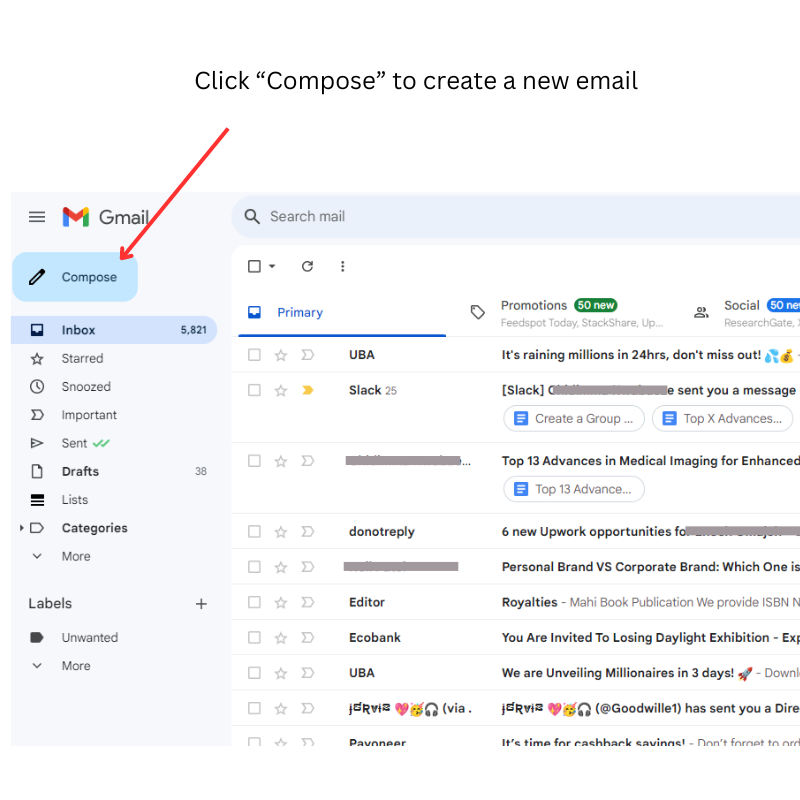
Step 1: Start a New Message
Open Gmail. Then, click “Compose” at the top left side of the Gmail window to create a new email.
Step 2: Enter Your Group’s Name in the Recipient’s Field
Click the “To” field in the “New Message” window. Then, start typing the name of the saved email group you want to send the message. As you type, matching names of contacts and saved groups will pop up. Select the group you want to message from the list.
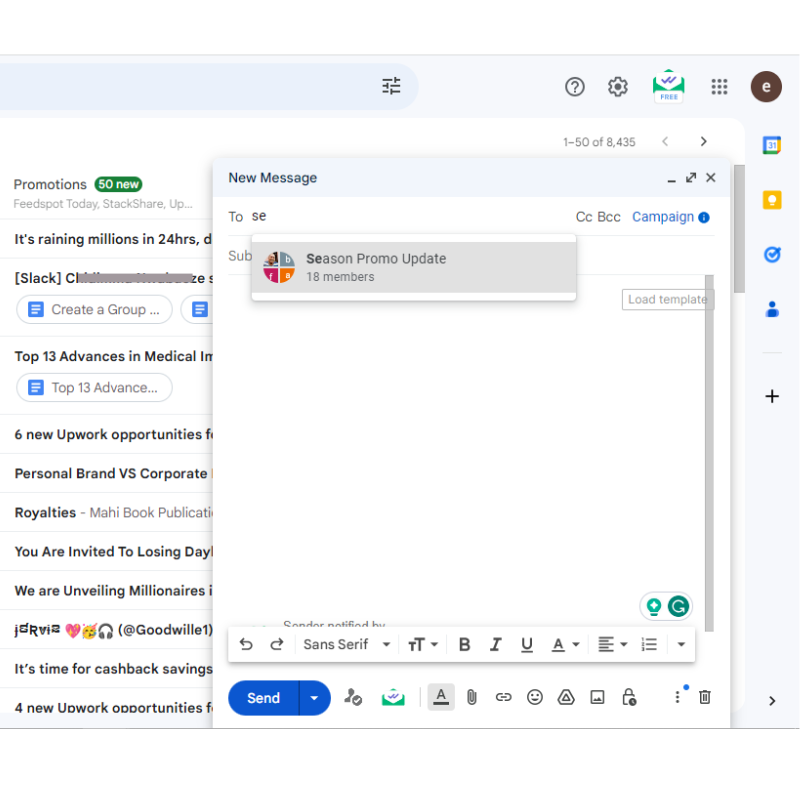
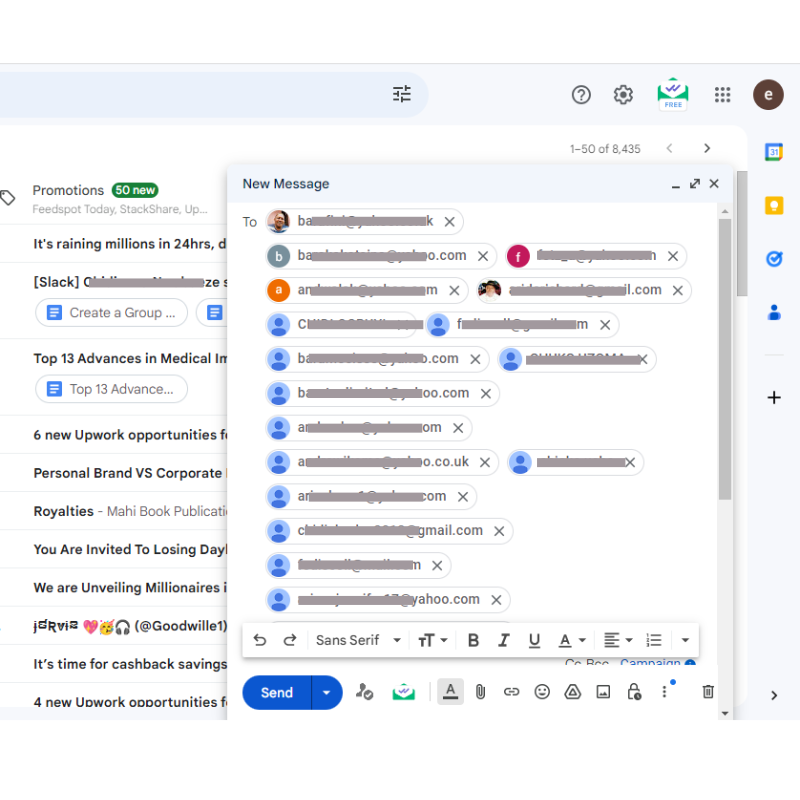
Once you select your email group, Gmail will instantly add the email addresses of everyone in the group in the “To” field. Thus, you’re saved from the stress of entering each email address.
Step 3: Type Your Message and Send
Then, proceed as you normally would. Write a subject for your message to the group. Type the body of your message. Then, hit the “send” button at the bottom of the Compose window.
Gmail will send the message to all the contacts in the group.
How to Add Contacts to an Already Existing Gmail Group
As your business evolves and you grow your network, you will acquire new contacts you would want to reach with the same message you send specific groups.
For example, you have a group of existing customers that you target with “repurchase” emails. Now, you’ve acquired more customers and want them to also receive the reactivation message.
Thankfully, you do not have to thrash your existing Gmail groups and create a new group from scratch to accommodate the new contacts. If you acquire new contacts, you can simply add them to your existing Gmail group.
Follow these steps to add new contacts to existing groups in Gmail:
Step 1: Go to Google Contacts
As we initially discussed, click the Google Apps tab on the top right of a Google browser, then select “Contacts.”
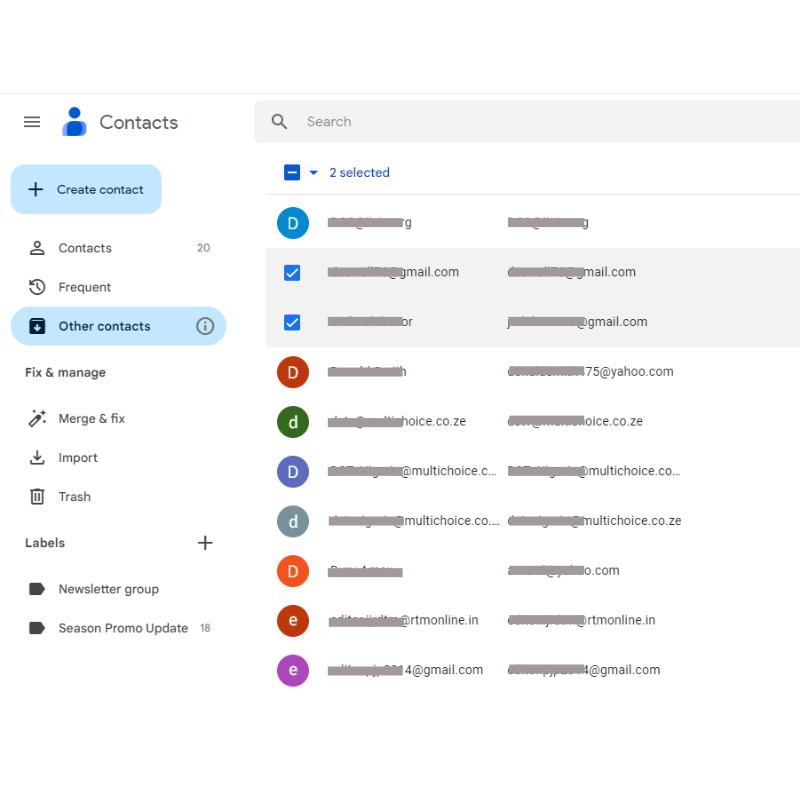
Step 2: Select Contacts to Add to Your Group
Find the contacts you want to add. For this, go to the left-hand pane of the Google Contact page and click on “Contacts.” You may also use your frequently contacted list (Frequent) or “Other Contacts.”
After finding a contact to add, hover over the profile icon to reveal the checkbox. Then, check the box to select the contact.
Step 3: Select a Group to Add the New Contacts
After selecting the contacts, click the “Manage Label” icon in the top right of the Google Contacts page. This pops up your existing Gmail groups and an option to create a new group. Select the group to which you want the selected contacts to be added.
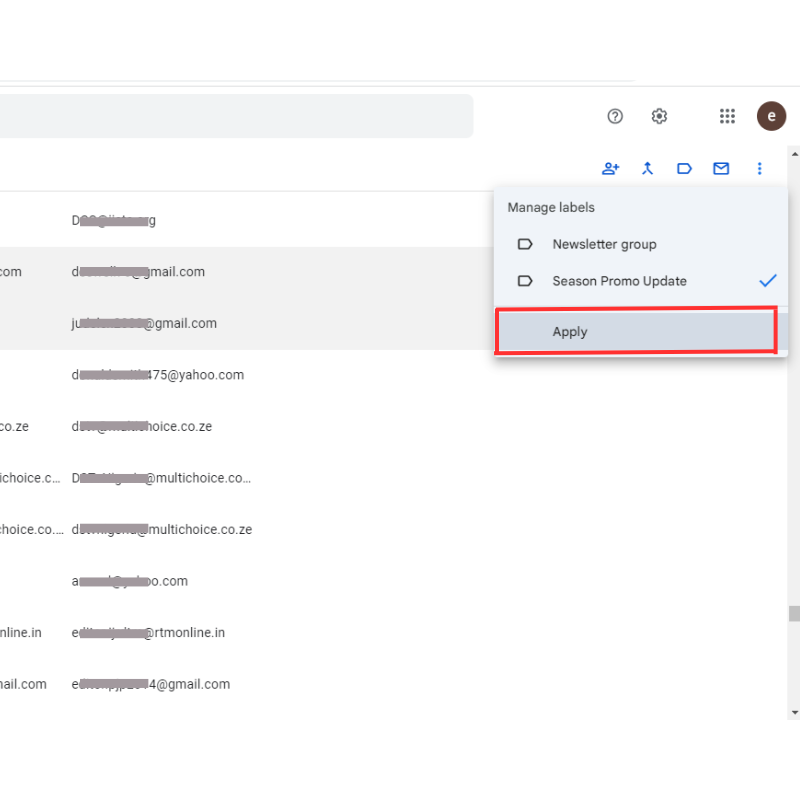
Step 4: Click Apply
After selecting a group, an “Apply” button appears. Click the button to implement the changes. Gmail automatically adds the new contacts to the selected email group.
How to Remove Contacts from a Gmail Group
If you want to remove some contacts from your Gmail group so they no longer receive your group messages, you can achieve this in 5 simple steps as follows:
Step 1: Go to Google Contacts
As mentioned earlier, this involves clicking the Google Apps tab (at the top right of a Google page) and selecting “Contacts” from the apps’ list.
Step 2: Select the Group You Want to Modify
Go to the Labels section in the left pane of the Google Contacts window. Find the group from which you want to remove contacts, and click it.
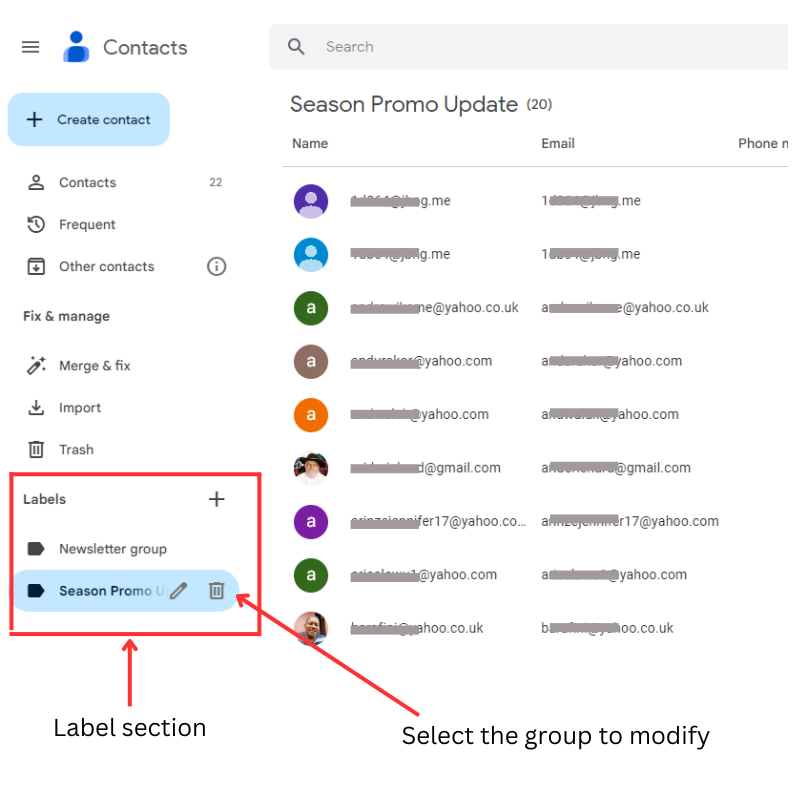
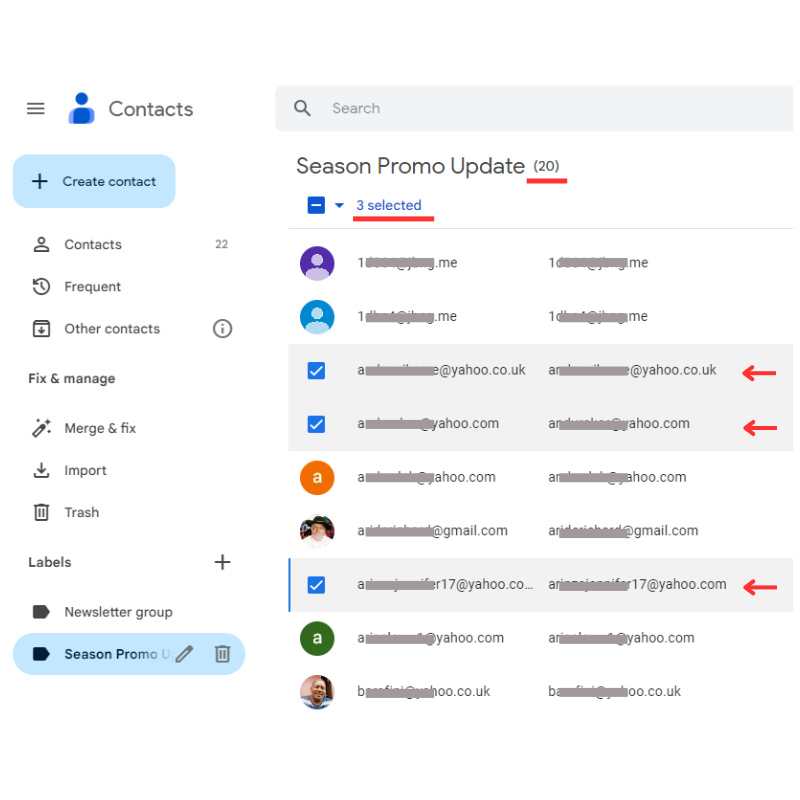
Step 3: Select the Contacts You Want to Remove from the Group
When you select the group you want to modify, you’ll see all the contacts in the group.
Find the contacts you want to remove. When you find the contact, hover over its profile picture to reveal the checkbox, then check the box to select the contact.
In the illustrative image below, we’re removing contacts from the “Season Promo Update” group. Note that it contains 20 contacts, and three have been selected to be removed.
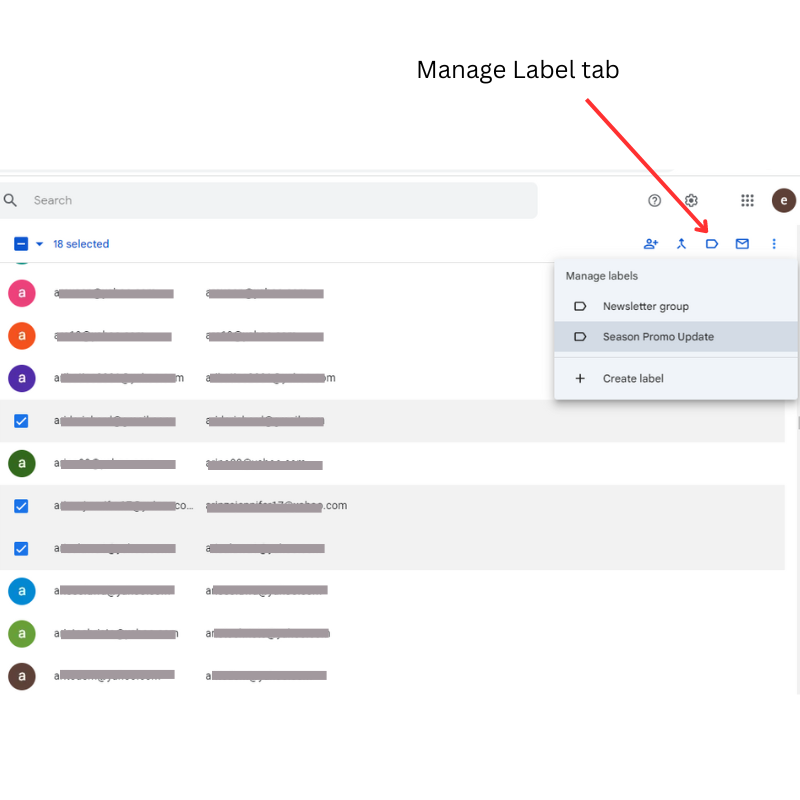
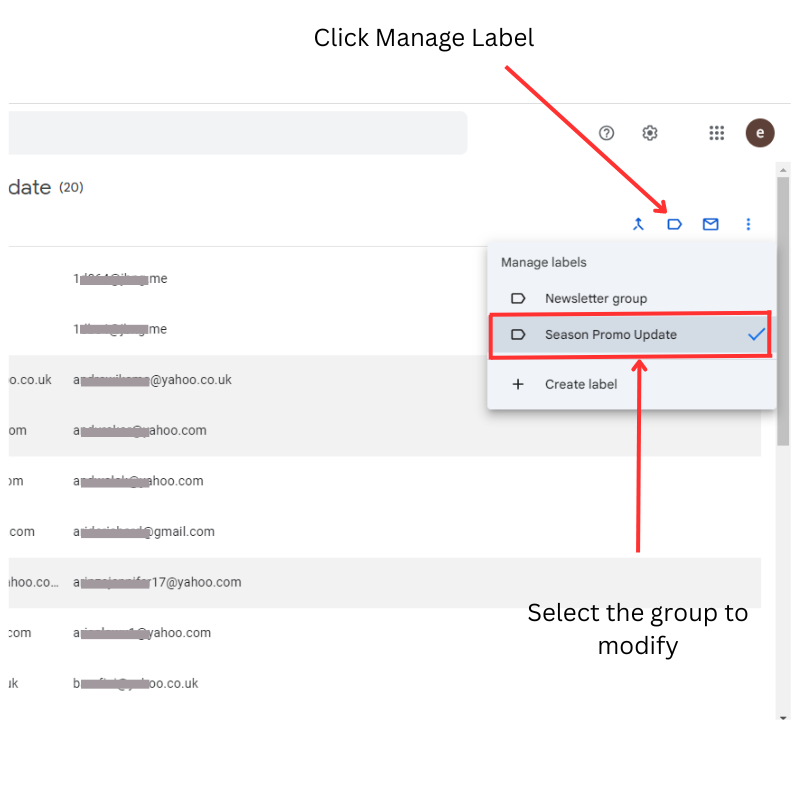
Step 4: Remove Selected Contacts from the Group
To do this, click the “Manage Label” tab, then reconfirm the group you want to remove contacts from.
Step 5: Apply Changes
When you select the group you want to modify from the Manage Label drop-down menu, an “Apply” button appears. Click the button to save your changes.
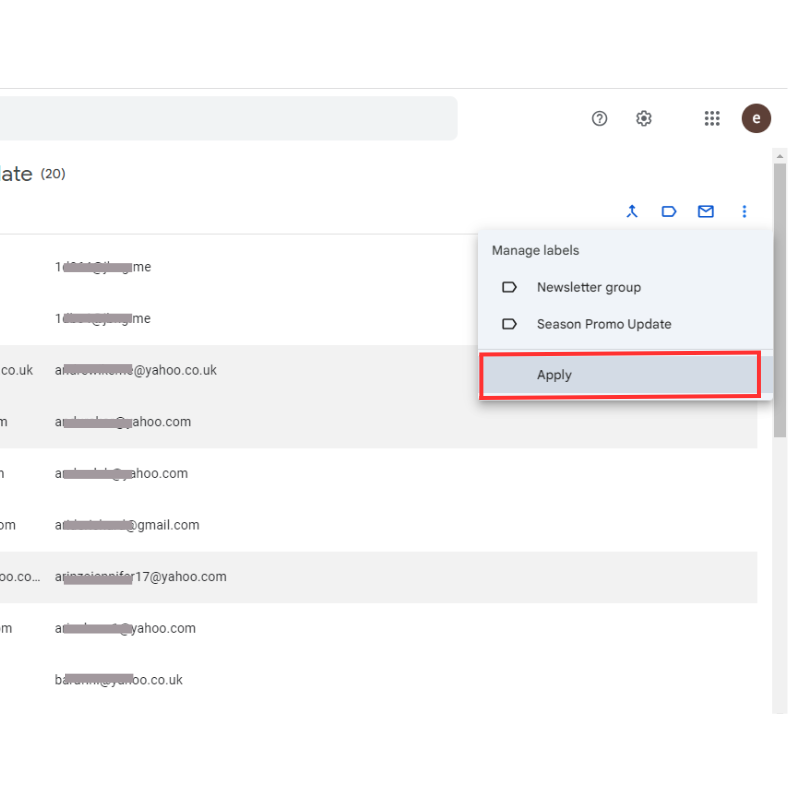
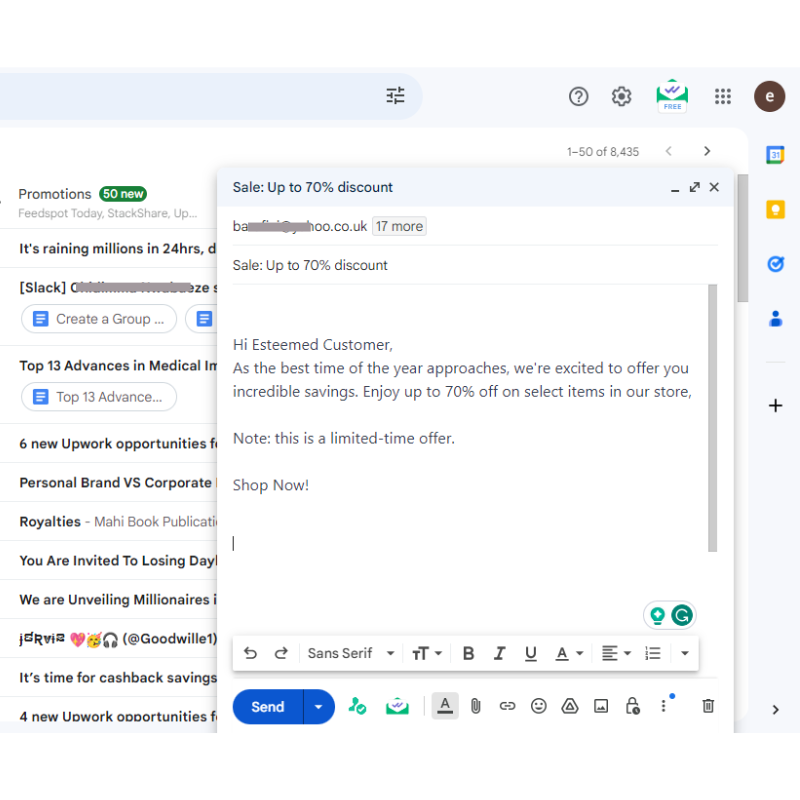
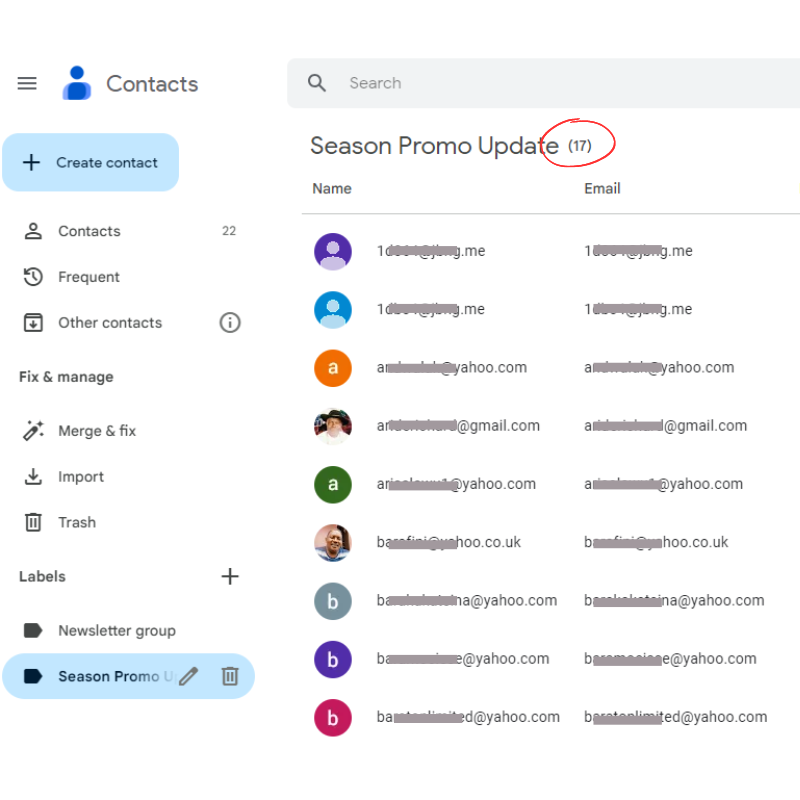
Once you click the apply button, Gmail will instantly complete your changes, removing the contacts you selected from the group. In the screenshot below, note how the “Season Promo Update” group now has 17 contacts.
What Are the Limitations of Using Gmail Email Groups?
True, it’s fairly easy to create a group of contacts in Gmail and send an email to all of them. However, when sending group messages using Gmail groups, there are a few things you should know:
Gmail Limits
Gmail does not want people to abuse group mailing. So, they have set up sending limits. Gmail limits the sending of emails to 500 per 24 hours for free accounts (and 2,000 for Google Workspace accounts – formerly G Suite).
If you hit your limit at any time, you’ll be suspended from sending any emails for the rest of the 24-hour day.
Know that if you hit the limit, Google won’t just take away your group email privileges. You wouldn’t be able to send any type of email at all for a short time.
That can wreak havoc on your workflow when you’re in the middle of speaking with potential customers. For this reason, it’s best to stay well below the Gmail email limit.
Also, the sending limit counts for every 24-hour period, not days of the week. So, if you sent 400 emails on Wednesday evening, you won’t be able to send another 200 on Thursday morning. You have to wait 24 hours from the Wednesday evening group mailing to send the other 200.
Difficult to Manage Groups
Gmail is weak when it comes to group management. So, as the number of your groups increases, organizing and managing them becomes difficult.
For example, it does not allow you to create subgroups to help you organize your groups properly.
It also does not have advanced features for filtering or sorting groups. Thus, you’ll have to scroll down a long list of groups to search for the specific one you want to message.
Does Not Support Email Tracking
Being aware of when your recipient opens your email or clicks on in-email links is important, as it helps you know how best to follow up. For example, you’ll know what to send a recipient who read the email versus those who didn’t open it.
Unfortunately, Gmail does not feature email tracking. So, when you send group messages, you’ll be in the dark about whether the recipients actually opened your messages or followed through on your CTAs.

CRM for Gmail
Create contact lists and send tracked emails—all without leaving your inbox
How to Send a Group Email in Gmail with a Better Alternative
We’ve seen how you can send group emails with only Gmail. You’ll need to leave your Gmail app and go through Google Contacts, and the integration between both apps is limited.
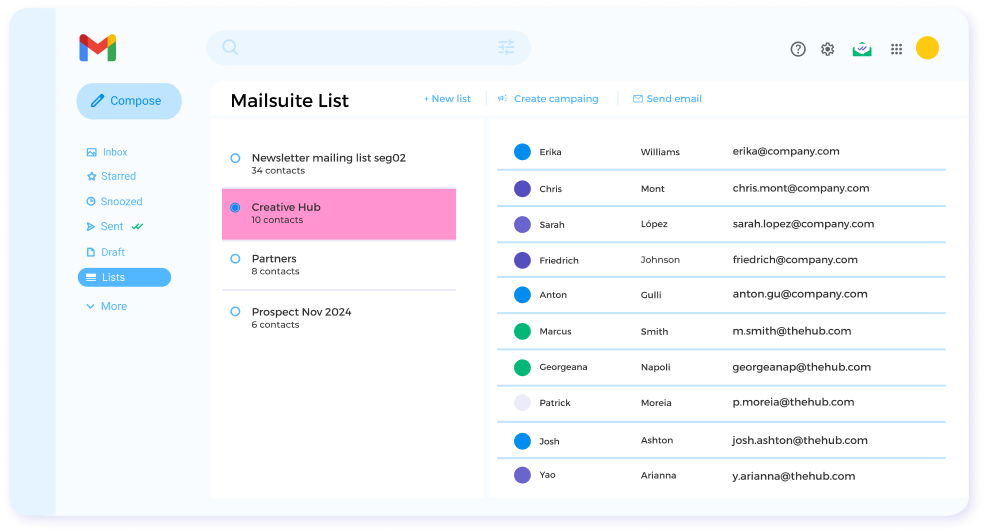
Thus, a solution that lets you manage mailing lists within Gmail itself will be faster and more efficient for sending group emails. This is where Mailsuite comes in!
Mailsuite lets you create and manage mailing lists within Gmail itself, allowing for faster and more efficient group mailing. That and its email tracking capabilities make it a better alternative for sending group emails like a pro.
Follow these steps to use Mailsuite to create groups and send group emails within Gmail:
Step 1: Install Mailsuite
Before anything else, you need to get the Mailsuite Chrome extension. Go to the Chrome web store and click “Add to Chrome.” Then, do as prompted – permit Mailsuite to connect with Gmail, choose the Gmail account Mailsuite will connect to, and then grant the necessary permissions.
Step 2: Create a New List
Armed with Mailsuite, the next step to sending group emails is to create a list (or group) of contacts that you want to email.
Open your Gmail account and navigate to “List” on the left-hand pane.

In the “List” window, click the “New List” button to start creating a group.

Step 3: Add Contacts to the List
Clicking the “New List” button opens a window that lets you add contacts to your list.
In the “List Name” field, enter a name for your group. In the “Add Contacts” field, enter the email addresses of your contacts.
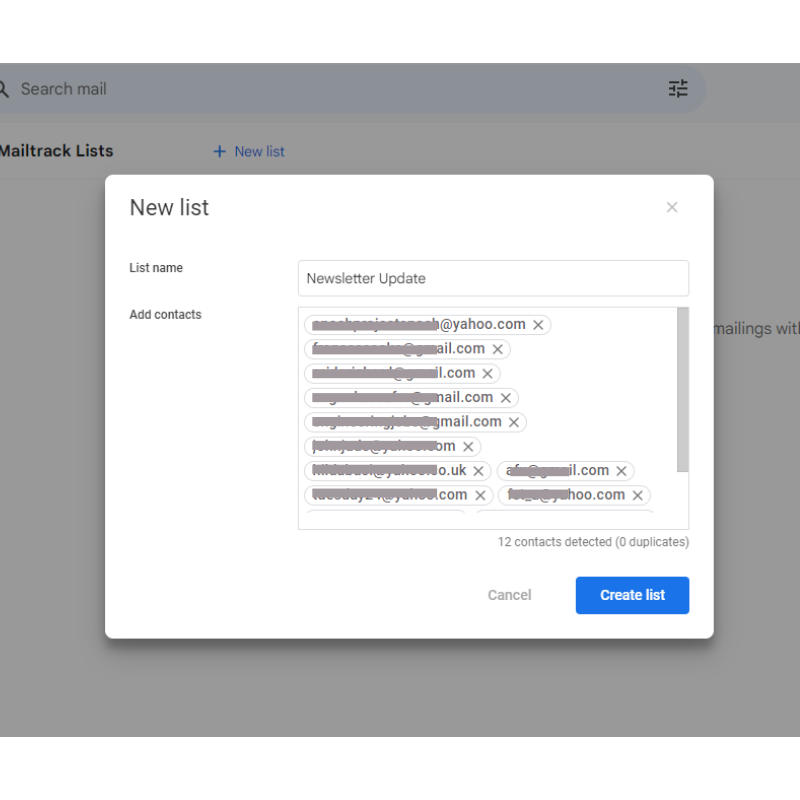
When you’ve added all the contacts, hit the “Create list” button. Your new list will be automatically added to Gmail.
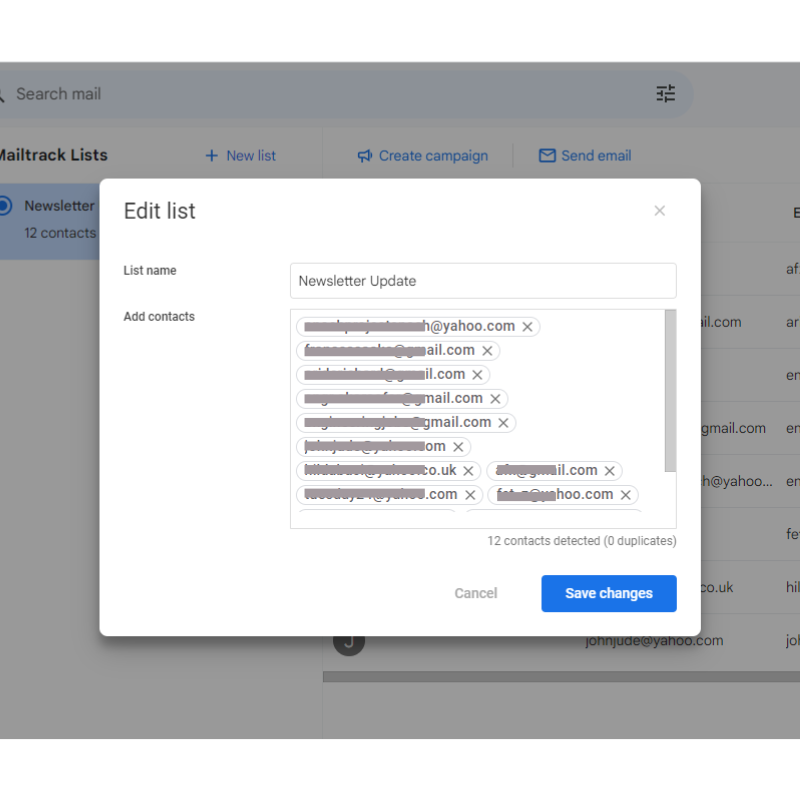
Step 4: Edit Contacts
To edit a contact, click on “List” on the left-hand menu of your Gmail account. Hover over the list you want to modify, and click the edit icon (the pen icon).
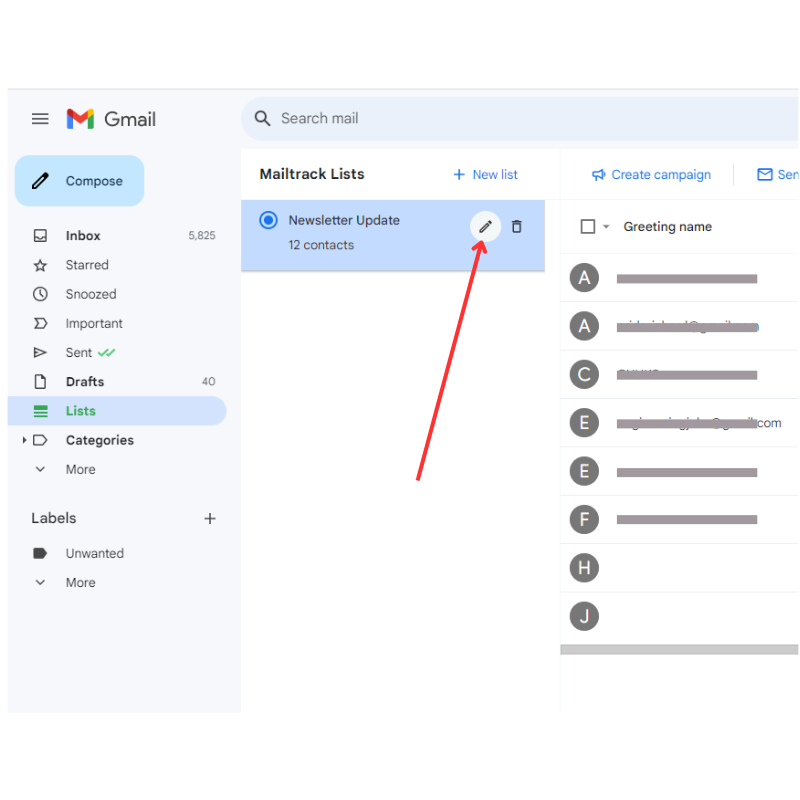
In the Edit List window, you can add new contacts or remove contacts from the list. To add a contact, simply type the email address into the text box. To remove a contact, simply click the “X” next to the email address.
After making changes to a list, click the “Save Changes” button.
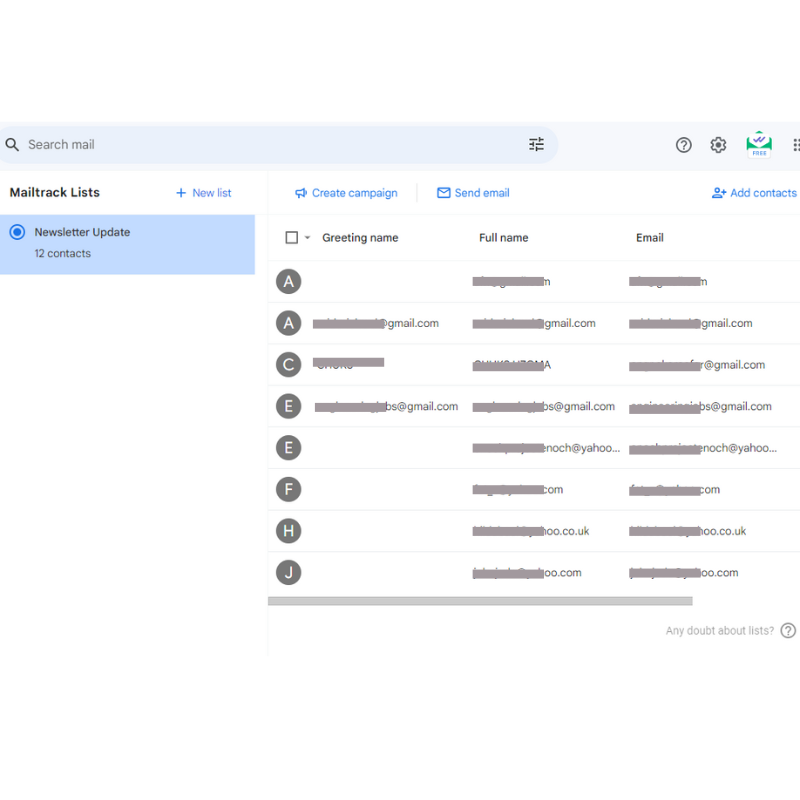
Step 5: Insert Your Contacts
When you need to send an email to the group, open your Gmail and click “List.” Next, select one list from your saved Mailsuite lists. Then, “Send email.”
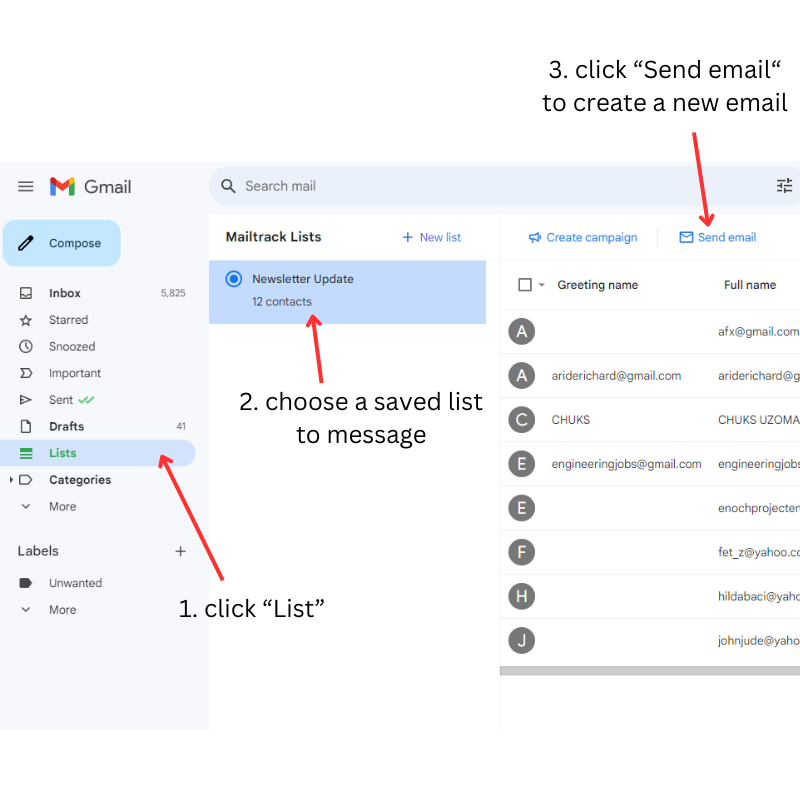
When you click “send email,” Mailsuite opens a “New Message” window and automatically adds the email addresses of every member of the selected group in the “To” field.
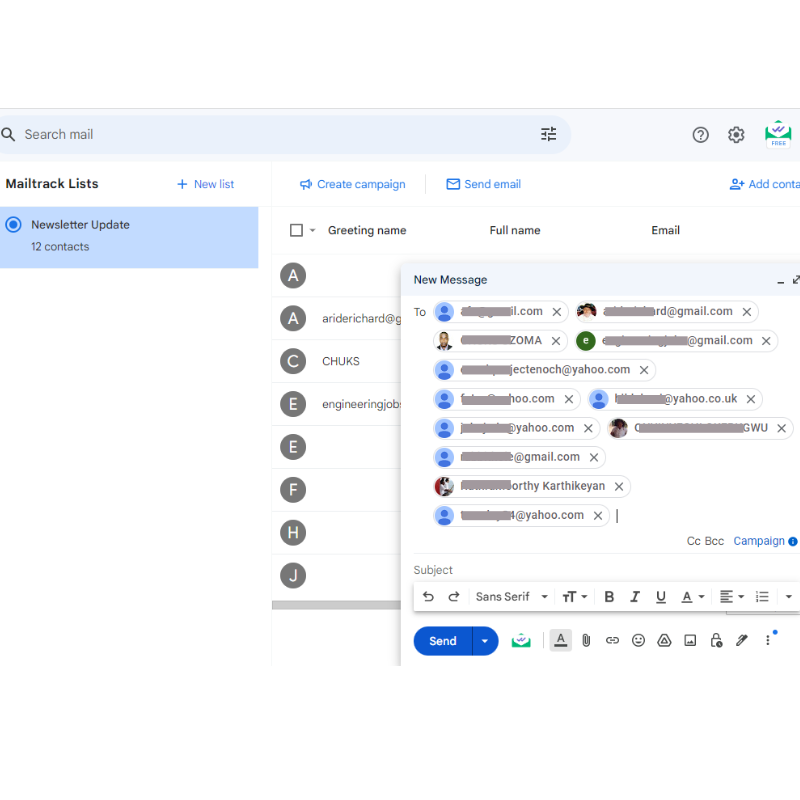
Step 6: Send Your Group Message
After inserting your group’s contacts in a New Message window, add an email subject and compose the body of your email. When you’re done, hit the “Send” button to send your mail to all the contacts.
How to Combine Mailsuite Lists with Campaigns to Send Group Emails Like a Pro
Until now, we’ve covered how to start sending a group email to up to 200 contacts from Mailsuite Lists. Now, there’s an even better way of sending group messages – turning them into a campaign.
The steps for doing this include:
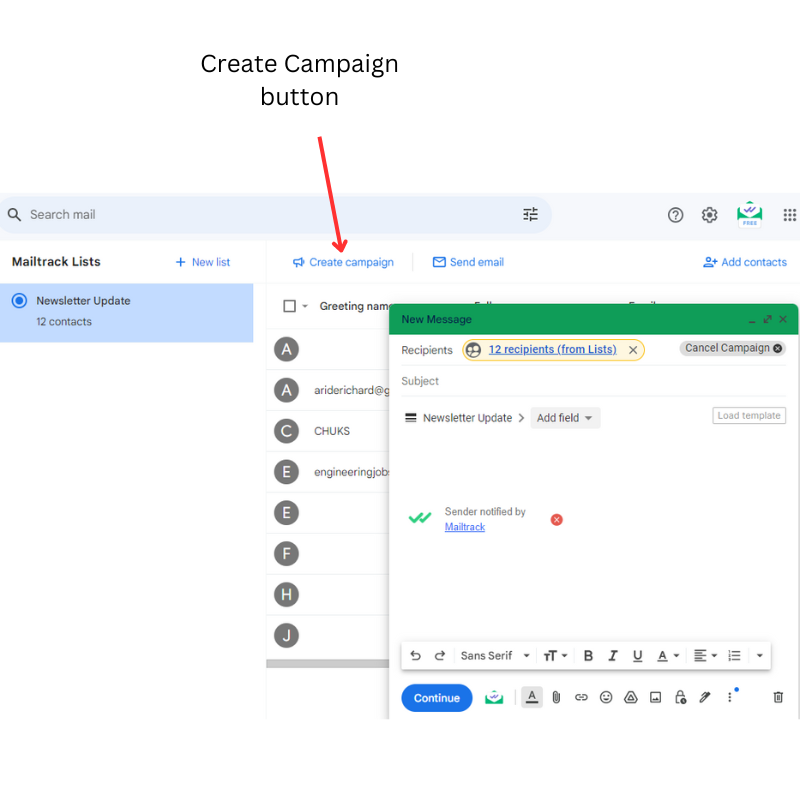
Step 1: Start a Group Campaign
Once you’ve grouped the contacts you want to add, click on “Create Campaign” from inside the Mailsuite List.
The top bar of the compose window will turn green, letting you know you’re inside an email group campaign. Finish off the email with a good subject line and compelling content.
Step 2: Send the Group Email
When your content is ready, simply send your email. You’ll see a popup confirming that you want to send the group email to the number of addresses in your mailing list. You can click “Send Now” to confirm or “Cancel” to go back.
Step 3: Sit Back and Collect the Data
The magic of Mailsuite starts after you click send. With Mailsuite Campaign, each email address in the group gets its own tracked email.
When you click on your outbox, you’ll see individual outgoing messages to everyone who was in the email group. In contrast, Gmail only shows one outgoing email representing the whole group.
Mailsuite’s mail-tracking functionality now applies to each email address in your mailing list. You’ll receive notifications when your contacts open the mail.
Each email in your group will also display one or two green checkmarks in your outbox. The first checkmark turns green to verify tracking is on, and that the email was sent. The second checkmark turns green when the recipient opens the email.
You can scroll through your outbox to view the checkmarks for your email’s performance.
Alternatively, you can go to your Mailsuite dashboard and view a report of all sent and read messages in the group. Mailsuite can monitor link clicks too.
While there may be different ways to create mailing lists in Gmail, they don’t provide equal data after you hit send. Mailsuite can monitor what happens after you send a message to your email list so you know when and how to follow up later.
Effective Tips for Creating a Group Email in Gmail Easily
Here are some final helpful tips to help you successfully perform group mailing in Gmail:
Update Gmail Groups Regularly
As your business grows, you acquire new contacts, while some become outdated. So, you need to keep your groups up-to-date and relevant by regularly adding new contacts and removing outdated ones.
Use Clear Labels to Organize Groups
Remember that Gmail does not have advanced group management features, so you should help yourself by using specific labels.
You should never be unsure about which group of people a label name refers to. This ensures that you always send the right message to the right people.
Always Use a Compelling Subject Line
All the mailing efforts will be wasted if your contacts do not read your emails. The subject line is the first thing they see when your email lands in their inbox. And it’s what they’ll use to decide whether to open the mail or not.
Start off with a compelling subject line that forces them to open and read your email!
Personalize for the Group
Don’t let anyone tell you that personalization is impossible when sending group emails.
Group segmentation will help you in this. Divide your larger group by members’ interests. Then, you can send personalized emails to each subgroup.
Takeaway: Create Gmail Groups and Send Group Emails Easily
Gmail groups help you send emails to a large number of people without the stress of entering their individual email addresses manually, thereby increasing your mailing efficiency.
You can create an email group in Gmail by opening Google Contacts, creating a new label, and adding contacts to the label. However, using Mailsuite is a better way to create email groups as it does this within Gmail itself and has email-tracking functionality.
With Mailsuite, not only do you easily create groups for quick mass mailing, but you can track how your recipients respond to the email.
Knowing whether the recipient has read the message or clicked a link helps you craft effective follow-up messages.
Use Mailsuite to supercharge your mass mailing efforts with Gmail groups. To get more insight into Mailsuite’s potential to boost your business communication, read: Can Mailsuite Improve Your Communication?